- Setting up the environment + Hello World
- Inspecting and tampering HTTP requests and responses
- Inspecting and tampering WebSocket messages
- -> Creating new tabs for processing HTTP requests and responses
- Adding new functionalities to the context menu (accessible by right-clicking)
- Adding new checks to Burp Suite Active and Passive Scanner
- Using the Collaborator in Burp Suite plugins
- BChecks – A quick way to extend Burp Suite Active and Passive Scanner
- … and much more!
Hi there!
Today we will see how to add components to the Burp Suite interface that are useful for conveniently managing different scenarios. In detail, we will focus on how to create new tabs for processing HTTP requests and responses.
But as always, let’s start with a use case and explore some ways it can be handled. We are analyzing a mobile application that adds an encryption layer to the HTTP request and response bodies. The mobile application encrypts the body using AES before sending the request and decrypts the response body in the same way, as it is encrypted by the backend application. I mention mobile applications because this scenario is more common in the mobile world, but over the years, we have also seen web applications behaving in a similar manner, encrypting and decrypting in the browser using JavaScript libraries.
A simple Flask Python application that does this job is the following (encryption/decryption stuff taken obviously from StackOverflow – necessary Python packages: flask and pycryptodome):
import flask
from flask import request
import base64
from Crypto import Random
from Crypto.Cipher import AES

app = flask.Flask(__name__)

# Encryption stuff from:
# https://stackoverflow.com/questions/12524994/encrypt-and-decrypt-using-pycrypto-aes-256

bs = AES.block_size
key = bytes.fromhex("eeb27c55483270a92682dab01b85fdea")
iv = bytes.fromhex("ecbc1312cfdc2a0e1027b1eaf577dce8")

def encrypt(raw):
    raw = _pad(raw)
    cipher = AES.new(key, AES.MODE_CBC, iv)
    return base64.b64encode(cipher.encrypt(raw.encode()))

def decrypt(enc):
    enc = base64.b64decode(enc)
    cipher = AES.new(key, AES.MODE_CBC, iv)
    return _unpad(cipher.decrypt(enc)).decode('utf-8')

def _pad(s):
    return s + (bs - len(s) % bs) * chr(bs - len(s) % bs)

def _unpad(s):
    return s[:-ord(s[len(s)-1:])]


@app.route('/', methods=['POST'])
def handle_request():

    encrypted_body = request.get_data()
    decrypted_body = decrypt(encrypted_body)

    response = "Your request was: \"" + decrypted_body + "\""
    encrypted_response = encrypt(response)

    return encrypted_response


app.run(host="127.0.0.1", port=5000, debug=True)
This simple application takes an input request with a body encrypted using AES/CBC (fixed Key and IV) and encoded in Base64 (since the output of AES/CBC is binary) and returns a similarly encrypted and encoded response that contains part of the input message. So, both request and response are encrypted and not easy to pentest without the help of a Burp Suite extension.
Creating a mini demo mobile application seems excessive, so we will simply forge an example HTTP request directly in the Burp Suite Repeater. We will use CyberChef (a powerful web app for encryption, encoding, compression, data analysis) for the encryption of the body of our forged HTTP request (and for decryption of the related HTTP response). Once we have implemented our plugin, it will handle the encryption and decryption for us.
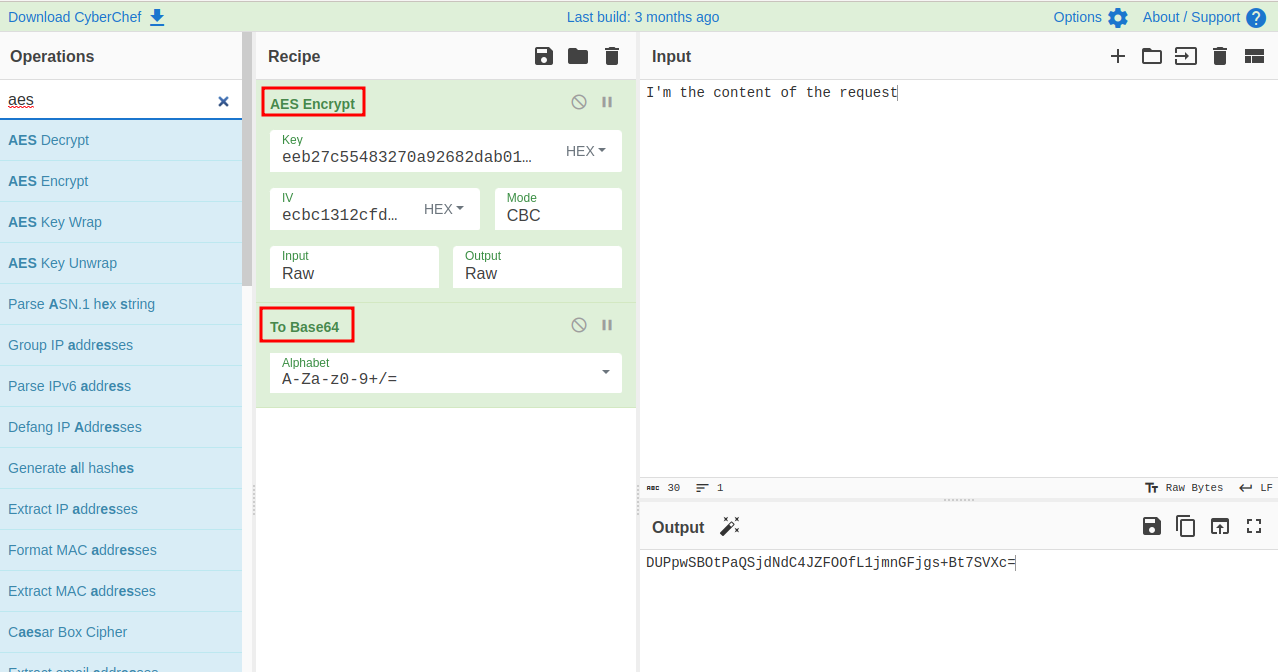
First, let’s encrypt a test sentence, taking fixed key and IV from the backend Python code:
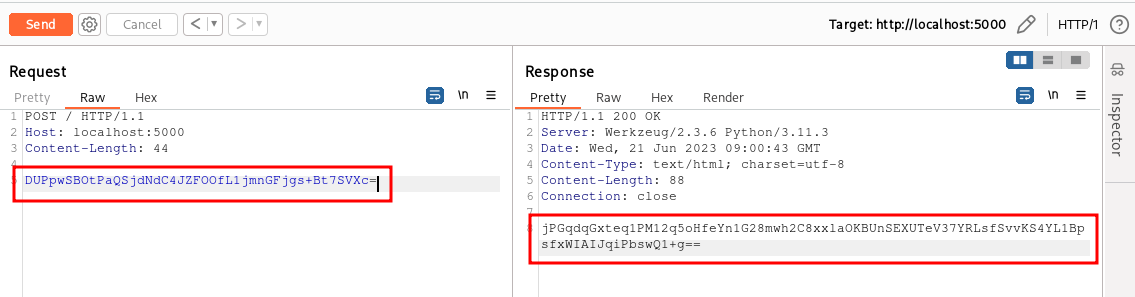
Then we send the encrypted content to the backend server with Burp Suite Repeater tool:
And we decrypt the obtained response again using CyberChef:
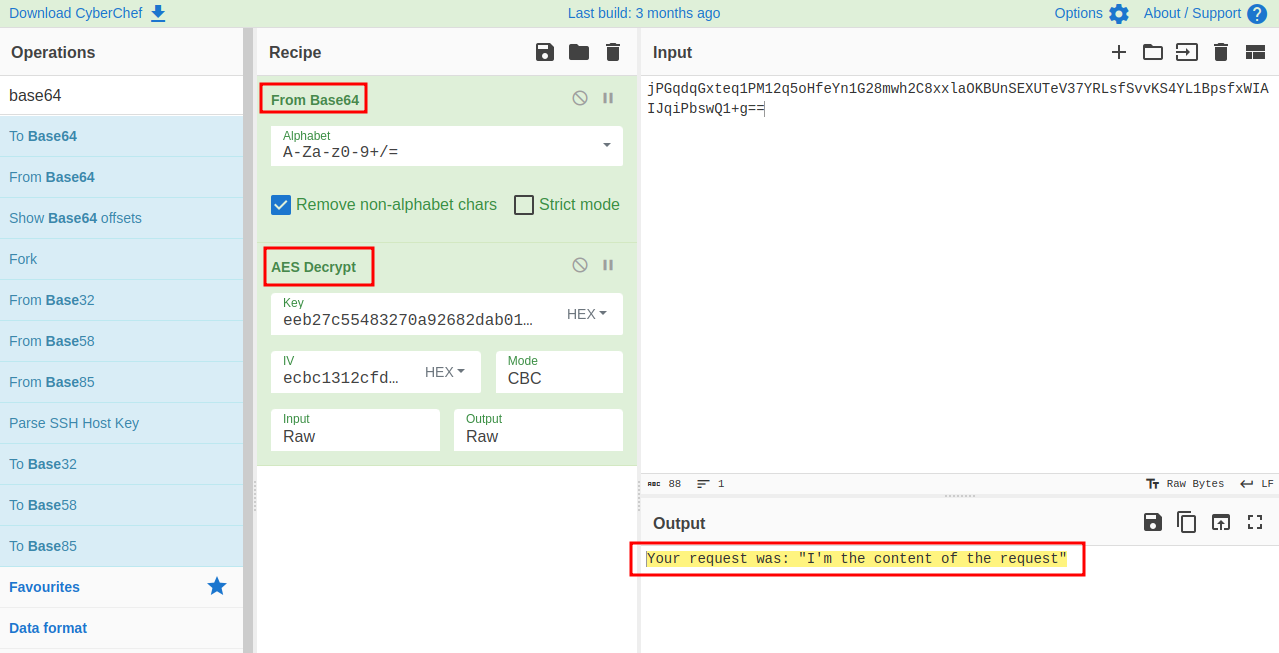
Well, our backend Python code works correctly.
Now that we have a working use case, let’s think about how to approach the problem. Our goal is to be able to analyze the application conveniently, without having to manually encrypt the request after entering each payload and decrypting the response to determine if the attack was successful.
One approach could be to implement an HttpHandler plugin (see part 2 of the series for further details) to transparently decrypt the requests sent by the application upon entering Burp Suite and automatically re-encrypt them on the way out. This way, the traffic we see in Burp Suite will appear as if the encryption layer is not even present. This approach has the advantage that we can also seamlessly use Burp Suite Scanner. The scanner will see the requests in their decrypted form and can apply its payloads. Similarly, it will see the responses in their decrypted form and can analyze them to determine if the attack was successful.
Personally, I usually use a plugin of this type only for the Scanner and Intruder, but not for the Proxy and Repeater. The reason is that I want to keep the original traffic in Burp Suite’s history, rather than the traffic already processed by the plugin, in order to have a “clean” record. This can be helpful for later reference and analysis purposes.
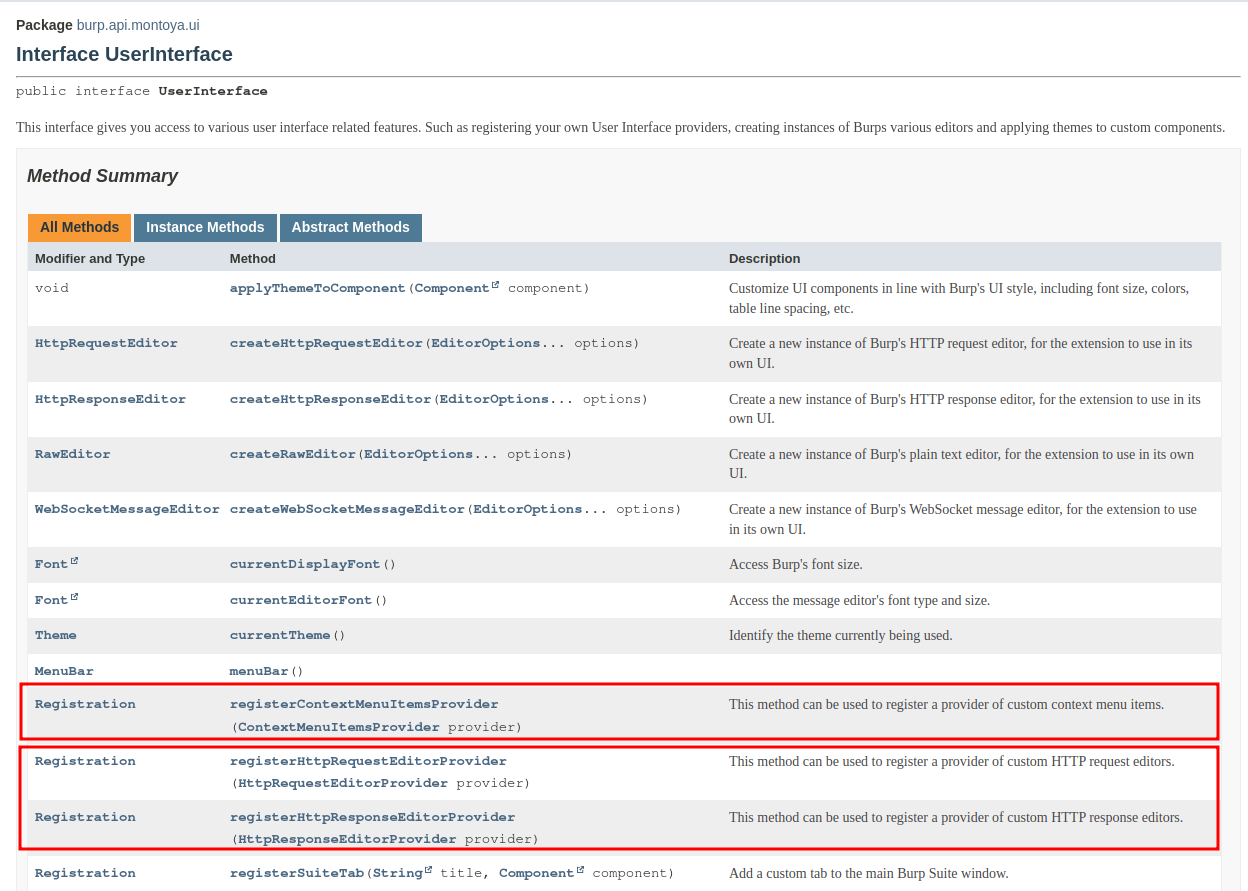
Now let’s explore two alternative approaches that we can use in these cases: using a plugin of type HttpRequestEditor/HttpResponseEditor (which is what I usually use) and a plugin of type ContextMenuItem (a bit less convenient, but useful in situations where there is a lot of variability in the request and/or response format). Both plugins can be registered from the UserInterface object that we can get from the usual MontoyaApi (the object supplied as argument to the initialize function of the plugin).
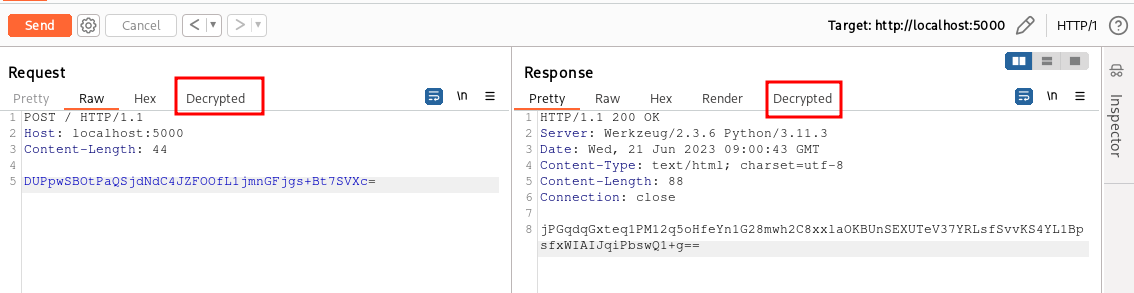
In this article we will see how to implement a plugin of type HttpRequestEditor/HttpResponseEditor. We will cover the ContextMenuItem in the next article of the series. With a plugin of this type, we can add a tab to the section of the Burp Suite interface that displays requests and responses. Once clicked, our tab will decrypt the HTTP request and show the decrypted version (same for responses). If we are in a tool that allows request modification (e.g., Repeater or Intercept), we can also modify the decrypted content, and our plugin will automatically re-encrypt it before sending the request to the backend (same for responses but in the opposite direction). This way, we will keep the original traffic while being able to work comfortably as if the encryption layer was not there. The HttpRequestEditor/HttpResponseEditor plugin looks as follows in Burp Suite:
As usual, we start from the Hello World plugin skeleton we wrote in the part 1 of the series.
package org.fd.montoyatutorial;

import burp.api.montoya.BurpExtension;
import burp.api.montoya.MontoyaApi;
import burp.api.montoya.logging.Logging;

public class HttpRequestResponseEditorExample implements BurpExtension {

    MontoyaApi api;
    Logging logging;

    @Override
    public void initialize(MontoyaApi api) {

        // Save a reference to the MontoyaApi object
        this.api = api;

        // api.logging() returns an object that we can use to print messages to stdout and stderr
        this.logging = api.logging();

        // Set the name of the extension
        api.extension().setName("Montoya API tutorial - HttpRequestResponseEditorExample");

        // Print a message to the stdout
        this.logging.logToOutput("*** Montoya API tutorial - HttpRequestResponseEditorExample loaded ***");

        // TODO - Register our listeners

    }
}
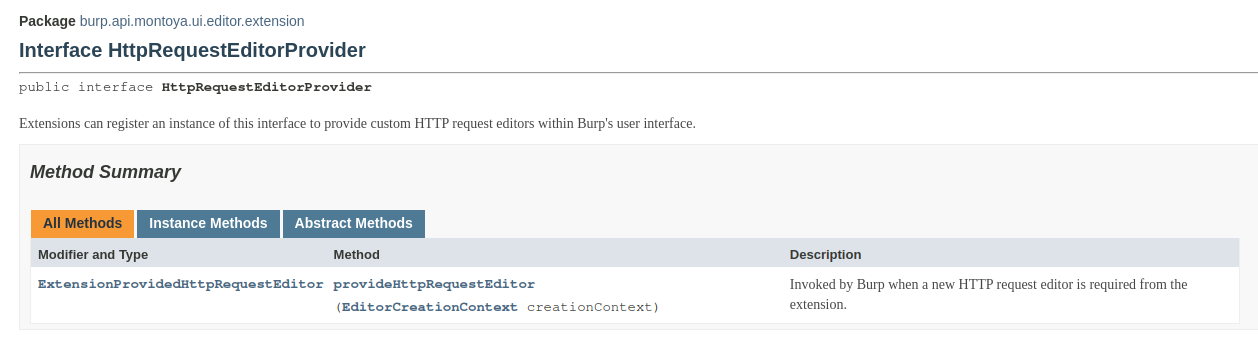
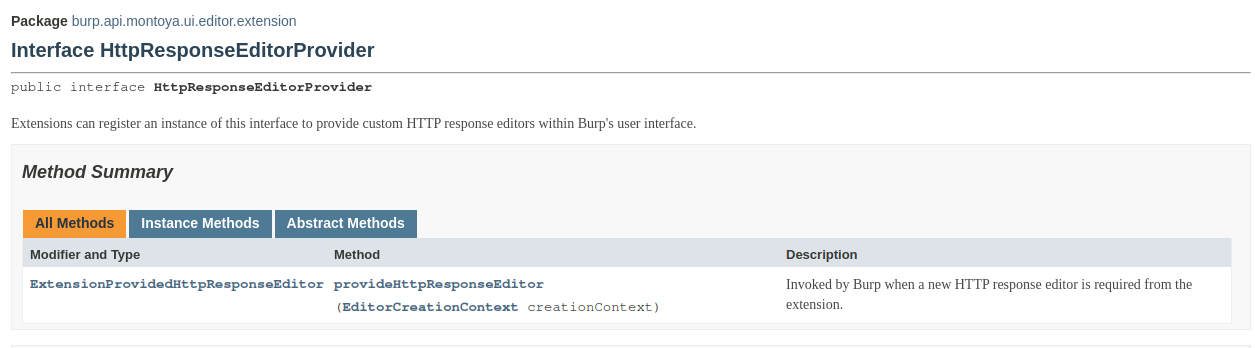
Here, our extension should register two different listeners, one for requests and one for responses, as we can see in the documentation:

As in most Burp Suite extension, each listener requires a different object that implements a specific interface supplied as argument:
Since the two interfaces are very simple and require only one method each we will use a single Java class that implements both interfaces. However, if you prefer, you can use two separate classes, each implementing one of the interfaces.
package org.fd.montoyatutorial;

import burp.api.montoya.MontoyaApi;
import burp.api.montoya.ui.editor.extension.*;

public class CustomHttpRequestResponseEditor implements HttpRequestEditorProvider, HttpResponseEditorProvider {

    MontoyaApi api;

    public CustomHttpRequestResponseEditor(MontoyaApi api) {
        this.api = api;
    }

    @Override
    public ExtensionProvidedHttpRequestEditor provideHttpRequestEditor(EditorCreationContext creationContext) {
        // TODO
    }

    @Override
    public ExtensionProvidedHttpResponseEditor provideHttpResponseEditor(EditorCreationContext creationContext) {
        // TODO
    }
}
The two functions should return an object of type ExtensionProvidedHttpRequestEditor and an object of type ExtensionProvidedHttpResponseEditor, respectively. As we can guess from the name of the interfaces, these functions should create and return a new graphical tab for HTTP requests and for HTTP responses, respectively. Fortunately for us all, unless you have specific requirements, the Burp Suite APIs provide methods to create graphical tabs without the need to deal with Java’s graphic libraries (and that’s a goooood thing :D). All we need to do is to create those graphical tabs using a specific API of Burp Suite and implement our encryption/decryption logic in there.
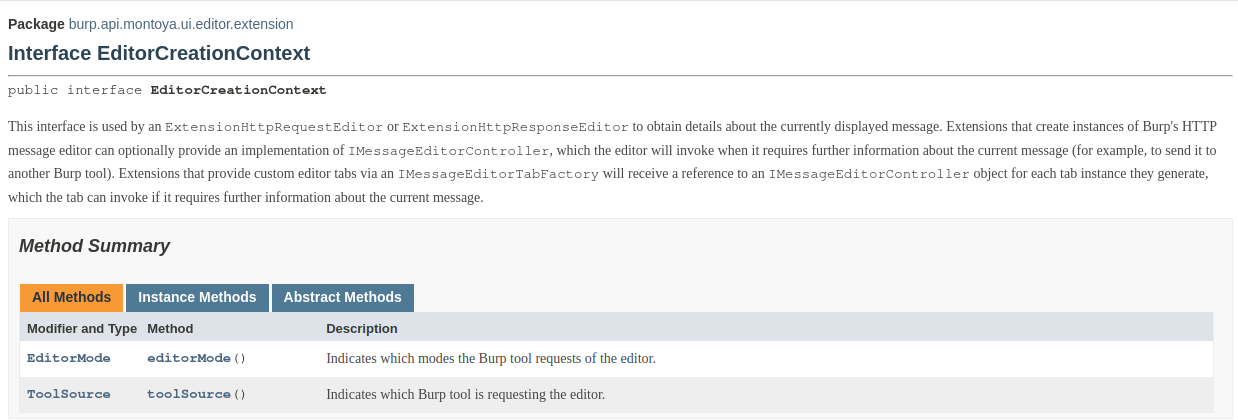
Let’s return to the provideHttpRequestEditor and provideHttpResponseEditor functions we have to implement. These two methods have the same argument, an object of type EditorCreationContext, which contains information on the context of the current request/response (which Burp Suite tool generated the request/response and if it is editable or not):
Let’s have a look of how we can create this ExtensionProvidedHttpRequestEditor object (we will see in detail the process only for requests because it is exactly the same for responses; the plugin example on the GitHub repository will have also the code to handle responses).
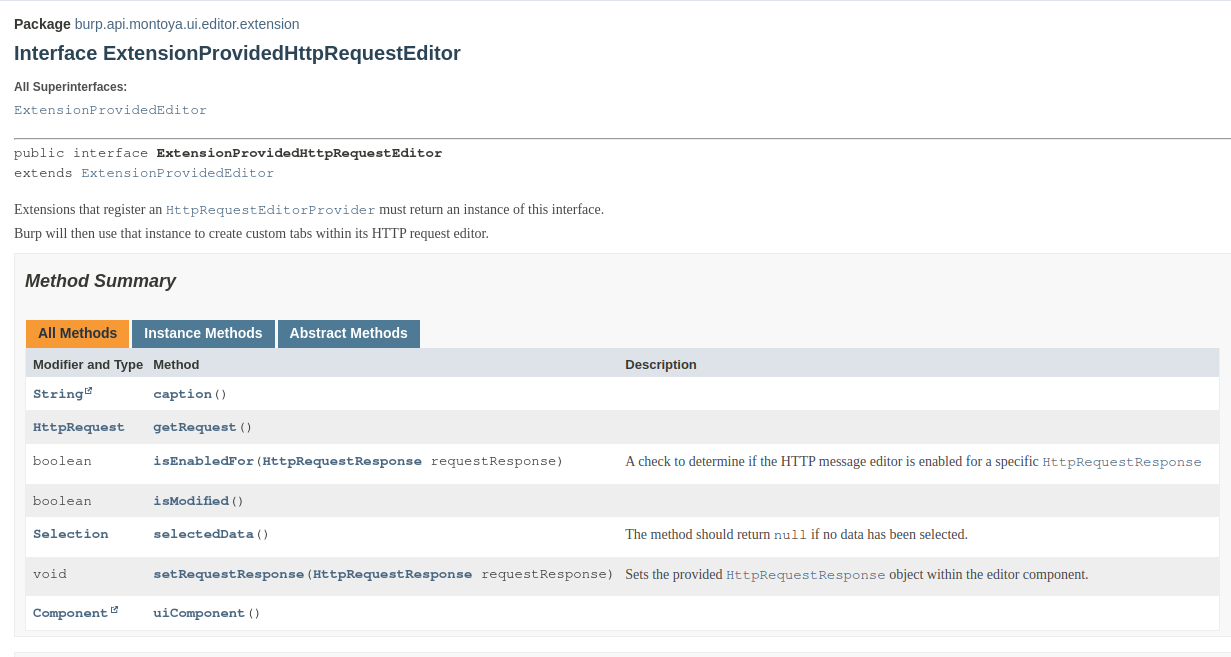
We have to create a class that implements this interface, defining all the following functions:
- caption: this method should return the name of our custom tab (in this example “Decrypted”).
- isEnabledFor: this method will return true or false depending on whether we want the current request to have our custom tab or not. We can use the current request and the current context for the choice (this way we can build plugins that add graphical tab only for specific requests).
- uiComponent: this method will return the actual UI component of our tab. As I said, we don’t have to write Java Swing code because Burp Suite has a couple of methods we can use to generate tabs.
- setRequestResponse: in this method we will create the content of our new tab (in our example, we will decrypt the body of the request and put the decrypted version in the tab).
- isModified: this method will return true or false depending on whether the user has made any modifications in our custom tab.
- getRequest: this method will be called when the user exits from our custom tab and returns to Burp Suite default tabs or when the request is sent. If the content of our custom tab has been modified by the user, in this method we have to take the edited content, encrypt it and build the request with the updated encrypted body.
- selectedData: this method should return the data actually selected by the user in our custom tab (if any). As we will see, the tab generated using Burp Suite APIs already has methods that will take care of this although our current extension does not need to let the user select a portion of the request.
Let’s start with the skeleton of the class with the code of straightforward methods and then we will implement the setRequestResponse and the getRequest, that contain the encryption/decryption logic of our plugin.
First we will code the constructor:
public class CustomHttpRequestEditorTab implements ExtensionProvidedHttpRequestEditor {

    static String keyHex = "eeb27c55483270a92682dab01b85fdea";
    static String ivHex = "ecbc1312cfdc2a0e1027b1eaf577dce8";

    MontoyaApi api;
    Logging logging;
    EditorCreationContext creationContext;
    RawEditor requestEditorTab;
    Base64Utils base64Utils;

    public CustomHttpRequestEditorTab(MontoyaApi api, EditorCreationContext creationContext) {

        // Save argument of constructor in object
        this.api = api;
        this.creationContext = creationContext;

        // Save references to object that we will use
        this.logging = api.logging();
        this.base64Utils = api.utilities().base64Utils();

        // Initialize our editor tab (Type RawEditor) in read only mode if the request is read only,
        // read/write otherwise
        if (creationContext.editorMode() == EditorMode.READ_ONLY) {
            requestEditorTab = api.userInterface().createRawEditor(EditorOptions.READ_ONLY);
        } else {
            requestEditorTab = api.userInterface().createRawEditor();
        }
    }

    [...]
To our constructor we will pass the usual MontoyaApi object (necessary for every task) and the context we just see (in order to let our plugin take decisions based on the tool in which the tab is created and if the tab should be editable or not). Then we save references to some object we will use in our plugin offered by Burp Suite Montoya APIs (a logging object and Base64 encoding/decoding utilities). Finally we have the graphical object of our tab. As I said before, Burp Suite provides some API functions that can be used to generate tabs of different types in the UserInterface object, one for raw text (that we will use in our plugin), one for HTTP requests (that we will not use because our custom tab will not contain an entire HTTP request but only the decrypted body), one for HTTP responses, and one for WebSockets:
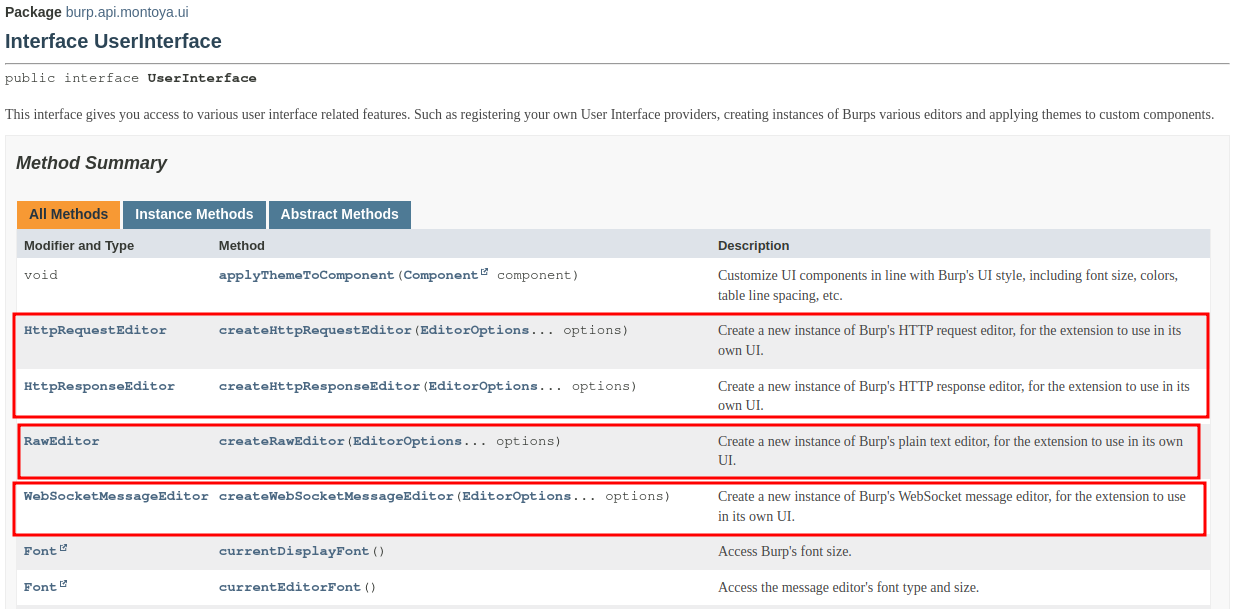
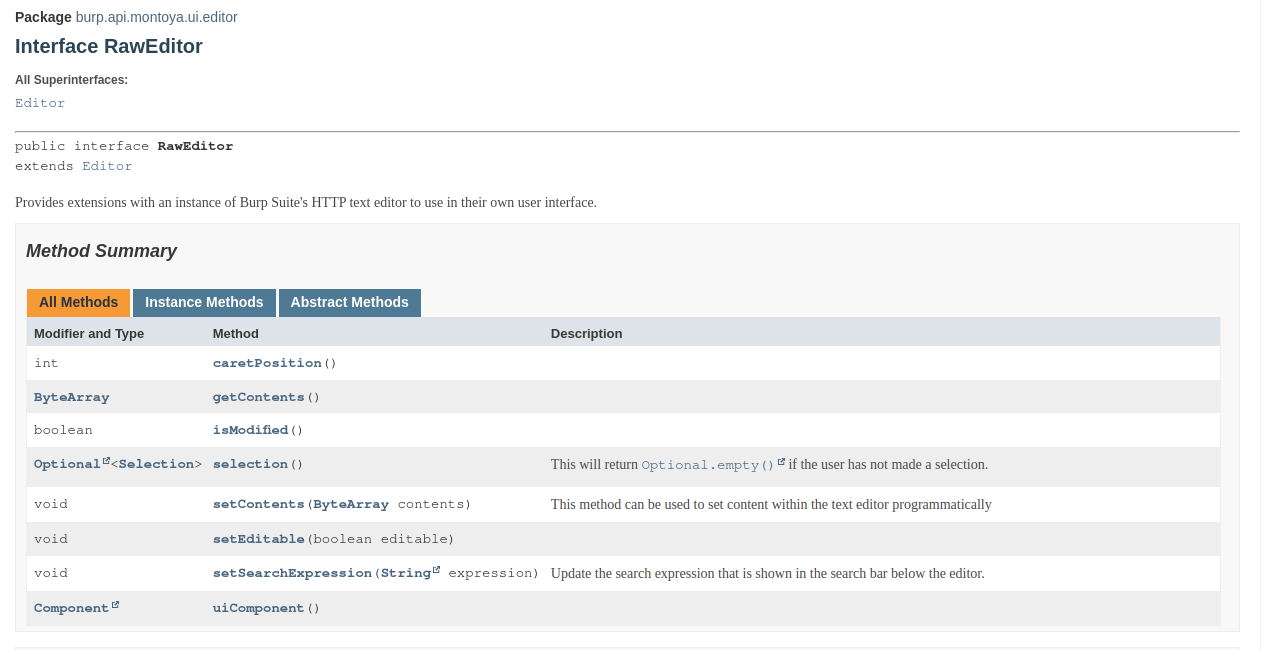
In our constructor we created a RawEditor object, that offers a graphical tab that should be used for raw text. This editor can be created as read-only or as read-write: we used the context object to generate the right type of editor, basing on the location of the current request our plugin is processing (e.g., read only for the History, read/write for the Repeater or Intercept, etc.). The RawEditor object offers many functionalities that we will use later in our plugin:
Now let’s return to the implementation of our CustomHttpRequestEditorTab object:
[...]

@Override
public boolean isEnabledFor(HttpRequestResponse requestResponse) {

    // Our tab is always enabled. In this method you can choose if you want to enable
    // the custom tab, basing on the value of the request, the context, etc.
    return true;

}

@Override
public String caption() {

    // The name of the tab
    return "Decrypted";

}

@Override
public Component uiComponent() {

    // Get the UI component of the tab (returned by the RawEditor object we use)
    return requestEditorTab.uiComponent();

}

@Override
public Selection selectedData() {

    // This method should return selected data in tab, if any. We can use method offered
    // by the RawEditor object to check if any data is selected and, if so, return this data
    if(requestEditorTab.selection().isPresent()) {
        return requestEditorTab.selection().get();
    } else {
        return null;
    }

}

@Override
public boolean isModified() {

    // This method should return true if the data inside our custom tab has been modified by
    // the user. The RawEditor tab has a method with the same name that return this information
    return requestEditorTab.isModified();

}

[...]
The implementation of the isEnabledFor, caption, uiComponent, selectedData and isModified is quite simple because they use functions offered by our RawEditor, that already implemented all the logic of these functions.
Now we will implements the body of the setRequestResponse function, that will decrypt our encrypted content and put the result in our tab.
static String keyHex = "eeb27c55483270a92682dab01b85fdea";
static String ivHex = "ecbc1312cfdc2a0e1027b1eaf577dce8";

HttpRequestResponse currentRequestResponse;
[...]

@Override
public void setRequestResponse(HttpRequestResponse requestResponse) {

    // Extract the request and its body
    HttpRequest request = requestResponse.request();
    ByteArray body = request.body();

    // Base64 decode
    ByteArray decodedBody = this.base64Utils.decode(body);

    // Save current requestResponse (we will need this object to build a new request
    // if the decrypted content will be modified)
    this.currentRequestResponse = requestResponse;
    try {

        // Create a specific object containing the IV for encryption
        byte[] iv = HexFormat.of().parseHex(this.ivHex);
        IvParameterSpec ivParameterSpec = new IvParameterSpec(iv);

        // Create a specific object containing the key for encryption
        byte[] key = HexFormat.of().parseHex(this.keyHex);
        SecretKey SecKey = new SecretKeySpec(key, 0, key.length, "AES");

        // Initialize our AES cipher in DECRYPT mode
        Cipher aesCipher= Cipher.getInstance("AES/CBC/PKCS5Padding");
        aesCipher.init(Cipher.DECRYPT_MODE, SecKey, ivParameterSpec);

        // Decrypt the body
        byte[] decryptedBody = aesCipher.doFinal(decodedBody.getBytes());

        // Set the decrypted value in our custom tab
        this.requestEditorTab.setContents(byteArray(decryptedBody));

    } catch (Exception e) {

        // Log exceptions (if any)
        this.logging.logToError(e);

    }

}

[...]
The method simply extracts the body of the request, Base64 decodes it and then decrypts it using the key and IV we chose in our backend code. Finally it puts the result in the tab using the setContents function of the RawEditor object. A reference to the HttpRequestResponse object is saved in an instance variable because we will need this object later to recreate our request if the user modifies the decrypted content (for example in the Repeater to add some sort of attack payload).
Now we just need one last method, getRequest, which will be responsible for recreating the HTTP request with the encrypted body in case it is modified by the user in its decrypted form within our custom tab.
[...]

@Override
public HttpRequest getRequest() {

    if(isModified()) {

        ByteArray newBody = requestEditorTab.getContents();

        try {

            // Create a specific object containing the IV for encryption
            byte[] iv = HexFormat.of().parseHex(this.ivHex);
            IvParameterSpec ivParameterSpec = new IvParameterSpec(iv);

            // Create a specific object containing the key for encryption
            byte[] key = HexFormat.of().parseHex(this.keyHex);
            SecretKey SecKey = new SecretKeySpec(key, 0, key.length, "AES");

            // Initialize our AER cipher in DECRYPT mode
            Cipher aesCipher = Cipher.getInstance("AES/CBC/PKCS5Padding");
            aesCipher.init(Cipher.ENCRYPT_MODE, SecKey, ivParameterSpec);

            // Decrypt the body
            byte[] encryptedBody = aesCipher.doFinal(newBody.getBytes());

            // Encode the encrypted value in Base64
            ByteArray encodedBody = this.base64Utils.encode(ByteArray.byteArray(encryptedBody));

            // Extract the request from the HttpRequestResponse we save in the setRequestResponse
            HttpRequest oldRequest = this.currentRequestResponse.request();

            // Replace its body with the new encrypted and encoded body and return the modified request
            HttpRequest newRequest = oldRequest.withBody(encodedBody);
            return newRequest;

        } catch (Exception e) {

            // Log exceptions (if any)
            this.logging.logToError(e);

            // Return original request
            return this.currentRequestResponse.request();

        }

    } else {

        // Return original request if decrypted body was not modified
        return this.currentRequestResponse.request();

    }

}

[...]
This code is quite similar to the previous one, but it encrypts and Base64 encodes the modified content (retrieved using the getContents function of the RawEditor object), instead of decoding and decrypting it. After encryption and encoding the new body is replaced in the HttpRequestResponse object we saved in the setRequestResponse function.
The implementation of the CustomHttpResponseEditorTab, that will handle the responses, is almost identical. For this reason I will not paste the code here but you can find it in the GitHub repository for this series. The only difference in the implementation is that it extract the response from the HttpRequestResponse argument instead of the request. In the example on the GitHub repository I copied and pasted the code used to handle requests in the function that handles responses to keep the example as clear as possible, but obviously it’s better to avoid having such repetitive code if possible.
Before building our plugin we only need to add references to the objects we just coded in the first two classes we created, the editor class (CustomHttpRequestResponseEditor) and the plugin main class (HttpRequestResponseEditorExample).
public class CustomHttpRequestResponseEditor implements HttpRequestEditorProvider, HttpResponseEditorProvider {

    MontoyaApi api;

    public CustomHttpRequestResponseEditor(MontoyaApi api) {
        this.api = api;
    }

    @Override
    public ExtensionProvidedHttpRequestEditor provideHttpRequestEditor(EditorCreationContext creationContext) {
        return new CustomHttpRequestEditorTab(api, creationContext);
    }

    @Override
    public ExtensionProvidedHttpResponseEditor provideHttpResponseEditor(EditorCreationContext creationContext) {
        return new CustomHttpResponseEditorTab(api, creationContext);
    }
}
public class HttpRequestResponseEditorExample implements BurpExtension {

    [...]

    @Override
    public void initialize(MontoyaApi api) {

        [...]

        // Register our CustomHttpRequestResponseEditor for both requests and responses
        // Note: we used a single class for both requests and responses (that implements both
        // HttpRequestEditorProvider and HttpResponseEditorProvider interfaces but we can also use
        // two different classes, one for requests and one for responses).
        CustomHttpRequestResponseEditor customHttpRequestResponseEditor = new CustomHttpRequestResponseEditor(api);
        api.userInterface().registerHttpRequestEditorProvider(customHttpRequestResponseEditor);
        api.userInterface().registerHttpResponseEditorProvider(customHttpRequestResponseEditor);

    }
}
And voilà! Let’s build and try our extension.
If we click on the “Decrypted” tab in both requests and responses we get the decrypted body:
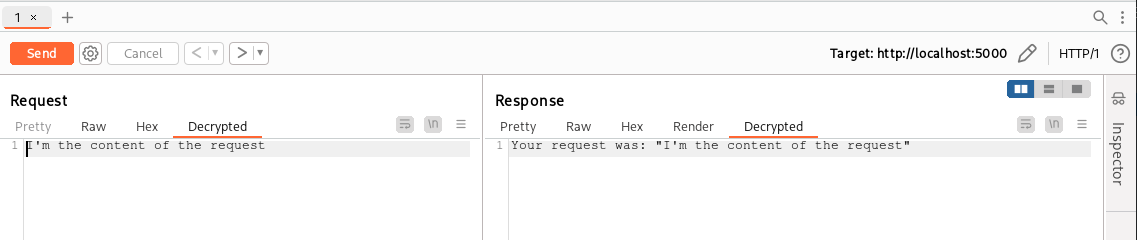
We can now change the decrypted value and click “Send” (or return to the Raw tab) to have our extension encrypt the new body for us!

This way our powerful extension will let us test easily without losing the original requests and responses in the proxy history. As I said, we can make use of this plugin for manual testing while using a plugin of type HttpListener to handle Scanner and Intruder!
In the next chapter we will see a different way to handle the same scenario using a ContextMenuItem plugin!
As always, the complete code of the backend and of the plugin can be downloaded from my GitHub repository.
Cheers!