- Setting up the environment + Hello World
- -> Inspecting and tampering HTTP requests and responses
- Inspecting and tampering WebSocket messages
- Creating new tabs for processing HTTP requests and responses
- Adding new functionalities to the context menu (accessible by right-clicking)
- Adding new checks to Burp Suite Active and Passive Scanner
- Using the Collaborator in Burp Suite plugins
- BChecks – A quick way to extend Burp Suite Active and Passive Scanner
- … and much more!
Hi there!
Today we will cover how to develop the type of extension most commonly used during a penetration test, namely HttpHandler plugins (or HttpListener in the old APIs). These plugins allow us to inspect or modify all HTTP requests exiting from every tool in Burp Suite and all incoming responses. It is possible to inspect and modify the traffic of specific tools in Burp Suite through other types of plugins as well, but these HttpHandler plugins provide access to all outgoing and incoming traffic.
With the new Montoya API, we can also inspect and modify WebSocket traffic, one of the features I have been eagerly awaiting for a long time (or better, the feature I have been waiting for the most). Before Montoya API we could write great plugin to handle encryption, signature, encodings, etc. in HTTP requests and responses and we had to keep our fingers crossed that the application didn’t use WebSockets. Otherwise, we could use Burp Suite only in standard scenarios and we had to switch to much more inconvenient tools in more complex ones.
Let’s consider the following example scenario: we have an application that adds a SHA256 hash of the body in an HTTP Header (usually things are a little more complex with for example a HMAC-SHA but let’s keep things simple). If we intercept a request and modify a parameter in the body without regenerating the hash, the request will be rejected by the backend. In the Proxy and Repeater, we can consider manually regenerating the SHA256 for each request we send, but this could significantly slow down the testing process and be quite annoying…

Additionally, if we were to use the Intruder or the Scanner, every request generated by Burp would be rejected by the backend as it would have an incorrect hash. The best way to handle this type of situation is to create an HttpHandler plugin that transparently regenerates the signatures of all the requests that require it.
Let’s see how we can do that. First, let’s code a simple demo backend with Python and Flask.
import flask
from flask import request
from hashlib import sha256

app = flask.Flask(__name__)

@app.route('/', methods=['GET', 'POST'])
def handle_request():
    hash = request.headers.get('Hash')
    body = request.get_data()
    calculated_hash = sha256(body).hexdigest()
    if(hash.strip() == calculated_hash):
        data = request.form.get('data')
        return data
    else:
        return("Invalid signature!")

app.run(host="127.0.0.1", port=5000, debug=True)
The code simply extracts the hash contained in the “Hash” header, calculates the hash of the body and then compares the two values. If they are equal, the backend returns the values sent in the “data” body parameter, otherwise it returns an error. Very simple.
The following request has the correct SHA256 hash:
POST / HTTP/1.1
Host: localhost
Content-Length: 19
Hash: 0bae7db0e4ee21521569abf0b881349c7d1da125a49435f8ea0a733b1ef4be78
Content-Type: application/x-www-form-urlencoded

data=Attack+vector!
HTTP/1.1 200 OK
Server: Werkzeug/2.3.6 Python/3.11.3
Date: Mon, 12 Jun 2023 16:05:29 GMT
Content-Type: text/html; charset=utf-8
Content-Length: 14
Connection: close

Attack vector!
The following one has an invalid hash:
POST / HTTP/1.1
Host: localhost
Content-Length: 21
Hash: 0bae7db0e4ee21521569abf0b881349c7d1da125a49435f8ea0a733b1ef4be78
Content-Type: application/x-www-form-urlencoded

data=Attack+vector+2!
HTTP/1.1 200 OK
Server: Werkzeug/2.3.6 Python/3.11.3
Date: Mon, 12 Jun 2023 16:10:17 GMT
Content-Type: text/html; charset=utf-8
Content-Length: 18
Connection: close

Invalid signature!
Let’s run our IDE and create the skeleton for an empty plugin (refer to part 1 for the tutorial on how to setup the IDE and create the skeleton).
package org.fd.montoyatutorial;

import burp.api.montoya.BurpExtension;
import burp.api.montoya.MontoyaApi;
import burp.api.montoya.logging.Logging;

public class HttpHandlerExample implements BurpExtension {

    MontoyaApi api;
    Logging logging;

    @Override
    public void initialize(MontoyaApi api) {

        // Save a reference to the MontoyaApi object
        this.api = api;

        // api.logging() returns an object that we can use to print messages to stdout and stderr
        this.logging = api.logging();

        // Set the name of the extension
        api.extension().setName("Montoya API tutorial - HttpHandlerExample");

        // Print a message to the stdout
        this.logging.logToOutput("*** Montoya API tutorial - HttpHandlerExample loaded ***");

    }
}
The APIs that allow to modify requests and responses can be accessed through the http method of the MontoyaApi object passed as an argument to the plugin’s initialization function (which we saved in a variable to access it anywhere in our plugin).
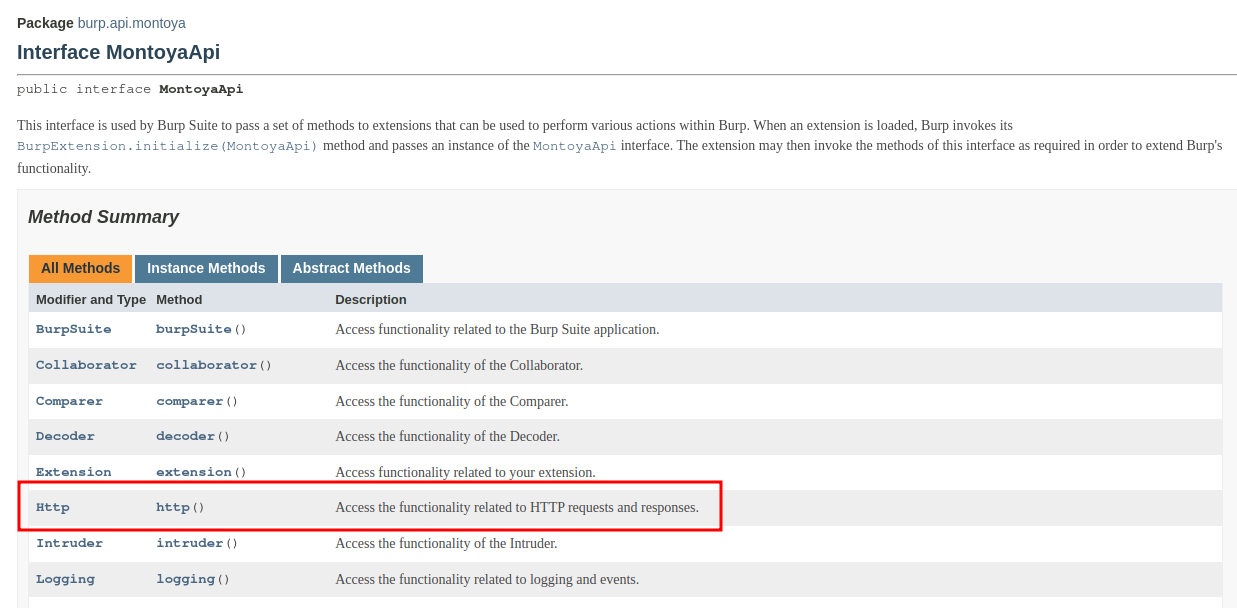
In detail, within our initialize method, we will declare that we want our plugin to receive outgoing requests and incoming responses by providing an object that will handle processing them. We will do this by calling the registerHttpHandler method of the Http object obtained in the previous step.
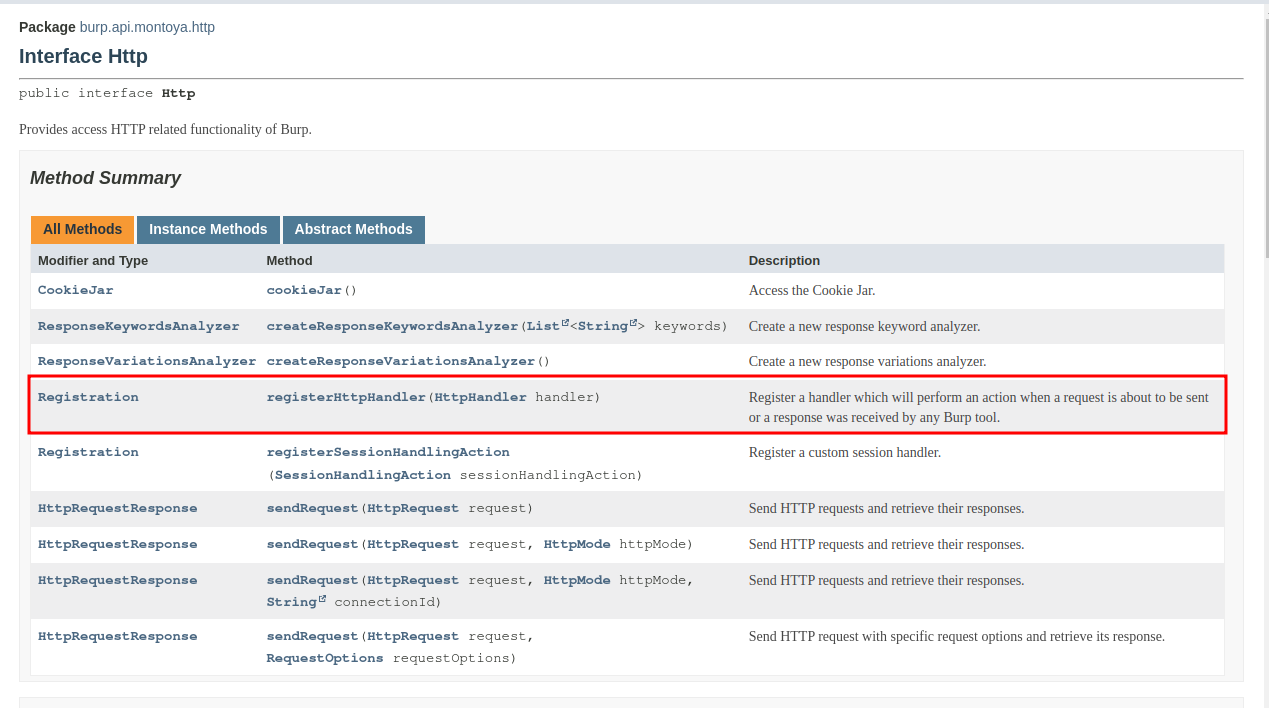
We need to provide to the registerHttpHandler method an object constructed by us that implements the HttpHandler interface, which means it offers the methods handleHttpRequestToBeSent and handleHttpResponseReceived.

Well, first we define our HttpHandler object responsible to handle requests and responses and then we will pass this object in the initialization method. Little hint: IDEs are perfect for automatically fixing issues and avoiding writing “boilerplate” code. For example, they can automatically create the skeleton of functions defined in an interface implemented in the current class, correct imports, add constructors and getter/setter methods, saving you time from writing tedious code. Example:

This is the skeleton of our HttpHandler (that probably blocks every exiting request and entering response or simply throws exceptions when they are processed):
package org.fd.montoyatutorial;

import burp.api.montoya.http.handler.*;

public class CustomHttpHandler implements HttpHandler {
    @Override
    public RequestToBeSentAction handleHttpRequestToBeSent(HttpRequestToBeSent requestToBeSent) {
        return null;
    }

    @Override
    public ResponseReceivedAction handleHttpResponseReceived(HttpResponseReceived responseReceived) {
        return null;
    }
}
First, let’s fix the plugin in order to simply let requests and responses pass without modifications. As we can see, handleHttpRequestToBeSent should return an object of type RequestToBeSentAction while handleHttpResponseReceived should return a ResponseReceivedAction object. So, we need a way to create or get objects of types RequestToBeSentAction and ResponseReceivedAction.
When you find yourself in such situations, the first thing you should do is consult the documentation of the interface for which you need an object (I said “interface” because in Burp Suite API there ale almost only interfaces and rarely classes or abstract classes). In most cases, in the Montoya APIs, you will find static methods (which can be called directly from the interface itself rather than from an instance of a class that implements it) that allow you to obtain an instance of an object implementing that interface (defined somewhere in Burp Suite code). This was not always the case in previous APIs, where sometimes it was necessary to write classes that implemented certain interfaces, often used only as “containers” (thanks, Burp! I really appreciate it!).
The RequestToBeSentAction contains two static methods that we can use for the purpose (the same applies also for ResponseReceivedAction):
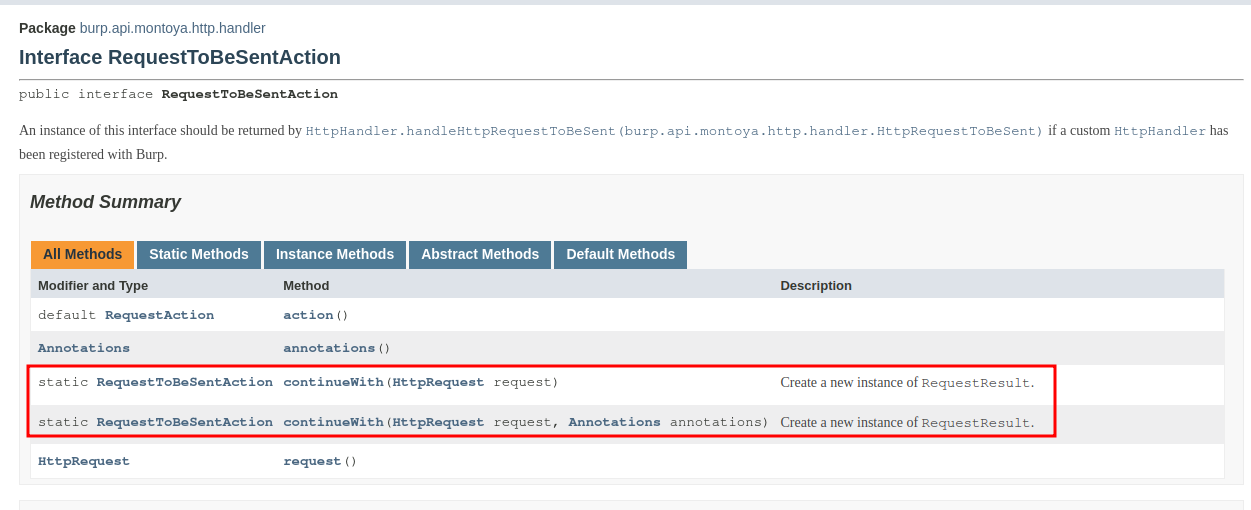
The continueWith method takes as argument a request (and if we want also an Annotation object, that allows to add notes to the request in Burp Suite and/or highlight the request) and returns the container object we need. We can fix our class as follows:
package org.fd.montoyatutorial;

import burp.api.montoya.http.handler.*;

public class CustomHttpHandler implements HttpHandler {
    @Override
    public RequestToBeSentAction handleHttpRequestToBeSent(HttpRequestToBeSent requestToBeSent) {
        return RequestToBeSentAction.continueWith(requestToBeSent);
    }

    @Override
    public ResponseReceivedAction handleHttpResponseReceived(HttpResponseReceived responseReceived) {
        return ResponseReceivedAction.continueWith(responseReceived);
    }
}
Now our HttpHandler simply forwards requests and responses without executing any operation on them. We can now register our listener in the main class of the plugin with the registration method registerHttpHandler we saw before in the documentation:
package org.fd.montoyatutorial;

import burp.api.montoya.BurpExtension;
import burp.api.montoya.MontoyaApi;
import burp.api.montoya.logging.Logging;

public class HttpHandlerExample implements BurpExtension {

    MontoyaApi api;
    Logging logging;

    @Override
    public void initialize(MontoyaApi api) {

        ...

        // Register our HttpHandler
        api.http().registerHttpHandler(new CustomHttpHandler());

    }
}
Now it’s time to implement the logic of our plugin. We add a small constructor to our HttpListener class, in order to save also here a reference to the MontoyaApi object, essential for interacting with just about anything.
public class CustomHttpHandler implements HttpHandler {

    MontoyaApi api;
    Logging logging;

    public CustomHttpHandler(MontoyaApi api) {
        // Save a reference to the MontoyaApi object
        this.api = api;
        // api.logging() returns an object that we can use to print messages to stdout and stderr
        this.logging = api.logging();
    }
[...]
Then, we can implement the real purpose of the plugin. Burp Suite provides many convenient features for extracting data and modifying requests and responses that we can use for our tasks, detailed in the documentation.
The plugin will:
- Check if the request contains the header Hash. If not, it will returns the original request
- Extract the body of the request
- Sign the body of the request with SHA-256 (Burp Suite Montoya API offers also a function to generate digests)
- Replace the old value of the header Hash with the new digest
- Send the edited request
Extracting the body, extracting the headers and updating the headers are all operations offered by the HttpRequestToBeSent interfaced, of which we have an object supplied as argument to the handleHttpRequestToBeSent function.
The SHA256 digest can be computed using the Burp Suite utilities API. We can obtain the reference from the usual MontoyaApi object. The utilities API includes various functions to handle common operations, like number operations, string operations, HTML and URL encoding, hashing, compression, random, and so on.
The final code of the handleHttpRequestToBeSent is the following:
@Override
public RequestToBeSentAction handleHttpRequestToBeSent(HttpRequestToBeSent requestToBeSent) {

    // Get a list of HTTP headers of the request
    List<HttpHeader> headers = requestToBeSent.headers();

    // 1 - Check if the list contains an header named "Hash" (using Java streams, introduced in Java 8)
    if(headers.stream().map(HttpHeader::name).anyMatch(h -> h.trim().equals("Hash"))) {

        // 2 - Extract the body of the request, using "body" function of the HttpRequestToBeSent object
        // https://portswigger.github.io/burp-extensions-montoya-api/javadoc/burp/api/montoya/http/handler/HttpRequestToBeSent.html
        ByteArray body = requestToBeSent.body();

        // Get a reference to the CryptoUtils offered by Burp Suite
        // https://portswigger.github.io/burp-extensions-montoya-api/javadoc/burp/api/montoya/utilities/CryptoUtils.html
        CryptoUtils cryptoUtils = api.utilities().cryptoUtils();

        // 3 - Calculate SHA256 hash
        ByteArray sha256hash = cryptoUtils.generateDigest(body, DigestAlgorithm.SHA_256);

        // Convert SHA256 bytes to a HEX string, using a Java way
        String digest = String.format("%064x", new BigInteger(1, sha256hash.getBytes()));

        // 4 - Set the hash in the "Hash" HTTP header, using withUpdatedHeader of the HttpRequestToBeSent object
        HttpRequest modifiedRequest = requestToBeSent.withUpdatedHeader("Hash",digest);

        // 5 - Return the container object feeded with the modified request
        return RequestToBeSentAction.continueWith(modifiedRequest);

    }

    return RequestToBeSentAction.continueWith(requestToBeSent);

}
Action 1 (check if the Hash header is present) has been executed using Java 8 streams (lambda expressions and similar things). If you are not familiar with these constructs, you can replace that portion of code with something like:
boolean headerFound = false;
for(int i=0;i<headers.size();i++) {
    if(headers.get(i).name().trim().equals("Hash")) {
        found = true;
        break;
    }
}
if(headerFound) {
    // ...
}
After building the plugin (see part 1 for reference) and loading it in Burp Suite, we can try it with out test backend by repeating the two requests we sent at the beginning.
The following request has the correct SHA256 hash:
POST / HTTP/1.1
Host: localhost
Content-Length: 19
Hash: 0bae7db0e4ee21521569abf0b881349c7d1da125a49435f8ea0a733b1ef4be78
Content-Type: application/x-www-form-urlencoded

data=Attack+vector!
HTTP/1.1 200 OK
Server: Werkzeug/2.3.6 Python/3.11.3
Date: Mon, 12 Jun 2023 16:05:29 GMT
Content-Type: text/html; charset=utf-8
Content-Length: 14
Connection: close

Attack vector!
The following one should have an invalid hash (we did not manually regenerate the hash):
POST / HTTP/1.1
Host: localhost
Content-Length: 21
Hash: 0bae7db0e4ee21521569abf0b881349c7d1da125a49435f8ea0a733b1ef4be78
Content-Type: application/x-www-form-urlencoded

data=Attack+vector+2!
HTTP/1.1 200 OK
Server: Werkzeug/2.3.6 Python/3.11.3
Date: Mon, 12 Jun 2023 16:10:17 GMT
Content-Type: text/html; charset=utf-8
Content-Length: 18
Connection: close

Attack vector 2!
As we can see, the backend seems to accept the second request even if it appears to have an incorrect hash. The reason is that our plugin is working correctly and is transparently modifying the hash before the request leaves Burp Suite. That’s why in the Repeater, we continue to see an incorrect hash even though it’s not the one actually reaching the backend. We can see the actual request in the Logger tab of Burp Suite (that as you can see has a different hash value):
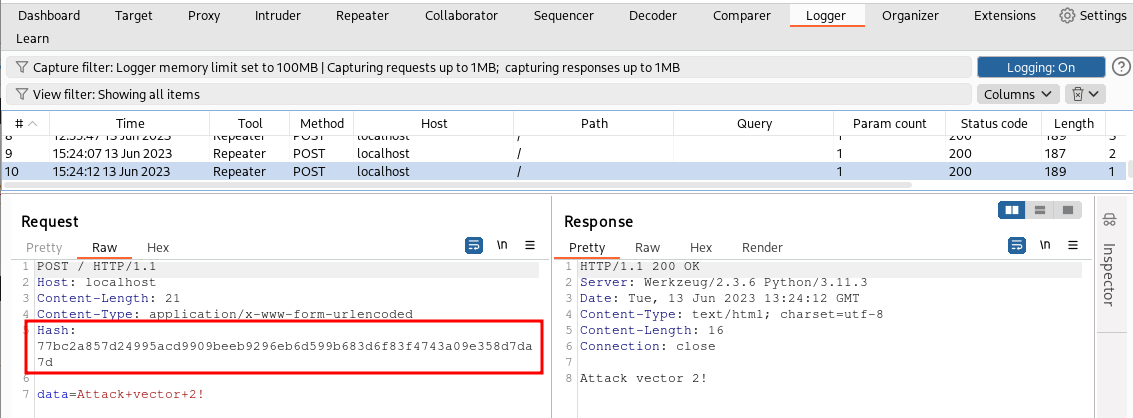
Similarly, by using our plugin, we can confidently use Burp Suite’s Intruder or Scanner, as the hash will be recalculated by the plugin before the actual sending of the requests.
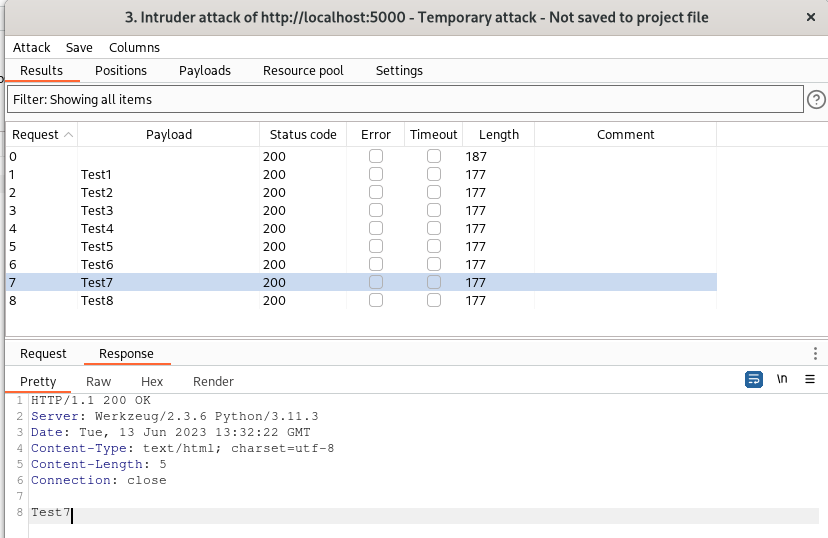
Our plugin will process each request exiting from Burp Suite, but we can also process only requests from specific tools, using the toolSource method of the HttpRequestToBeSent obejct. As an example, we edit our plugin to process only Repeater, Scanner, and Intruder traffic as follows:
@Override
public RequestToBeSentAction handleHttpRequestToBeSent(HttpRequestToBeSent requestToBeSent) {

    if(requestToBeSent.toolSource().isFromTool(ToolType.REPEATER, ToolType.SCANNER, ToolType.INTRUDER)) {

        [...]
Hint: To process the traffic generated by other extensions, such as a Burp Scanner extension, it is necessary to include ToolType.EXTENSIONS as well. Otherwise, the requests made by other extensions will be excluded from processing. In our scenario, the hash should be updated also in requests generated by third-party extensions (like Scanner or Intruder ones), otherwise they checks will fail.
Second hint: Be careful when you have multiple HttpListener plugins, as you may need them to be executed in a specific order. For example, if one plugin modifies the request body and another one computes the hash, if the two plugins are not executed in the correct order, the hash will be incorrect (because the hash should be computed after any body update). Burp Suite maintains a kind of listener queue, and requests are sent in order through that queue. In the “Extensions” -> “Installed” tab, you can reorder the extensions by moving them up or down. However, in the past, I have encountered situations where the order in which requests were processed by plugins did not respect that ordering. My advice in this case is not only to arrange them in the correct order in the mentioned tab but also to load them in the order you require to avoid any issues.

I would have liked to include an example on WebSockets as well, but this article has already become too long. We will explore the topic in next episode.
Full example code (including the backed used for the scenario) can be downloaded in my GitHub repository.
Cheers!