- -> Setting up the environment + Hello World
- Inspecting and tampering HTTP requests and responses
- Inspecting and tampering WebSocket messages
- Creating new tabs for processing HTTP requests and responses
- Adding new functionalities to the context menu (accessible by right-clicking)
- Adding new checks to Burp Suite Active and Passive Scanner
- Using the Collaborator in Burp Suite plugins
- BChecks – A quick way to extend Burp Suite Active and Passive Scanner
- … and much more!
Hi there!
I have been thinking for a long time about releasing a course or lessons on developing extensions for Burp Suite (and to tell you the truth, I had already created a draft course with accompanying extensions some time ago), and what better opportunity than the release of a new API to start the project!
Burp Suite is an exceptional suite of tools that currently stands unparalleled in the world of web application penetration testing. In addition to the HTTP proxy, it provides fuzzing tools, an excellent automated scanner, a request repeater tool, and more. However, personally, the tool I find most remarkable since I started using Burp is undoubtedly the Extender.
The Extender offers a set of APIs that allow for convenient and effective extension of every tool offered by Burp Suite. It provides full control to the penetration tester over all outgoing requests and incoming responses, enabling enhanced customization and flexibility. Thanks to it, over time, third-party plugins have been developed that can support frameworks and protocols, handle complex situations, identify issues, integrate Burp Suite with external tools, and, more generally, make the life of a penetration tester easier by maximizing effectiveness and results.
Since I started doing this job, I have developed dozens (if not hundreds, I’m starting to feel old) of plugins. Some of the more structured ones have been published on GitHub, such as Brida or Java Deserialization Scanner. However, the majority of them were quickly created for a specific purpose during a specific task. Some examples include transparently managing encryption layers for HTTP requests in a mobile application, automatically modifying attack payloads sent to a web application to bypass a WAF, applying a signature to requests directed at an API, transparently handling protocols and encodings, and so on.
This post will be the first in a series, where we will explore how to develop plugins for Burp Suite that can assist us during everyday analyses, from the simplest ones to the most complex ones. We will explore in detail what the Burp Suite APIs offer and the types of plugins we can create, making an effort to navigate the documentation effectively (which, at first glance, can be a bit challenging for some aspects).
Let’s start with the first question. What can we do with Burp Suite’s Extender? Well, a lot of things. Some examples are:
- Inspect and/or edit all requests exiting from every tool in Burp Suite and all responses coming to them (even WebSocket messages from the release of the Montoya API!)
- Extend Burp Suite GUI with new contents, adding custom tabs, entries in the main menu and in the context menu, HTTP or WebSocket message editor tabs, and so on
- Add checks to the active and passive Scanner or even custom insertion points in which scanner payloads will be inserted (useful to handle data formats not known by Burp Suite or if we want to insert attack payloads in the middle of the value of a parameter)
- Create payloads for the Intruder or process each payload before it is inserted into the requests
- Control the requests processed by the Proxy, inspect them, modify them, and decide whether they should be intercepted or not
- Use the Collaborator in our plugins, generating URLs and monitoring the interactions
- View and modify sitemap, vulnerabilities, and scope
- And much more!
Well, second question. In which language can we write a plugin for Burp Suite? With the old API you could choose between Java, Python (using Jython, an implementation of Python in Java) and Ruby (using JRuby, an implementation of Ruby in Java). Unfortunately (?), Java is the only choice with the new Montoya API.
To be honest, in many situations, in my opinion, Java was still the best choice. Python could be a convenient choice for small extensions, but for more complex ones (especially those with a GUI), Java greatly simplified matters. Even if the plugin was written in Python, it had to interact with the Java objects provided by Burp and with the graphical components of Swing (because Burp Suite itself is coded in Java). I can assure you that, especially in the latter case, it was not an enjoyable experience. In addition, Jython does not currently support Python 3, which would require writing extensions with Python 2. I only mentioned Python because, honestly, I have never written (or seen) an extension written in Ruby. 🙂
So, since the following tutorials will focus on the new Montoya APIs, we will proceed using Java.
First, using a Java IDE is convenient for many different reasons (syntax highlighting, code completion, code navigation, etc.). There are many available IDEs for Java, both commercial and free, including Eclipse, IntelliJ IDEA, NetBeans and Visual Studio Code. Choose the one that you prefer, in these tutorials I will use IntelliJ IDEA Community Edition, that integrates better with build tools.
Secondly, we need a build tool to create the archive of our plugin. The best options are Maven and Gradle. While I personally prefer Maven, I suggest to use Gradle because in the past, when I published plugins in the BApp Store, the Burp team asked for the Gradle file for compilation. Therefore, I believe they prefer it. IntelliJ IDEA has great integration with Gradle while Eclipse at the moment has a default configuration that requires manual modifications of the project skeleton.
After this large introduction, let’s start with our first “Hello World” plugin. First let’s create a new Gradle project in IntelliJ IDEA (I will try to be very detailed as I know that many pentesters typically dislike Java!).
After running IntelliJ, a new project can be created as follows:
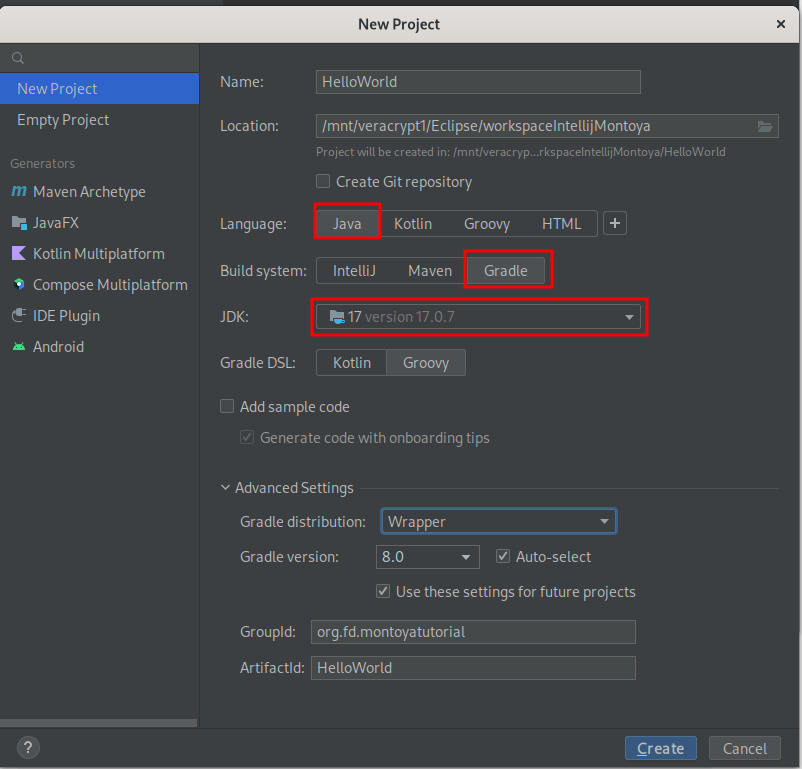
It is important to select a version of Java 17 or lower because currently higher versions are not supported.
IntelliJ will build the skeleton of the project:
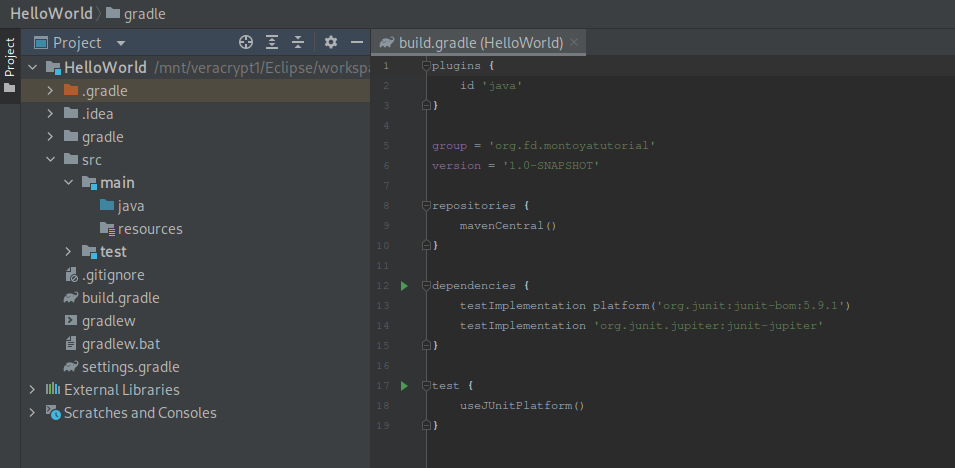
Now, we have to edit the build.gradle file, in order to include the Burp Suite library (block “dependencies”) and add instruction to package our plugin (block “jar”). An example is the following:
plugins {
    id 'java'
}

group = 'org.fd.montoyatutorial'
version = '1.0-SNAPSHOT'

repositories {
    mavenCentral()
}

dependencies {
    implementation 'net.portswigger.burp.extensions:montoya-api:+'
}

jar {
    from {
        configurations.runtimeClasspath.collect { it.isDirectory() ? it : zipTree(it) }
    }
}
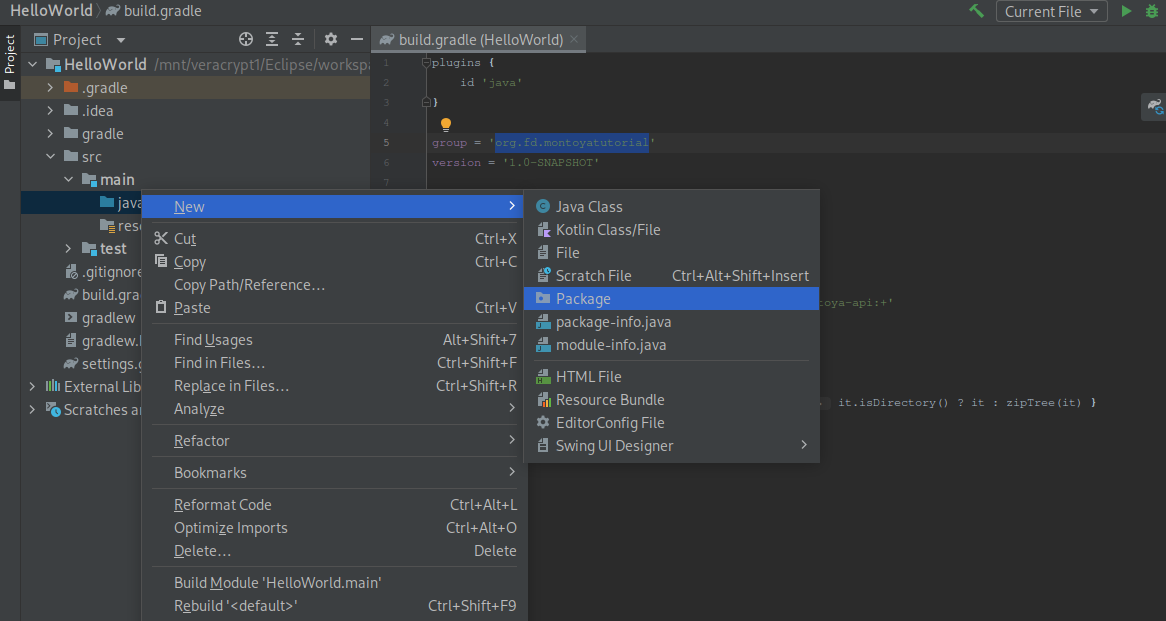
Then we can create a new package (that should match the value inserted in the “group” property of the build.gradle file):
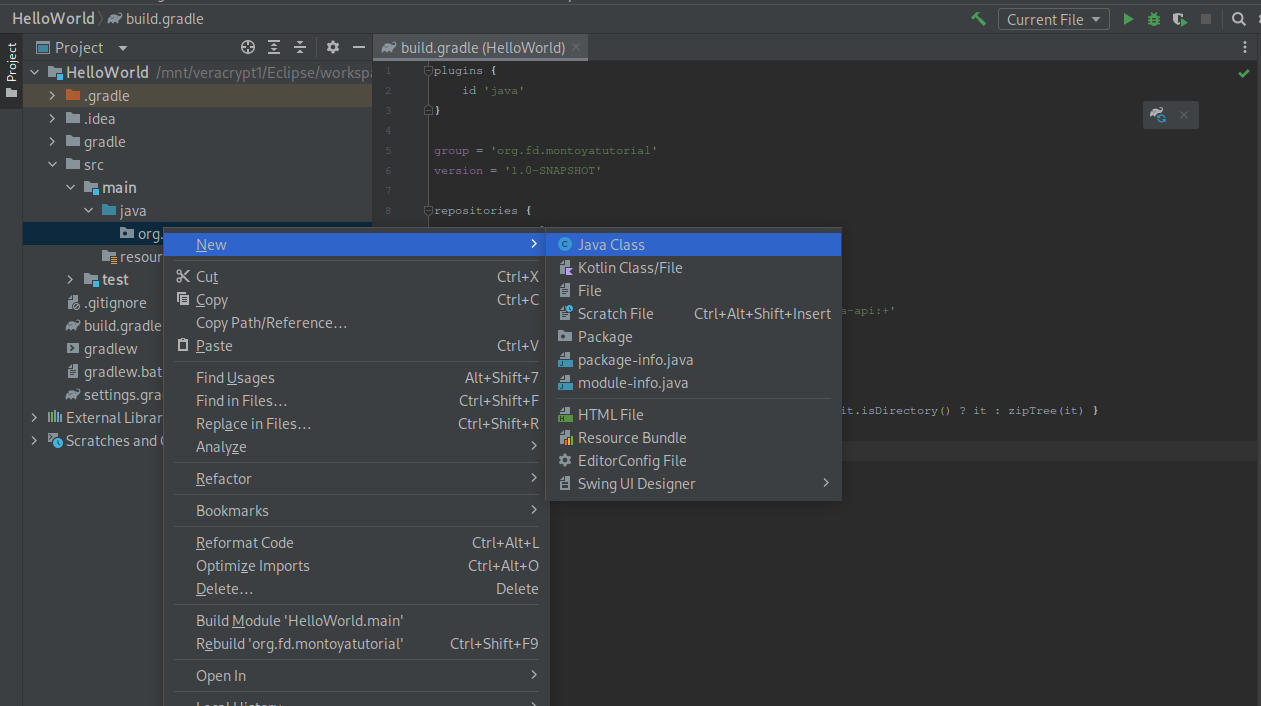
And then a new class that will contain the code of our plugin in the package we created:
Now let’s start with the basics of a Burp Suite Montoya extension. Here you can find the documentation of the Montoya API.
The main class of each extension must implement the burp.api.montoya.BurpExtension interface and consequently add the initialize method defined in the interface. IDEs are great for that and usually automatically fix common errors. For example here it is sufficient to implement the interface and the IDE will offer functionalities to add all the required methods for you. The result is the following:
package org.fd.montoyatutorial;

import burp.api.montoya.BurpExtension;
import burp.api.montoya.MontoyaApi;

public class HelloWorld implements BurpExtension {

    @Override
    public void initialize(MontoyaApi api) {

    }
}
In the initialize method we usually do a few things:
- Set the name of the extension
- Save a reference to the MontoyaApi object passed as argument because we will need this object to interact with all the tools of Burp Suite (API documentation)
- Execute the registration procedures necessary to extend the various Burp Suite tools
- Perform any necessary initialization procedures specific for our extension
The MontoyaApi object passed as argument to the initialize method is our entry point in the Burp Suite world, as we can see from the documentation:
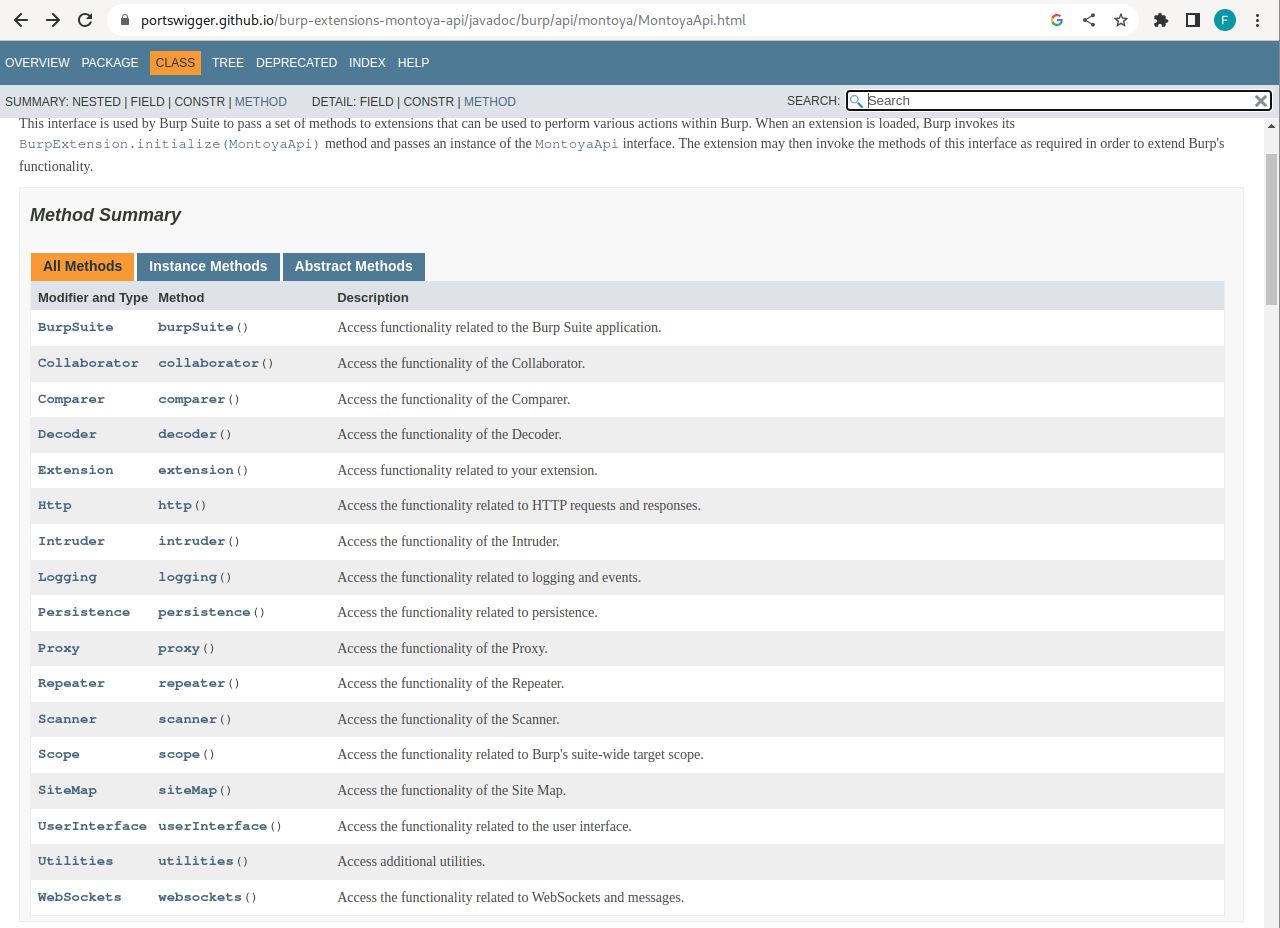
Starting with the MontoyaAPI object, we can effectively implement all types of plugins. We will see them gradually throughout the course, but I’ll give you a few of hints about what you can find in the various available objects:
- BurpSuite: this object can be used to import/export project configurations, shutdown Burp and retrieve specific information on the current Burp Suite instance.
- Collaborator: this object can be used to implement Burp Suite Collaborator functionality in our plugins.
- Comparer: at the moment, it is not possible to extend the Comparer tool in Burp Suite. The API allows only to send a request to the Comparer for manual analysis.
- Decoder: at the moment, it is not possible to extend the Decoder tool in Burp Suite. The API allows only to send a request to the Decoder for manual analysis. Frankly, there are better tools than the Decoder (which is quite old as a tool and hasn’t been updated recently), both as Burp Suite plugins (such as Decoder Improved) and external ones (like CyberChef).
- Extension: this object can be used to get information on the current extension, handling when the extension is unloaded by the user or to unload the extension from the code.
- Http: we will see this object in the next tutorial of the series. We can use this object mainly to create a plugin that inspects and/or tampers HTTP requests exiting from Burp Suite and HTTP responses entering in Burp Suite. Furthermore, other functions of this object can be used to retrieve the Cookie Jar (a Burp Suite container for cookies), to send a new HTTP request using Burp Suite and to register a custom session handler (if you don’t know what they are, I recommend taking a look at them because they are powerful tools in Burp Suite. You can find an example of what you can do with those rules here).
- Intruder: this object can be used to register an Intruder Payload Generator Provider (a provider that generates payloads that you can place in your insertion points during an Intruder attack) and/or an Intruder Payload Processor (processors process values before putting them in the insertion points, for example to add a particular encoding or encryption).
- Logging: this object can be used to log messages to the plugin stdout and stderr and to print informational, debug, warning, critical events in the Burp Suite event log.
- Persistence: this object can be used to store (and access) data within the Burp Suite project or within the Java preferences.
- Proxy: this object allows to create extensions for the Proxy tool in Burp Suite that can inspect and modify all requests and responses passing through it (only requests processed by the Proxy tool, unlike extensions created from an Http object, which process all the incoming/outgoing requests/responses from every tool in Burp Suite). You can control whether they should be intercepted (i.e., blocked and sent to the user for manual review and modification) or simply dropped. Furthermore, this object offers functions to retrieve the requests/responses and the messages contained in the Http History and in the WebSocket History.
- Repeater: at the moment, it is not possible to extend the Repeater tool in Burp Suite. The API allows only to send a request to the Repeater for manual analysis.
- Scanner: this object allows us to create extensions that can add new checks to Burp’s active and passive scanner. Extensions can also add mechanisms used by the scanner to determine the location of insertion points, for example, to perform scans on specific formats of the request body that Burp Suite may not be aware of. Additionally, we can build extensions able to receive notifications whenever a vulnerability is detected (for instance, we can create a plugin that sends an email notification whenever a high or critical vulnerability is found). Finally, some functions of this object can be used to generate reports for a subset of issues and to start a specific scan or crawl. A little counterintuitive (but aligned with current Burp Suite GUI), but the list of found issues cannot be accessed from this object, but only from the SiteMap (and you need this object also to report a new issue).
- Scope: this object allows to check if a URL is in scope, to add/remove specific URLs to/from the scope and to register an extension that will be notified when the scope changes.
- SiteMap: this object allows to get a list of requests/responses in the sitemap, add requests to it, get a list of the issues of URLs in the sitemap, and add a new issue.
- UserInterface: this object controls all the interactions with the Burp Suite GUI. It can be used to add custom tabs to Burp Suite, add custom HTTP requests/responses or WebSocket editors, add custom items to the context menu (the one that pops up with a right click of the mouse), and add entries to the menu bar. Furthermore, we can use functions of this object to access to and customize many graphical items of Burp Suite, like themes, fonts, etc.
- Utilities: here we have many utilities that simplify common tasks we face when we write an extension. At the moment we have utilities to work with Base64 encoding, Byte structures, compression protocols, cryptographic protocols (only digest, but maybe it will be improved in future), HTML encoding, numbers, random primitives, strings, and URLs.
- WebSockets: We can use this object mainly to create a plugin that inspects and/or tampers WebSocket messages exiting and entering from/in Burp Suite. Furthermore, we can create new WebSockets.
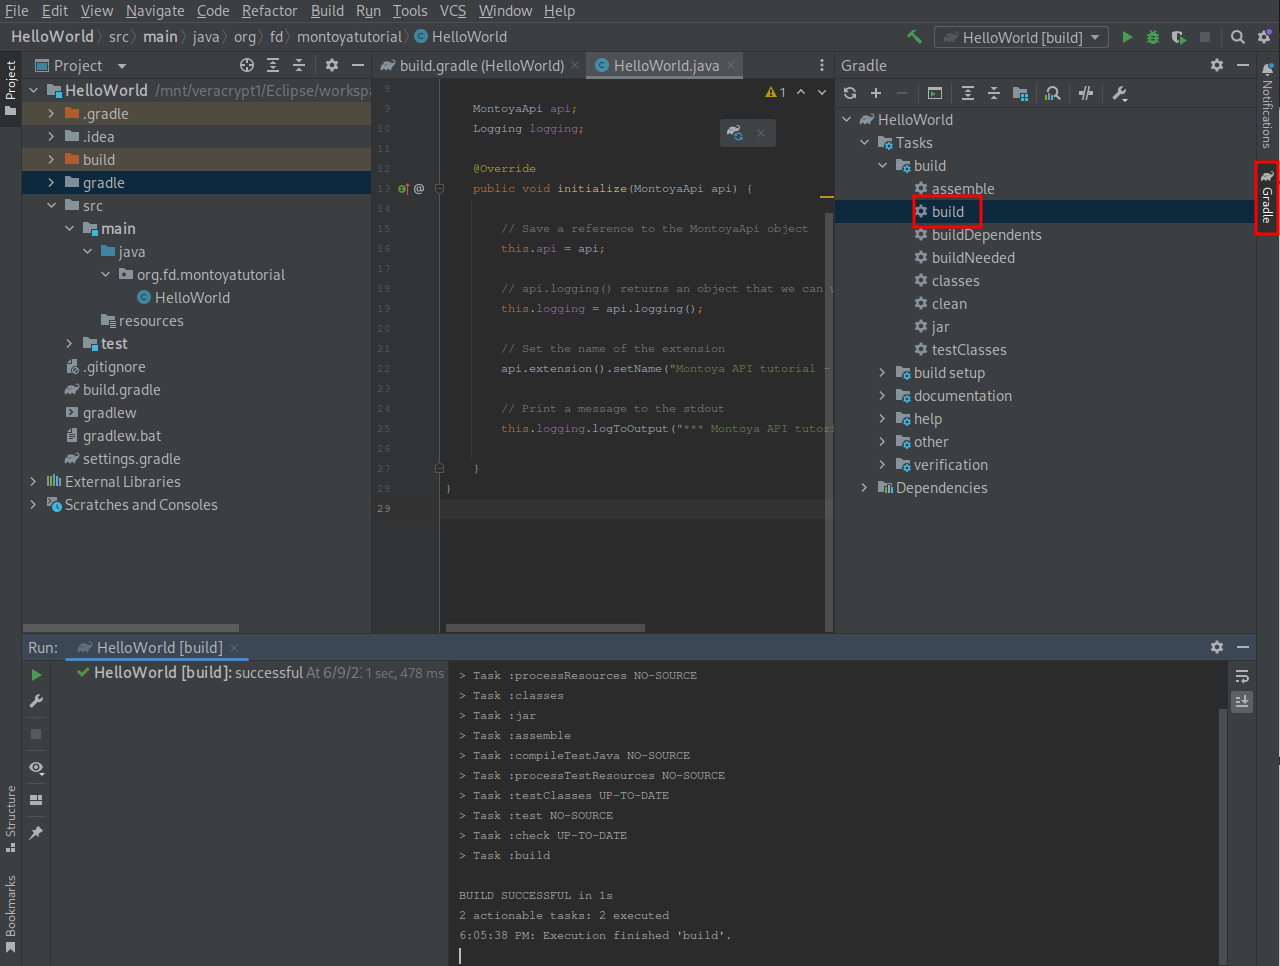
Well, let’s return to our current topic. Our useless “HelloWord” extension will simply set the name, save some references and print a “Hello World” message to the standard output of the plugin. The following code should be quite self-explanatory:
package org.fd.montoyatutorial;

import burp.api.montoya.BurpExtension;
import burp.api.montoya.MontoyaApi;
import burp.api.montoya.logging.Logging;

public class HelloWorld implements BurpExtension {

    MontoyaApi api;
    Logging logging;

    @Override
    public void initialize(MontoyaApi api) {

        // Save a reference to the MontoyaApi object
        this.api = api;

        // api.logging() returns an object that we can use to print messages to stdout and stderr
        this.logging = api.logging();

        // Set the name of the extension
        api.extension().setName("Montoya API tutorial - Hello World");

        // Print a message to the stdout
        this.logging.logToOutput("*** Montoya API tutorial - Hello World loaded ***");

    }
}
In the extension we set the name and print a message to the standard output. As we will see shortly, we can choose where we want stdout and stderr to be printed when the plugin is loaded directly from Burp Suite interface.
Now it’s time to build the plugin. From the “Gradle” menu at the right, we select “Tasks -> build -> build” to create our plugin archive.
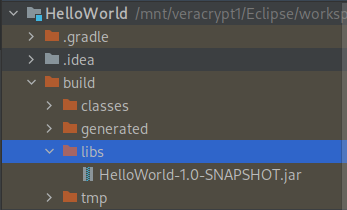
The plugin will be saved in the “build -> libs” folder of the project:
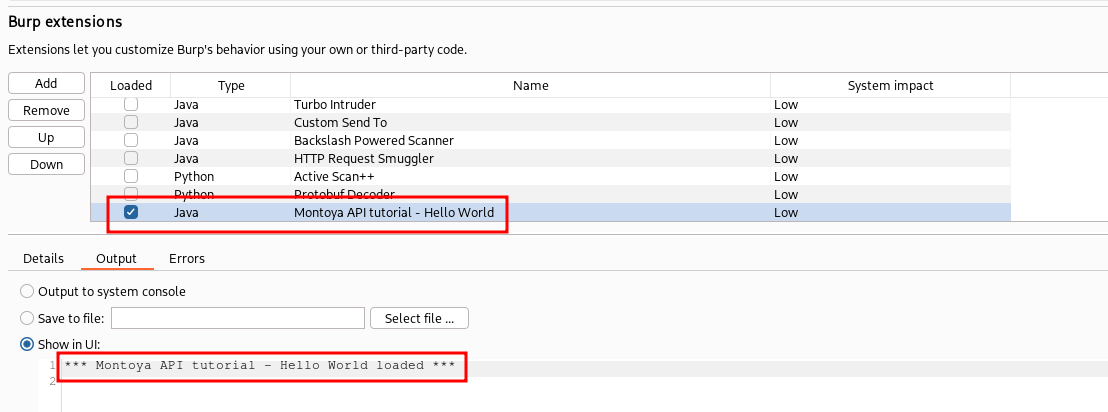
We can try our plugin by importing it in Burp Suite from the “Extensions” -> “Installed” pane:
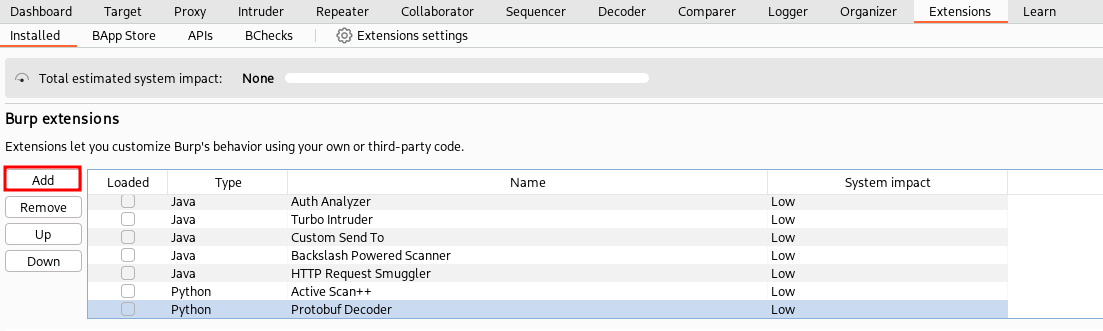
Compiled apps should be installed as described. The “Manual install” button present in the “Extensions” -> “Bapp Store” pane serves a different purpose: it can be used to install apps downloaded from the web page of Burp Suite official Bapp Store.
The loading pane that pop-up allows us to choose where to redirect the standard output and standard error. We can choose between Burp Suite UI, system console, and file:
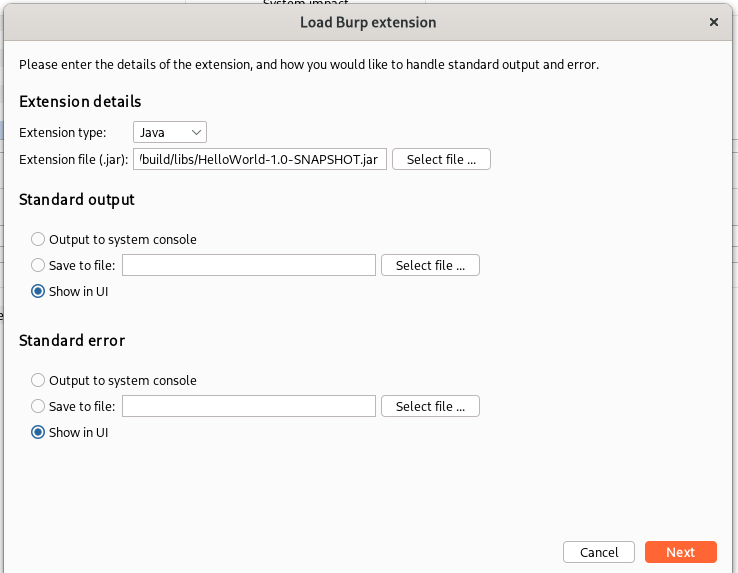
Leaving the default, we can see that our extension has been loaded and our message has been printed on the stdout:
Hint: when developing a plugin, you may need to perform operations like building and loading the new plugin into Burp Suite multiple times. If the newly generated plugin has the same name and path as the previous one, you can simply unload and reload it by toggling the “Loaded” flag on the left side of the extension type, without removing it and then adding it again. You can further optimize the process by simultaneously performing unload and load operations in one click. By holding down the CTRL key and clicking on the “Loaded” flag, both unload and reload operations are performed at once.
Great, for this first article, that’s all. We have created a fantastic but completely useless plugin. However, I believe that an introduction to the development environment can be helpful for those starting to develop extensions. In the next article, we will see how to view and edit all the HTTP requests and responses entering and leaving Burp Suite. In other words, we will see how to develop extensions that you will commonly need during your daily penetration testing activities. And if you will write a useful extension for the community, you can also submit it to the Burp Suite team to have it included in the extensions available for download from the BApp Store.
Full example code can be downloaded from my GitHub repository.
Cheers!