In this article, I’ll show how to detect and bypass some basic security checks in the application’s DLLs, such as the root check, to be able to start pentesting an android mobile application written in Xamarin.
Backstory
I was not expecting Xamarin. I’m quite new to the mobile application pentesting world and it was a sunny bright day when I decided to pick an app from a bug bounty program thinking “this app looks like a good candidate to flex my new skills”. Turned out it was quite different from my previous experiences. Not so sunny anymore.

There were a few articles online on Xamarin app pentesting but none seemed to tackle all the complexities I had faced from start to end. So here I am, hopefully helping someone who just got Xamarined in the face.
Unpacking and decoding the apk
Nothing special here, just preparing the field by unpacking and decoding the apk. I used Apktool:
$ java -jar apktool_2.6.1.jar d -o /<path for output>/apktoolOut /<path to apk>/XamarinApplication.apk
Discovery
My starting point in this case was an error message that the application displayed after recognizing I was using a rooted device. Searching for strings is usually a very quick way to find the relevant code behind a specific function. However, pay attention that your search includes also archives, binaries and such. Just so, by searching the error string returned by the root check, I discovered that the root check functionality I was searching for was inside a binary file called assemblies.blob.
With a bit of googling I learned that this file contains the DLLs used by the application and, as it turned out, this particular application had actually most of its security logic implemented in these DLLs.
Unpacking the assemblies.blob
To unpack the assemblies.blob I tried a few different tools but settled for pyxamstore because it also allowed to repack the blob after tampering with the DLLs. This tool must be launched on the folder containing both the assemblies.blob and the assemblies.manifest files:
$ pyxamstore unpack -d apktoolOut/unknown/assemblies/
As output this tool creates an assemblies.json, which will be needed for repacking, and a folder named “out” containing all the DLLs.
Now, searching again for the error string I could locate the exact DLL that contained it.
Tampering the DLL
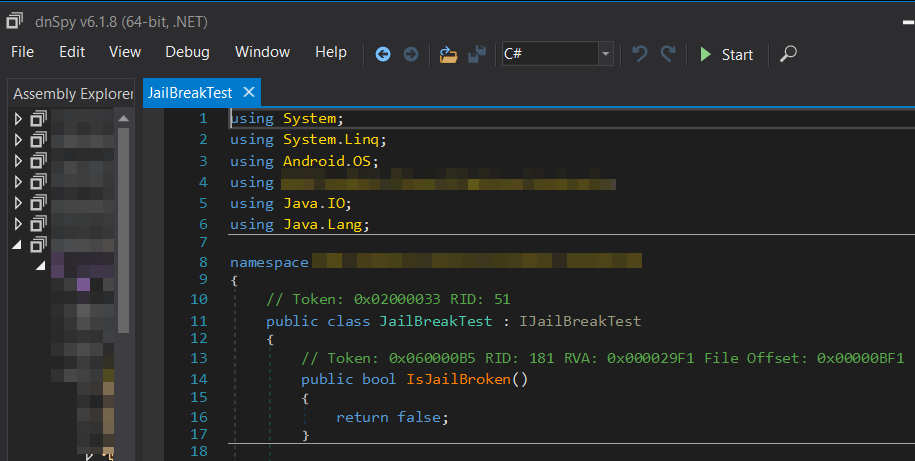
To decompile, edit and recompile the DLL I used dnSpy. Turned out it was quite easy to bypass the root check. Starting from my error string I eventually found a class named IsJailBroken(). All I had to do was replace all code with a “return false”.
To edit the code simply right click on it and select “Edit Class” then hit “Compile”.
When done with all the code edits go to File > Save Module. I left the default settings with Module Type: DLL and overwrote the original file.
Now the annoying part, making it all work again.
Repacking assemblies.blob
I repacked the blob with pyxamstore, running it in the folder that had the assemblies.json and the “out” folder with the tampered DLL:
$ pyxamstore pack
In the folder generated by Apktool I replaced the original assemblies.blob and assemblies.manifest files with those generated by the pyxamstore pack command. In my case they were in a folder named /unknown/assemblies/.
Repacking the apk
I repacked the application with Apktool as follows:
$ java -jar apktool_2.7.0.jar b -o /<path to repacked output>/XamarinApplication.apk /<path to Apktool generated folder>/apktoolOut
Resigning the apk
Finally, the apk needs to be signed and reinstalled on the phone. I had some trouble with the whole manual signing, zip aligning, etc. process but managed to make it work very easily by using the tool uber-apk-signer:
$ java -jar uber-apk-signer-1.3.0.jar --apks /<path to repacked apk>/XamarinApplication.apk
In my case I had the additional complexity that the application was actually an app bundle divided into 5 apks, that looked something like this:
- XamarinApplication.apk
- split_config.arm64_v8a.apk
- split_config.en.apk
- split_config.it.apk
- split_config.xxhdpi.apk
To be able to reinstall the application and make it work, all 5 apks had to be resigned.
Installing the apk
To install the repacked application I had to create an install session via adb. First I had to verify the size of all the newly signed apks:
rosemary:/sdcard/Download # ls -l

total 276713

-rw-rw---- 1 root everybody  31771075 2023-04-06 11:39 XamarinApplication-aligned-debugSigned.apk

-rw-rw---- 1 root everybody 106548220 2023-04-06 17:45 split_config.arm64_v8a-aligned-debugSigned.apk

-rw-rw---- 1 root everybody     57690 2023-04-06 17:45 split_config.en-aligned-debugSigned.apk

-rw-rw---- 1 root everybody     33114 2023-04-06 17:46 split_config.it-aligned-debugSigned.apk

-rw-rw---- 1 root everybody   3242770 2023-04-06 17:47 split_config.xxhdpi-aligned-debugSigned.apk
The sum of the sizes of all the apks is needed to create the installation session. In this case the total space needed was 31771075+106548220+57690+33114+3242770= 141652869, so from inside the adb shell I first created the install session:
# pm install-create -S 141652869
This command returned the session id. Next the following command was run for all 5 apks to install:
# pm install-write -S <size of the apk> <session id> <index> /<apk path>/<apk name>
So for example to install the first apk, XamarinApplication-aligned-debugSigned.apk:
# pm install-write -S 31771075 1164635543 0 /sdcard/Download/XamarinApplication-aligned-debugSigned.apk
After all the apks were written in the session the installation could be finalized with the following command:
# pm install-commit <session id>
In my case the repacked application worked correctly and the root check was bypassed!