- Setting up the environment + Hello World
- Inspecting and tampering HTTP requests and responses
- -> Inspecting and tampering WebSocket messages
- Creating new tabs for processing HTTP requests and responses
- Adding new functionalities to the context menu (accessible by right-clicking)
- Adding new checks to Burp Suite Active and Passive Scanner
- Using the Collaborator in Burp Suite plugins
- BChecks – A quick way to extend Burp Suite Active and Passive Scanner
- … and much more!
Hi there!
In the last article of the series we learned how to develop the most commonly used type of Burp extensions during a penetration test, namely HttpHandler plugins (or HttpListener in the old APIs). These plugins allow us to inspect or modify all HTTP requests exiting from every tool in Burp Suite and all incoming responses. Today we will see how to do a similar thing when our target application uses WebSockets.
WebSocket is a stateful full-duplex protocol supported by modern browsers, usually employed in applications that need real-time updates. Until a few years ago, Burp Suite only partially supported WebSockets (I used OWASP Zap for WebSocket testing instead, as it supported them better). Then Burp Suite improved its support over this technology and now WebSockets are well integrated in the Proxy and Repeater tools.
Speaking of extensions, WebSocket support was introduced only with the Montoya API, which is another reason to choose them over the previous APIs, even though they don’t currently support Python and Ruby. Over the years, I’ve come across many applications that used WebSockets and for which I needed an extension (which was often already available publicly for the HTTP counterpart), and the lack of support for this technology was a sore point. Now, as we will see, we can finally inspect and modify WebSocket requests in a similar way to what we did for HTTP requests.
As always, we start from a test scenario that uses WebSocket. For the purpose, I made a few small changes in one of the examples of the Flask-SocketIO project (an integration of SocketIO for Flask). The app.py example of that project runs a simple chat server using SocketIO and it is perfect for our purposes, because it can use WebSocket for communications.
The modified test application is available in my GitHub repository, along with the extension code we are going to create. The following changes have been made to the SocketIO example, in order to fit our needs:
- The SocketIO applications (including our test one) can use many different async modes; some of them uses WebSockets while others use HTTP requests. I set a mode (named eventlet) that uses WebSocket, adding also the required modules to the Python requirements.
- The test application continuously sends back and forth ping requests and responses. I commented that code in order to limit the number of WebSocket messages and simplify our scenario.
- A hash has been added to the “Echo” functionality of our chat, that prints the messages we send at the bottom of the page. Now the JavaScript code calculates a SHA-256 hash of the message and attaches the hash to the message. The backend checks if the hash if correct. If not, it returns an error message instead of the message sent by the user.
This is the edited code of the backend that checks for the hash of the message:
[...]
@socketio.event
def my_event(message):
    session['receive_count'] = session.get('receive_count', 0) + 1

    # Edited by fd for test case

    if 'hash' in message:
        calculated_hash = sha256(message['data'].encode('utf-8')).hexdigest()
        if(message['hash'] == calculated_hash):
            emit('my_response',
                 {'data': message['data'], 'count': session['receive_count']})
        else:
            emit('my_response',
                 {'data': 'INVALID SIGNATURE', 'count': session['receive_count']})

    else:

        session['receive_count'] = session.get('receive_count', 0) + 1
        emit('my_response',
            {'data': message['data'], 'count': session['receive_count']})
[...]
The test application can be executed as follows:
- (optional) Create a Python virtual environment and activate it
python -m venv venvsource venv/bin/activate
- Install requirements
pip install -r requirements.txt
- Run the application
python app.py
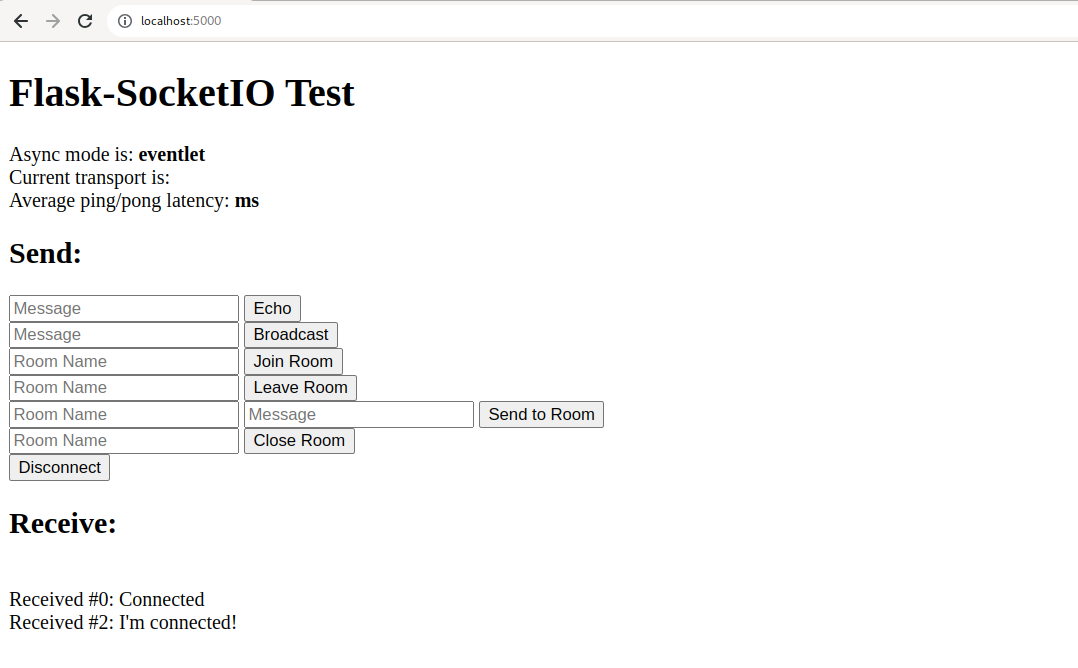
- The application can be reached at http://localhost:5000/
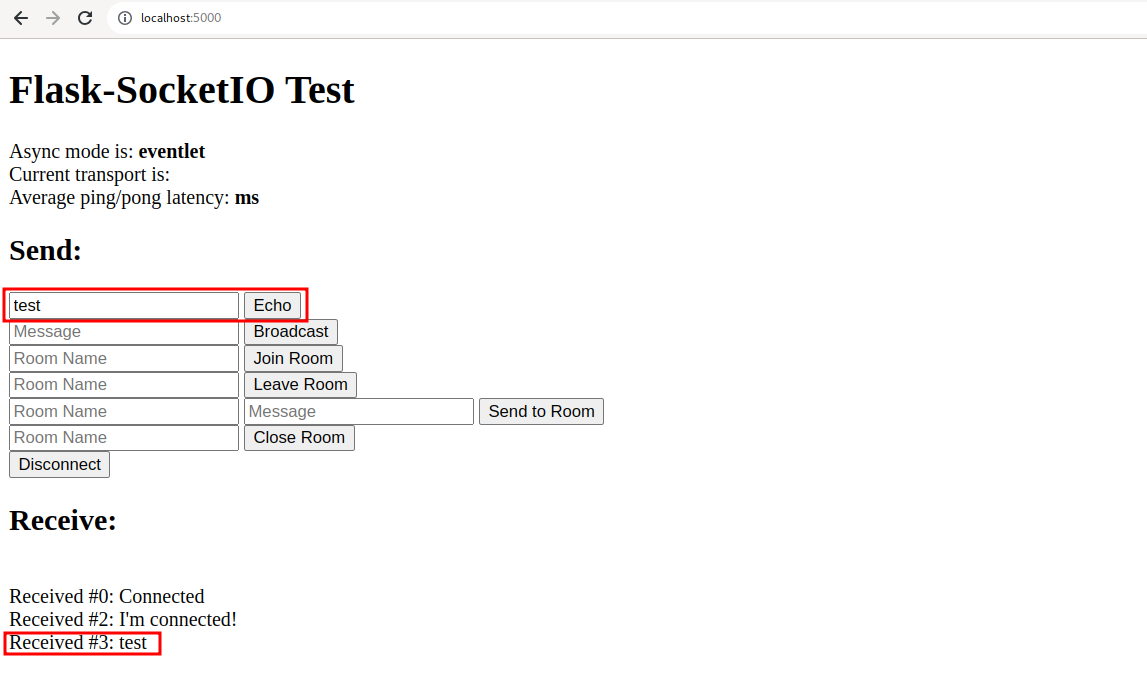
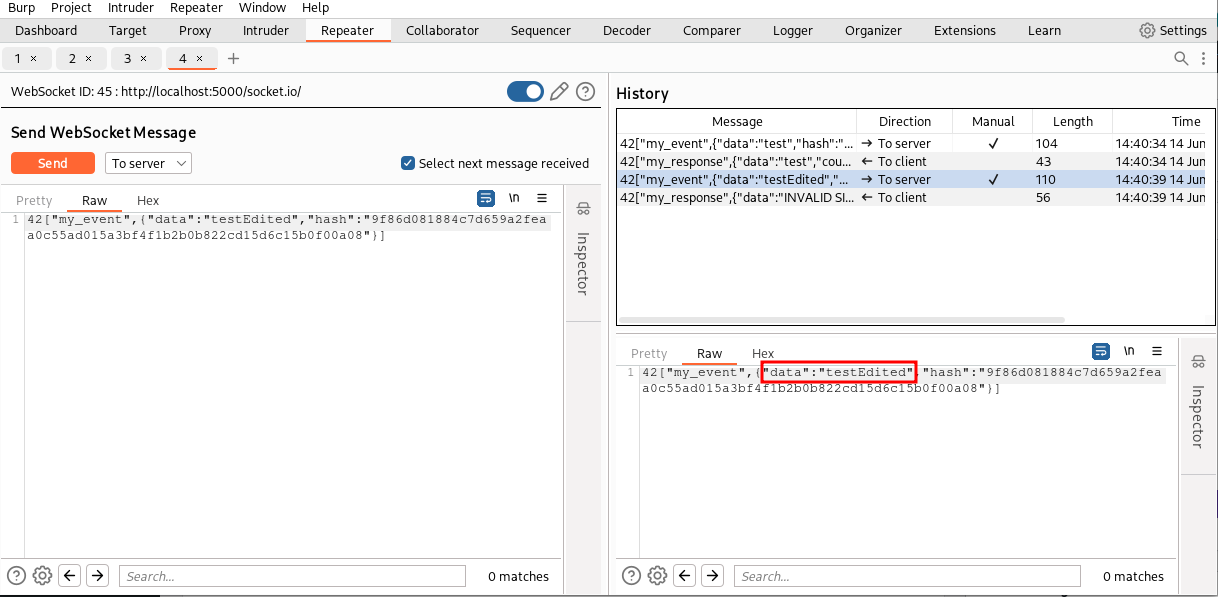
We can try to send a message using the “Echo” functionality from the web GUI:
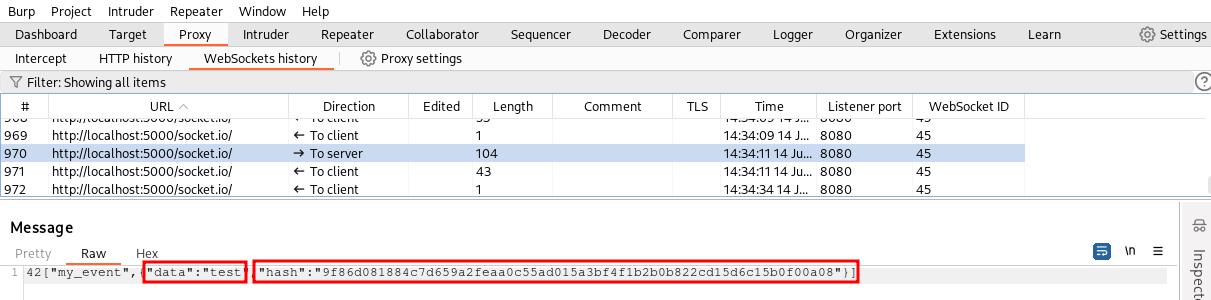
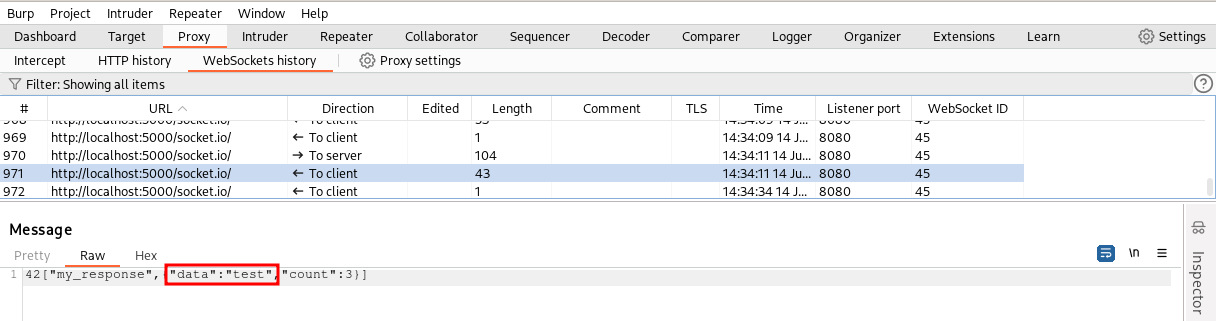
By inspecting the WebSocket traffic in Burp Suite we can see that our browser sent a message containing the “test” string and its SHA256 hash (the hash is computed only on the value of the data field) and received a message with the same string (unlike HTTP protocol, Websockets don’t have requests and corresponding responses, but only client-server messages and server-client messages without an explicit relation among them).
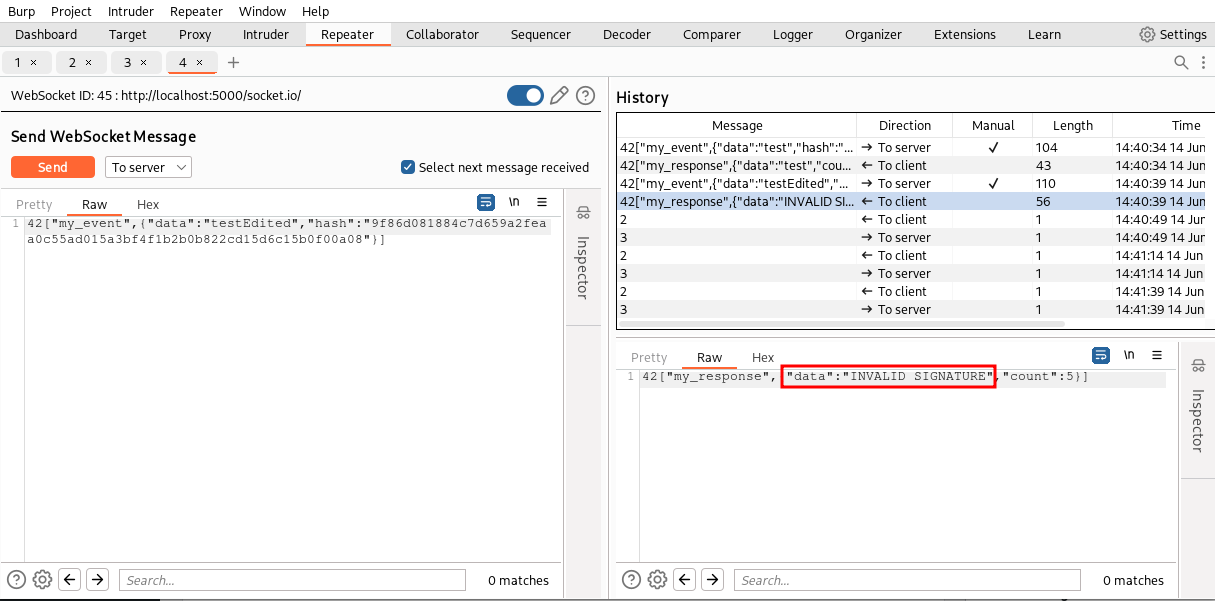
If we try to sent our message to the Repeater tool and change the value of the data without regenerating the SHA256 signature, the backend will send back an “INVALID SIGNATURE” message.
Great! Now we have a working scenario. Let’s implement a Burp Suite extension similar to the one we implemented in the previous article of the series. Our extension will simply regenerate the hash of all WebSocket messages from our browser to the backend service. This way we can intercept and tamper messages or use the Repeater without having to manually generate the hash on each message we send.
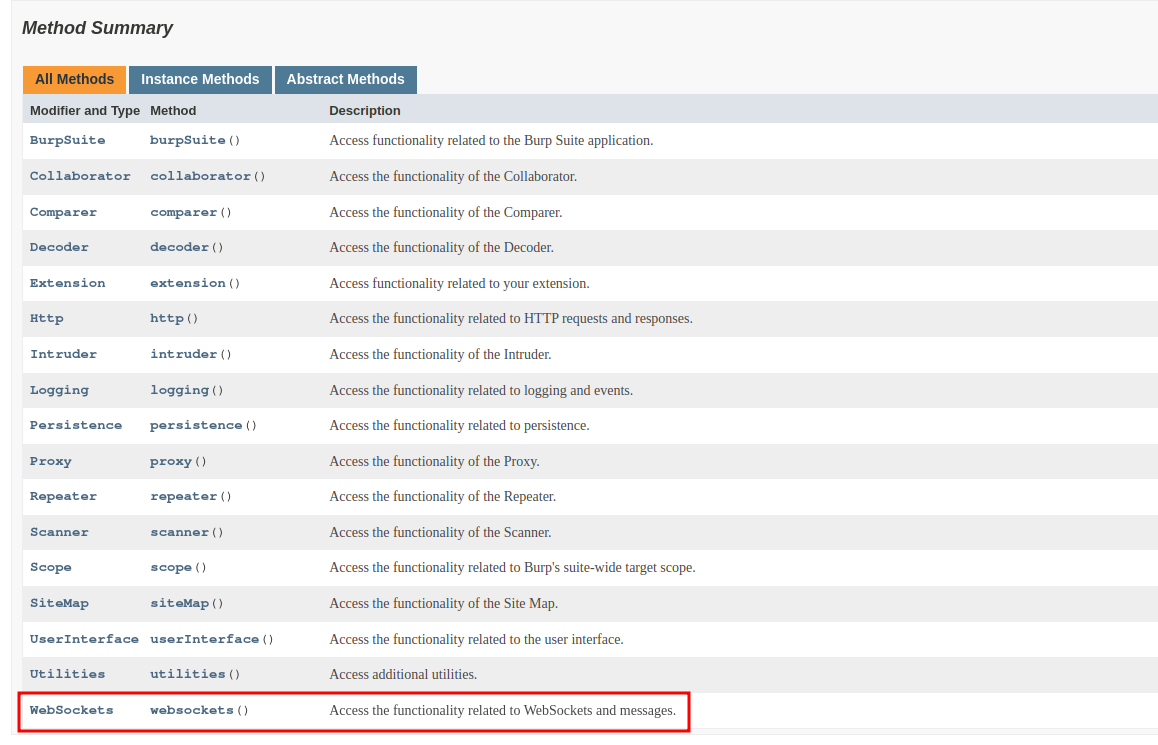
As always, we start from our Hello World project we built in part 1 of the tutorial. To create an extension for the WebSockets we have to look in the homonymous section of the MontoyaApi interface:
As in the previous example (and in all the future ones) we always have to register a listener, supplying some handling code that will be called by Burp Suite once a specific event occurs (a WebSocket is created in this example).
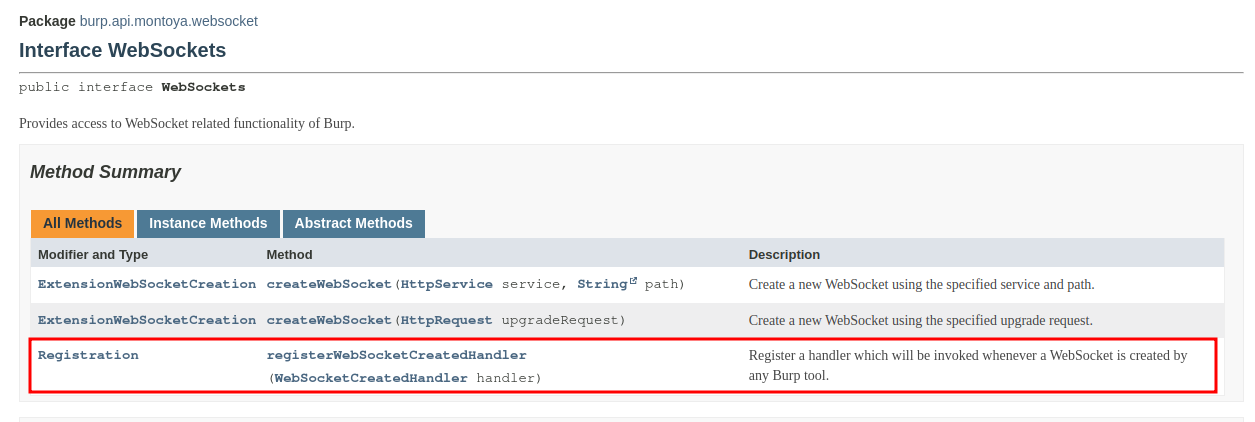
The WebSocket process is slightly more complex compared to HTTP one as it requires registering two different listeners. In the HTTP scenario, we had a single listener notified when a HTTP request/response left/entered Burp Suite. When we work with WebSocket we cannot directly set up a listener for WebSocket messages but we have to set a first listener that is called when a WebSocket is created in one of Burp Suite’s tools (through a specific “upgrade” HTTP request with a some dedicated HTTP headers, refer to Wikipedia or other sources to learn how WebSockets work). When a WebSocket is created, our listener is called and using the information included in the arguments we can registered a second listener that can process messages of that particular WebSocket channel.
Let’s start with the first listener. In order to register our plugin we have to implement a class that extends the interface WebSocketCreatedHandler.
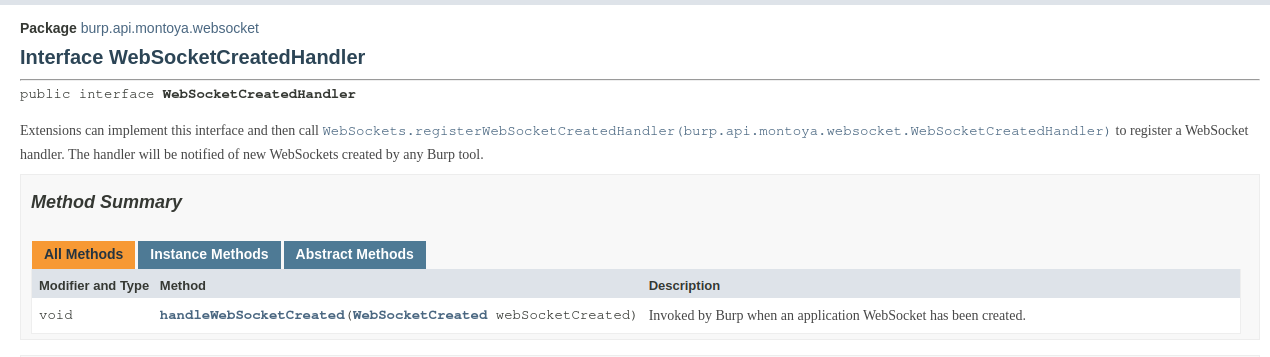
That class must implement the method handleWebSocketCreated and we will also add a constructor to save a reference to the MontoyaApi object supplied to the plugin during the initialization. This object allows to interact with all Burp Suite components.
import burp.api.montoya.MontoyaApi;
import burp.api.montoya.logging.Logging;
import burp.api.montoya.websocket.WebSocketCreated;

public class CustomWebsocketCreatedHandler implements WebSocketCreatedHandler {

    MontoyaApi api;
    Logging logging;

    public CustomWebsocketCreatedHandler(MontoyaApi api) {
        // Save a reference to the MontoyaApi object
        this.api = api;
        // api.logging() returns an object that we can use to print messages to stdout and stderr
        this.logging = api.logging();
    }

    @Override
    public void handleWebSocketCreated(WebSocketCreated webSocketCreated) {
        // TODO: Do something when a WebSocket is created
    }

}
The handleWebSocketCreated will be called when a WebSocket is created in one of the Burp Suite tools, giving to our listener code an object of type WebSocketCreated that offers the following three functions:
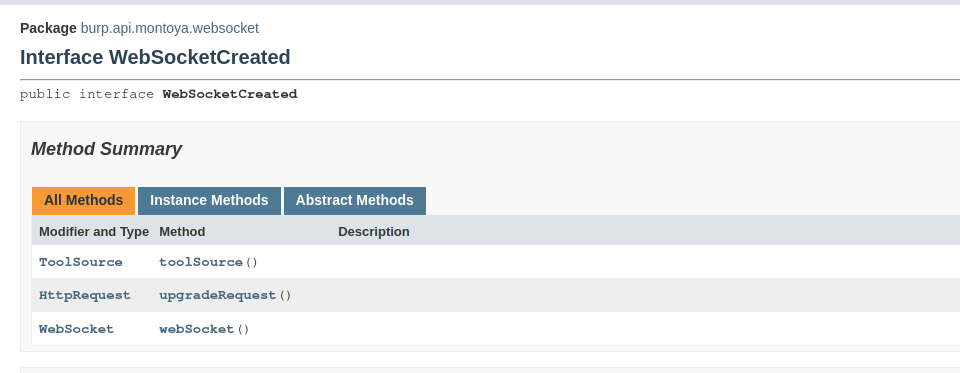
Through the three methods of this object, we can:
- toolSource(): know which Burp Suite created the WebSocket
- upgradeRequest(): Get the corresponding Upgrade HTTP request that created the WebSocket (refer to Wikipedia for more information on how WebSockets work)
- webSocket(): Get a reference to the actual WebSocket that has been created, reference that we need to inspect and tamper the messages that will be exchanged on the WebSocket
The webSocket method returns an object that offers a function to register the listener that we need to access to the messages of the WebSocket, as we can see from the documentation of the object:
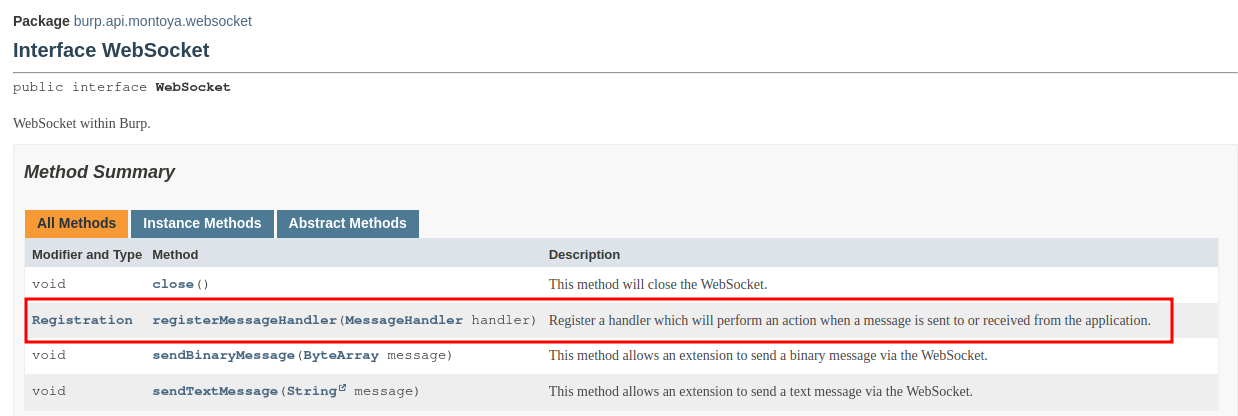
As usual, we have to create a class that will handle the event. In this case, our handler will be called when one message of the WebSocket is sent or received. Our handler, as we can see in the documentation, must implement the MessageHandler interface:
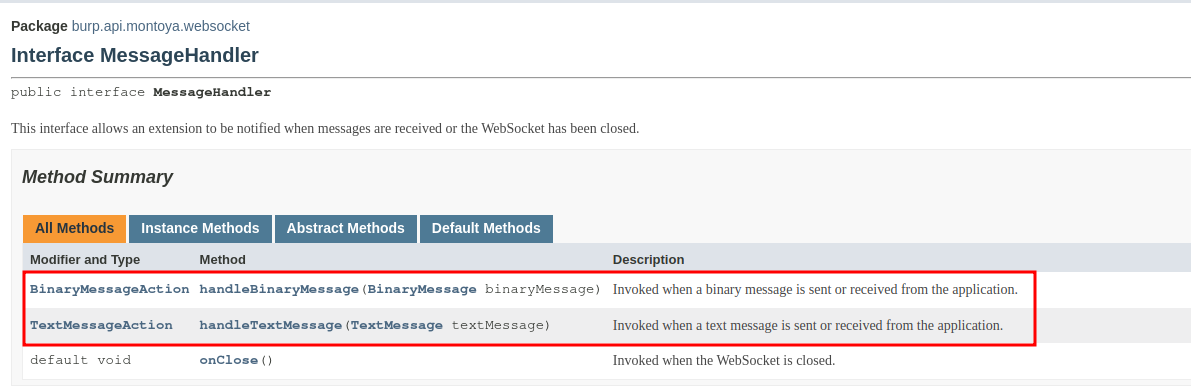
As we can see, we have to implement two functions (with an optional third one): one to handle binary messages (handleBinaryMessage) and one to handle text messages (handleTextMessage). The skeleton of our new object is the following (with the usual constructor that saves a reverence to the MontoyaApi object supplied during initialization):
import burp.api.montoya.MontoyaApi;
import burp.api.montoya.logging.Logging;
import burp.api.montoya.websocket.*;

public class CustomWebsocketHandler implements MessageHandler {

    MontoyaApi api;
    Logging logging;

    public CustomWebsocketHandler(MontoyaApi api) {
        // Save a reference to the MontoyaApi object
        this.api = api;
        // api.logging() returns an object that we can use to print messages to stdout and stderr
        this.logging = api.logging();
    }

    @Override
    public TextMessageAction handleTextMessage(TextMessage textMessage) {
         // TODO - Hanlde text message
         return TextMessageAction.continueWith(textMessage);
    }

    @Override
    public BinaryMessageAction handleBinaryMessage(BinaryMessage binaryMessage) {
        // TODO - Handle binary message
        return BinaryMessageAction.continueWith(binaryMessage);
    }
}
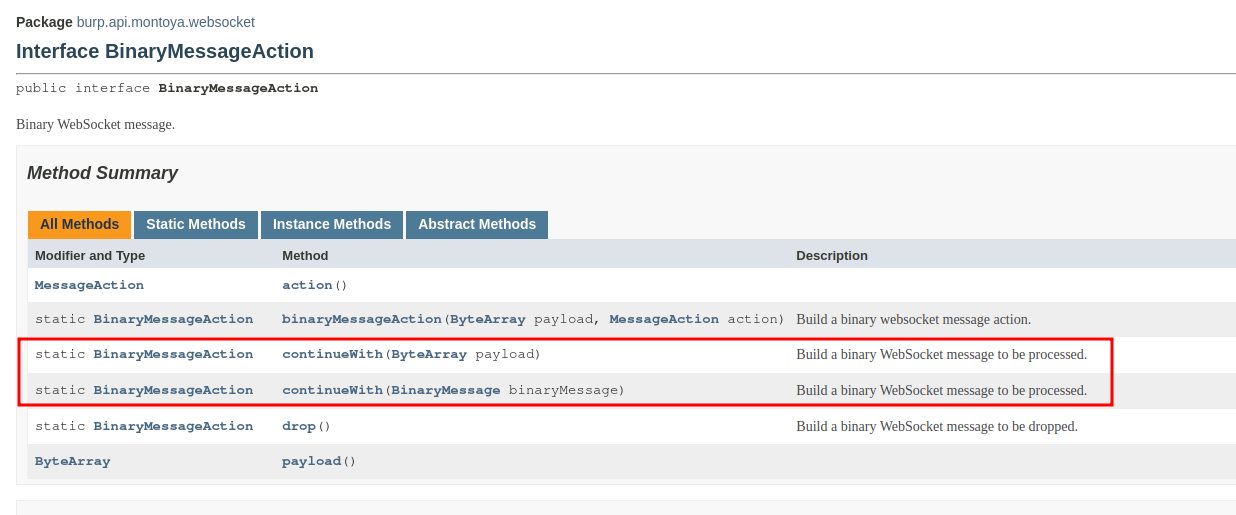
As you can see, handleBinaryMessage and handleTextMessage should return respectively an object of type BinaryMessageAction and TextMessageAction. As we saw in the previous article, when we should return an object of a specific type, first we have to look at the documentation of the corresponding interface. Usually you can find static methods that will create necessary objects for you:

We will populate our skeleton in a while, but first let’s register the handler we just coded. We have to register an instance of the class we just created in the object we defined before (the one that handles the creation of a new WebSocket):
public class CustomWebsocketCreatedHandler implements WebSocketCreatedHandler {

    [...]

    @Override
    public void handleWebSocketCreated(WebSocketCreated webSocketCreated) {
        // Get a reference to the created WebSocket
        WebSocket websocket = webSocketCreated.webSocket();
        // Register a listener to handle bidiretional messages of the WebSocket
        websocket.registerMessageHandler(new CustomWebsocketHandler(api));
    }

}
Secondly, we have to register in the initialize method of the main class of the plugin the handler that will handle the creation of a new WebSocket:
public class WebsocketExample implements BurpExtension {

    [...]

    @Override
    public void initialize(MontoyaApi api) {

        [...]

        // Register our websocket handler
        api.websockets().registerWebSocketCreatedHandler(new CustomWebsocketCreatedHandler(api));

    }
}
Well, our skeleton is ready. First, we will write some code that simply prints the messages that pass through our extension to verify that everything is working correctly. We have two functions, handleTextMessage and handleBinaryMessage, that will be called when a message of the corresponding type is being processed (binary or text). The TextMessage and BinaryMessage, objects supplied as argument contain the actual message and the its direction (client to server or server to client).
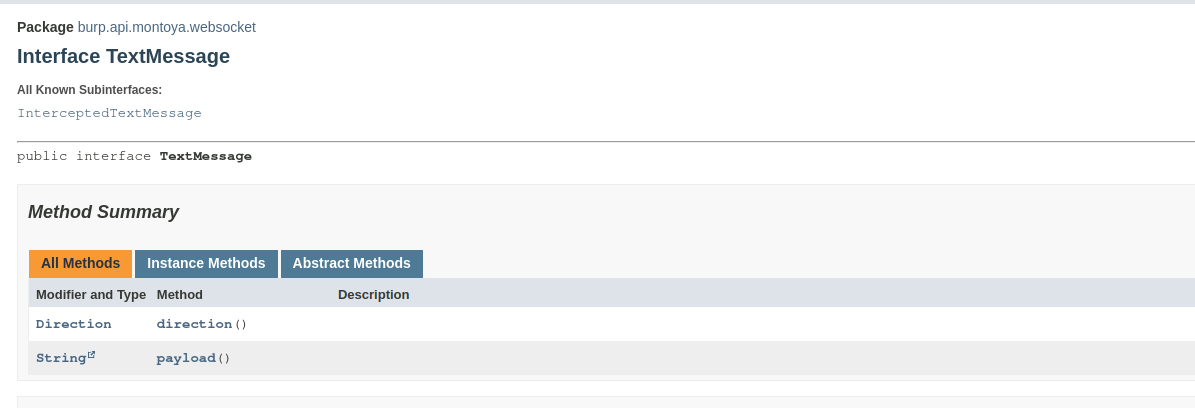
Using these objects we can write some simple logging code (the binary payload is printed encoded in Base64 because it may contains non-printable characters, using one utility class offered by Burp Suite):
[...]

@Override
public TextMessageAction handleTextMessage(TextMessage textMessage) {

    //DEBUG - Print text messages

    // Extract actual message and direction (client->server or server->client) from the TextMessage object
    String payload = textMessage.payload();
    Direction direction = textMessage.direction();

    if (direction == Direction.CLIENT_TO_SERVER) {
        logging.logToOutput("T ==========>>");
    } else {
        logging.logToOutput("T <<==========");
    }

    logging.logToOutput(payload);
    logging.logToOutput("");

    // Return orignal text message
    return TextMessageAction.continueWith(textMessage);

}

@Override
public BinaryMessageAction handleBinaryMessage(BinaryMessage binaryMessage) {

    //DEBUG - Print binary messages

    // Extract actual message and direction form BinaryMessage object
    ByteArray payload = binaryMessage.payload();
    Direction direction = binaryMessage.direction();

    if(direction == Direction.CLIENT_TO_SERVER) {
        logging.logToOutput("B ==========>>");
    } else {
        logging.logToOutput("B <<==========");
    }

    logging.logToOutput(base64Utils.encodeToString(payload));
    logging.logToOutput("");

    // Return original message
    return BinaryMessageAction.continueWith(binaryMessage);

}

[...]
After building our plugin and loading it (refer to the first article for references on this process), we can reload the web page of our test app, try the “Echo” functionality and inspect the stdout of the plugin:

Highlighted in the screenshot, our message (payload: “aaaa”) with its hash and the message sent by the backend as response. Both messages are text messages (and not binary ones), so we will implement the hash logic only in the handleTextMessage function (but the process is the same also for binary messages).
The logic will be similar to the one described in the previous article but this time we will use regexes to extract data from the message (we can also extract the JSON portion and parse it but for a tutorial regexes are good enough). In details:
- We process only messages with the text “my_event” (we can see that the ones sent by the “Echo” functionality of the web application always contain the string “my_event”) and direction client to server
- Using a regex we extract the actual message (data field) and its hash (hash field)
- We calculate the SHA-256 hash using the same Burp Suite utility employed in the previous tutorial
- We replace the old hash with the new one
- We print the edited message (we will see in a while why it is important to print the edited message also in the final version of the plugin)
- We send to the backend the edited message instead of the original one
Here is the code:
@Override
public TextMessageAction handleTextMessage(TextMessage textMessage) {

    // Extract actual message and direction (client->server or server->client) from the TextMessage object
    String payload = textMessage.payload();
    Direction direction = textMessage.direction();

    // 1 - Take only messages containing my_event string sent from client to server
    if(payload.contains("my_event") && direction == Direction.CLIENT_TO_SERVER) {

        // 2 - Extract with a regex the actual message in the field "data" and the hash in the field "hash"
        Pattern p = Pattern.compile(".*\"data\"\\:\"([^\"]+)\".*\"hash\"\\:\"([^\"]+)\"");
        Matcher m = p.matcher(payload);

        // Check if the message has the expected structure, otherwise return original message
        if(m.find() && m.groupCount() == 2) {

            // 3 - Calculate SHA256 hash
            ByteArray sha256hash = cryptoUtils.generateDigest(ByteArray.byteArray(m.group(1)), DigestAlgorithm.SHA_256);

            // Convert SHA256 bytes to a HEX string, using a Java way
            String digest = String.format("%064x", new BigInteger(1, sha256hash.getBytes()));

            // 4 - Create a message with the hash updated
            String newMessage = payload.replaceAll(m.group(2), digest);

            // 5 - Print edited message
            logging.logToOutput("* Message with updated hash:");
            logging.logToOutput(newMessage);

            // 6 - Return the edited message
            return TextMessageAction.continueWith(newMessage);

        } else {

            logging.logToOutput("Data and hash not found. Returning original message.");
            return TextMessageAction.continueWith(textMessage);
        }

    }

    // Return orignal text message
    return TextMessageAction.continueWith(textMessage);

}
Now we can build and try our plugin. We refresh the web page, use the “Echo” functionality to send the text string “aaaa”, send the message to the WebSocket Repeater, change the value of the data field to “bbbb” without generating a new hash and see if edited messages are accepted by the backend:
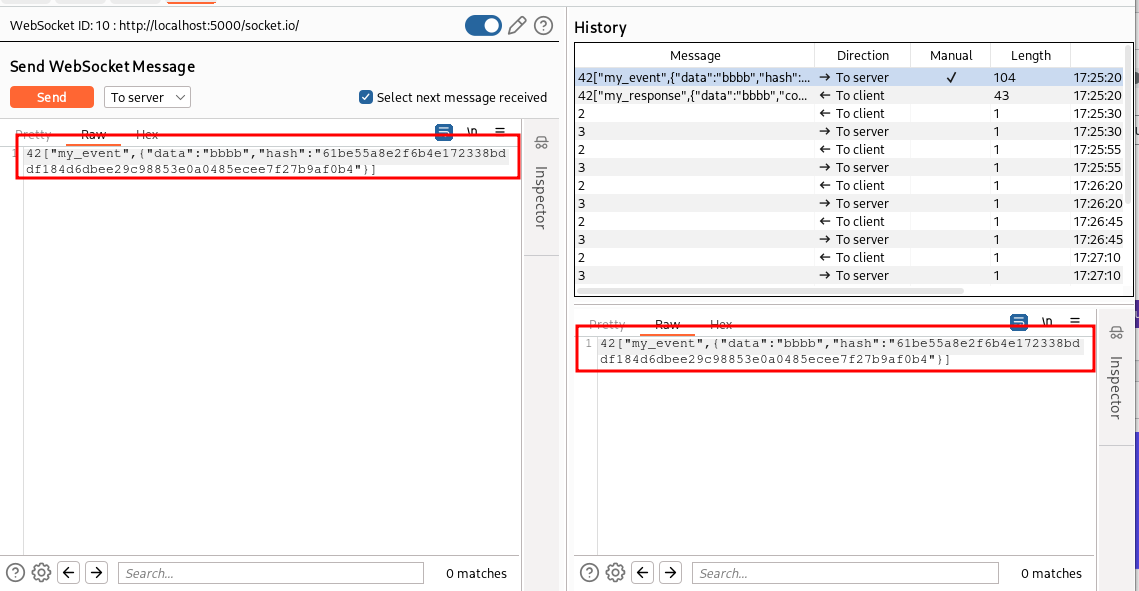

The backend sent back a message with the data “bbbb”, without returning an “Invalid signature” message. This indicates that our plugin is working as expected.
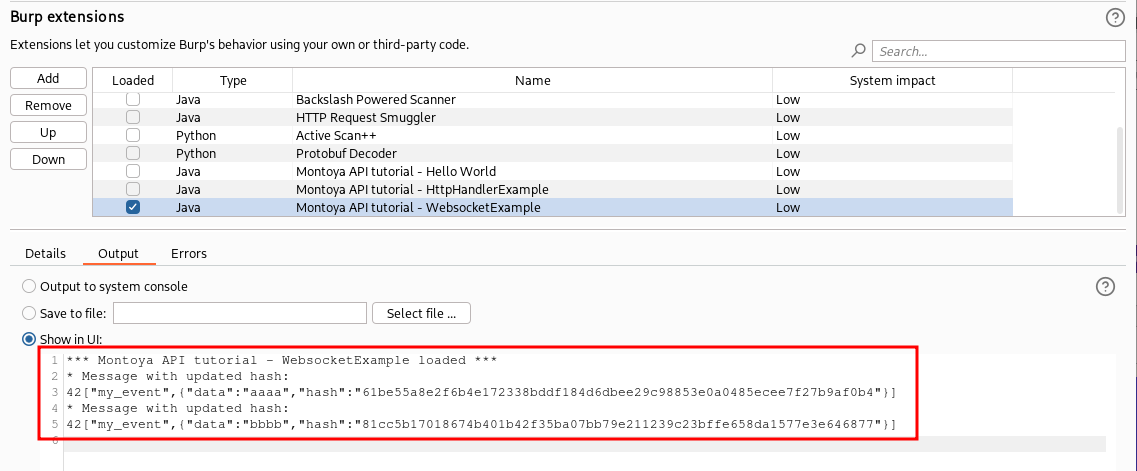
As for the HTTP scenario, our plugin modifies the hash just before the message leaves Burp Suite and consequently in the WebSocket Repeater we continue to see the SHA-256 hash of the original “aaaa” message. When we work with the HTTP protocol, we can use the Logger Burp Suite tool to see the actual request that has been sent after any plugin modification but unfortunately at the moment there isn’t a Logger equivalent for the WebSockets. For this reason at location 5 of our plugin we print the edited message. We can see the actual message that has been sent to the backend in the stdout of the plugin (in the following picture we see also the entry of “aaaa” because the plugin actually regenerates all the hashes, including the ones that have not been tampered):
And for this episode, that’s all. Now we can inspect and temper WebSocket messages from our extensions. You can download the plugin and the modified Flask example in my GitHub repository.
In the next episode we will see how to add a request/response message editor tabs, useful to handle custom encoding or encryption with an approach different from the one used so far (this is a type of extension I used many times over the years).
Cheers!