- Setting up the environment + Hello World
- Inspecting and tampering HTTP requests and responses
- Inspecting and tampering WebSocket messages
- Creating new tabs for processing HTTP requests and responses
- Adding new functionalities to the context menu (accessible by right-clicking)
- -> Adding new checks to Burp Suite Active and Passive Scanner
- Using the Collaborator in Burp Suite plugins
- BChecks – A quick way to extend Burp Suite Active and Passive Scanner
- … and much more!
Hi there!
Today we will see how to develop an extension that will add custom active and passive checks to Burp Scanner, following the configurations with which the scanner itself has been run.
In this article, we will look at how to extend the scanner using the “classic method”, that is, by writing a plugin that uses the Montoya API. This method gives us the most possibilities, as we can write arbitrary Java code to implement our checks. On the other hand, it is also the most complex way to add a check to the scanner, since Burp Suite has recently integrated a new method that allows to add checks via text files with a format similar to YAML, called BCheck. The Burp Suite team is continuing to develop this new method to allow for checking for more and more issues, but it is still good to know how to develop a complete extension as it obviously allows for more articulated checks. Maybe we will also see in one of the upcoming articles how to extend the scanner using the BCheck method.
As usual, let’s start from a real scenario. This time we will use a Java application that I developed some time ago as a test case for developing an extension aimed at identifying Java deserialization issues, named Java Deserialization Scanner. The test application, in WAR format, simply deserializes objects received in different ways and with different encodings, and it is easy to add vulnerable libraries to its package.
In order to exploit a Java serialization issue to achieve RCE, it is not sufficient to merely find an endpoint that deserializes user input. It is also necessary to find a serializable object known to the backend that, during deserialization, allows the execution of arbitrary commands or Java code. Such objects are not super easy to find and known ones are mainly offered by outdated external Java libraries. To delve deeper into this topic, I recommend the article that demonstrated the actual potential of this type of issue by exploiting most Java application servers (Foxglove Security) and the original slides by the researchers who discovered the vulnerability (Gabriel Lawrence and Chris Frohoff).
Our target will therefore be a Java application that deserializes the input sent to it, packaged with a vulnerable version of the Apache Commons Collections 3 libraries, which offer one of these serializable objects that allow for the execution of arbitrary Java code once deserialized. The target application can be downloaded from my Github repository. To deploy it, a Java application server is necessary. I used Apache Tomcat, which is easy to configure. Specifically, I used Tomcat 9, running with OpenJDK 17 (if you use a too old version of Java, the provided application might not function correctly as it may be compiled with a more recent version of Java). Details on how to configure and run Tomcat are beyond the scope of this article.
Let’s start from our test case. After the deployment of the test application, we can reach the homepage (in my deployment at http://localhost:8080/sampleCommonsCollections3/):

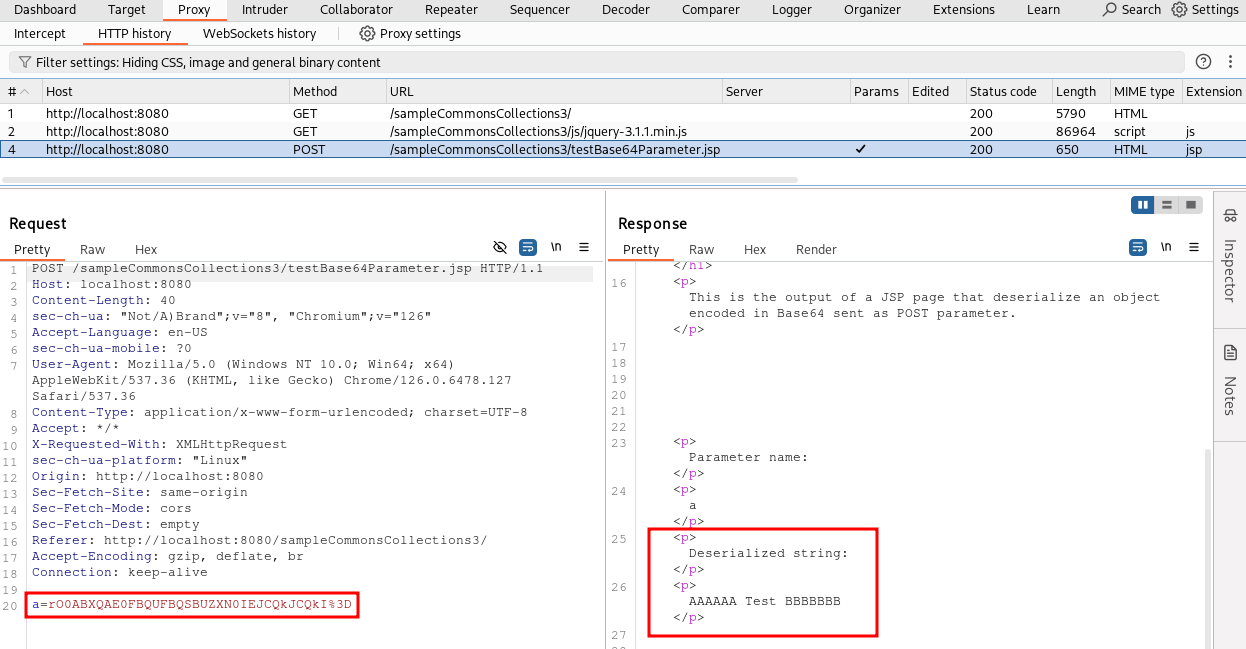
The application is very simple. It offers some links that send a serialized Java object to the backend in different ways and with different encodings (and a backend that deserializes them). Let’s click on “Serialzied Java Object in parameter, encoded in Base64”.

The sample application simply tells us to inspect the traffic from Burp, where we can see the request and response.
But what will our extension do? Our extension will perform two tasks: it will add a passive check to the scanner to search for serialized objects in HTTP requests (useful for identifying potential vulnerable parameters), and it will add some active checks to the scanner to test if endpoints are actually exploitable, using specific attack vectors for Apache Commons Collections 3. Essentially, we will write a simplified version of the Java Deserialization Scanner using the Montoya API, which only executes payloads for a single vulnerable library (Commons Collection 3) and supports a single encoding (Base64), to keep the example simple.
Before we begin, a few words about Burp Suite’s passive and active scanners. The purpose of the passive scanner is to identify issues simply by passively inspecting the traffic that passes through the tool, without making any request. In contrast, the active scanner tries to actively identify the presence of issues by sending specific attack vectors to the application and analyzing the responses. As we will see shortly, we can actually write Java code to extend both the passive and active scanners. Therefore, unless something has changed recently, there is nothing preventing us from adding code to the passive scanner that performs active checks. However, it is good practice to avoid this approach, as the user who will use the plugin will expect behavior consistent with the type of plugin they are using.
As usual, we start from the Hello World plugin skeleton we wrote in part 1 of the series.
package org.fd.montoyatutorial;

import burp.api.montoya.BurpExtension;
import burp.api.montoya.MontoyaApi;
import burp.api.montoya.logging.Logging;

public class ScanCheckExample implements BurpExtension {

    MontoyaApi api;
    Logging logging;

    @Override
    public void initialize(MontoyaApi api) {

        // Save a reference to the MontoyaApi object
        this.api = api;

        // api.logging() returns an object that we can use to print messages to stdout and stderr
        this.logging = api.logging();

        // Set the name of the extension
        api.extension().setName("Montoya API tutorial - Scan Check Example");

        // Print a message to the stdout
        this.logging.logToOutput("*** Montoya API tutorial - Scan Check Example loaded ***");

        // Register our custom scan check
        // TODO

    }
}
We will need to register our custom scan check after the creation of the classes that will handle it.
The plugin we need is of type ScanCheck and can be registered from the Scanner object that we can get from the usual MontoyaApi (the object supplied as argument to the initialize function of the plugin).
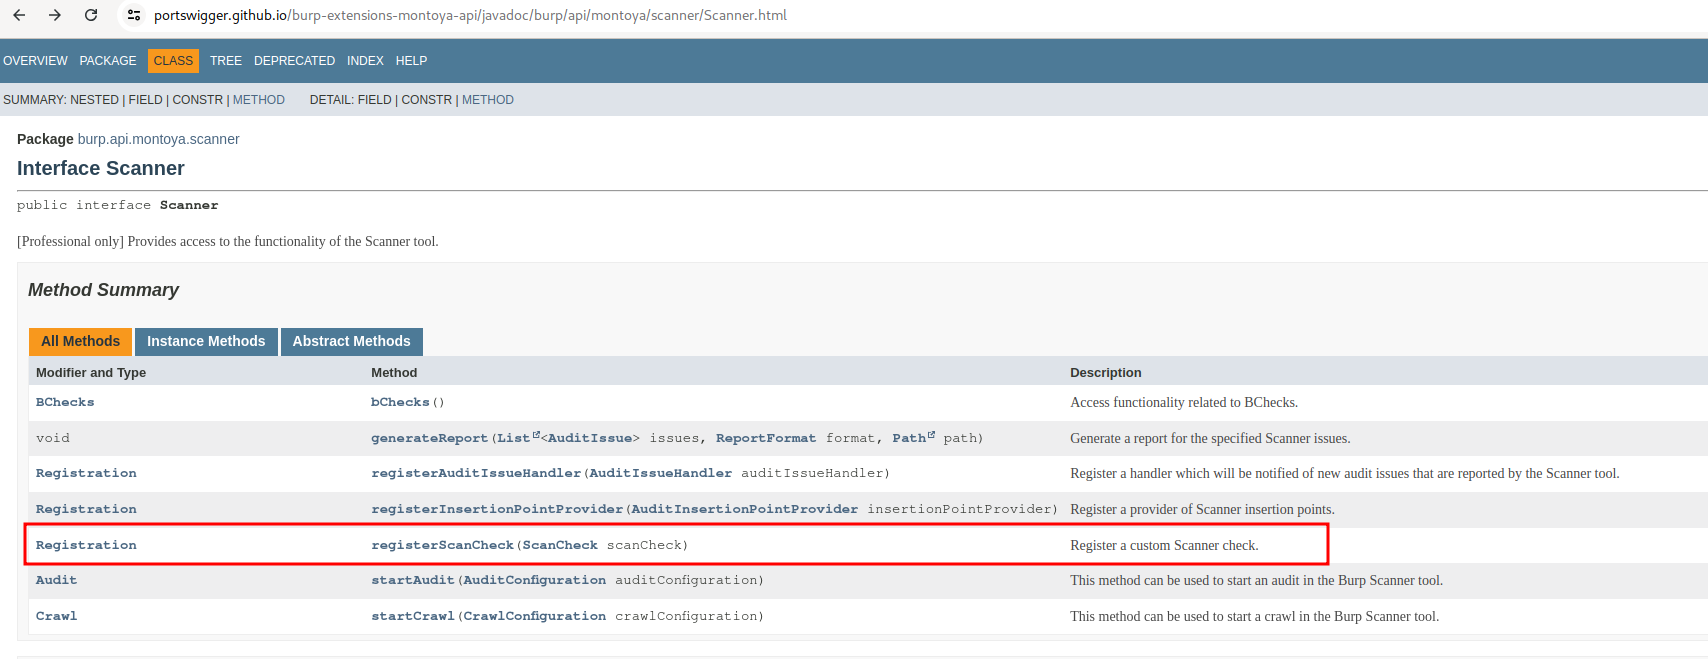
To register our plugin we need to code an object that implements the interface ScanCheck and that will contain active and passive scan logic. The interface ScanCheck is documented as follows:
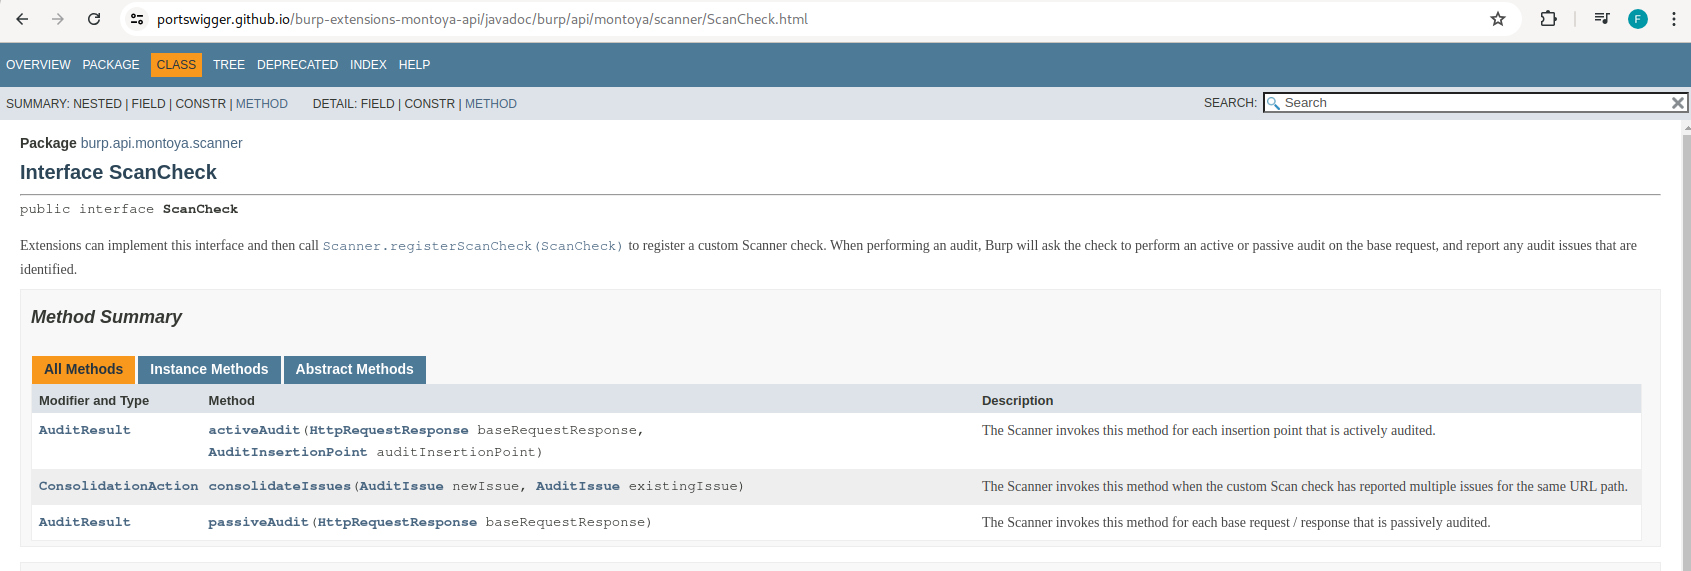
As we can see, the ScanCheck interface requires the implementation of the following three methods:
- AuditResult passiveAudit
(HttpRequestResponse baseRequestResponse): this method will be called each time Burp Suite’s passive scanner runs. It will be provided with an object containing the request and the response on which the passive scanner was executed, allowing us to perform some checks on it to identify issues passively (i.e., simply by analyzing the request/response without making further requests). The method should return an object that contains a list of identified issues, which will be integrated into Burp Suite’s scanner results. - AuditResult activeAudit
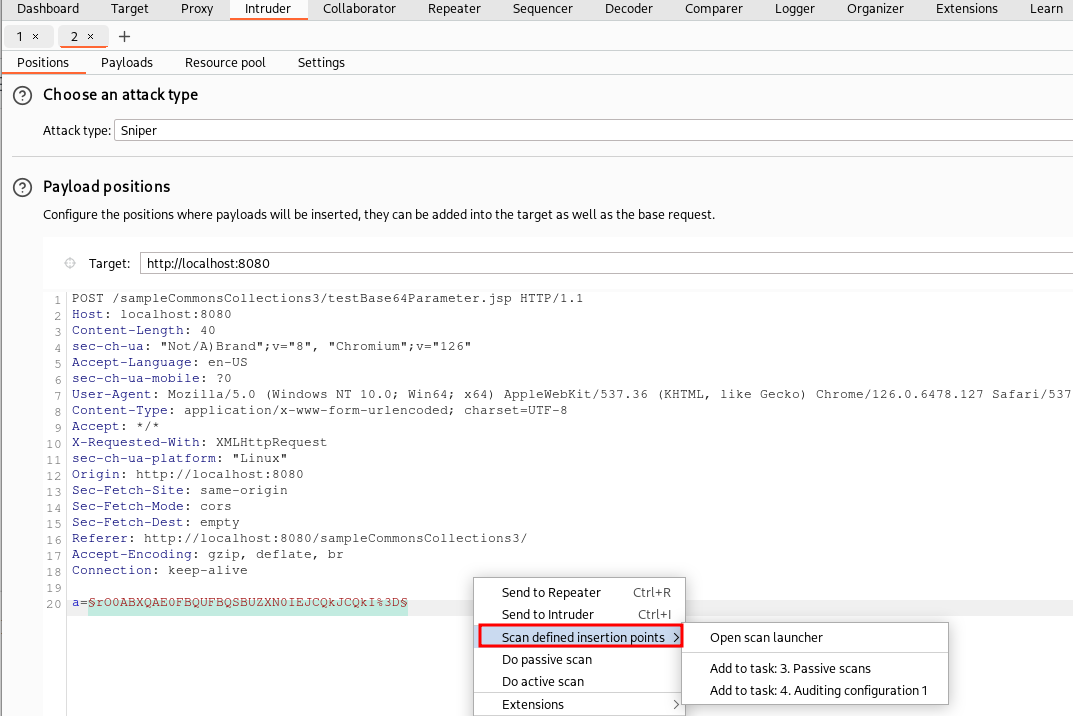
(HttpRequestResponse baseRequestResponse, AuditInsertionPoint auditInsertionPoint): this method will be called each time Burp Suite’s active scanner runs on a request, once for each insertion point selected by the scanner engine or manually by the user (via the “Scan defined insertion points” feature of the Intruder – more info at the end of the article). Here, we will have, in addition to the request and response on which the scanner was executed, an object containing information about the current insertion point, so that we can correctly position our attack vectors. As before, the method should return an object that contains a list of identified issues, which will be integrated into Burp Suite’s scanner results. - ConsolidationAction consolidateIssues
(AuditIssue newIssue, AuditIssue existingIssue): the method is called when our custom scan check has returned multiple issues for the same URL. In this scenario, each time a new issue is identified by our check, this method is called once for every other issue identified by our check on the same URL. Within this method, we need to define logic to determine whether the issue is a duplicate or should be reported.
The skeleton of our new class that will contain the scan checks is the following:
package org.fd.montoyatutorial;

import burp.api.montoya.MontoyaApi;

public class CustomScanCheck implements ScanCheck {

    MontoyaApi api;
    Utilities utilities;

    public CustomScanCheck(MontoyaApi api) {

        // Save references to usefull objects
        this.api = api;
        this.utilities = this.api.utilities();

    }

    @Override
    public AuditResult activeAudit(HttpRequestResponse baseRequestResponse, AuditInsertionPoint auditInsertionPoint) {
        return null;
    }

    @Override
    public AuditResult passiveAudit(HttpRequestResponse baseRequestResponse) {
        return null;
    }

    @Override
    public ConsolidationAction consolidateIssues(AuditIssue newIssue, AuditIssue existingIssue) {
        return null;
    }

}
Let’s start with the activeAudit method. Our goal is to identify a serialization issue in the backend with an active probe (so, we can use our payloads to identify the issues). As said before, we will try to identify only serialization issues in the Apache Commons Collections 3 library, in order to simplify our demo plugin.
To generate serialization payloads to exploit most Java vulnerable libraries we can use the ysoserial tool. It’s the main tool for generating exploitation payloads for Java serialization vulnerabilities, created by Chris Frohoff (one of the researchers who discovered the issue). However, the tool is designed for exploitation and not for detection, and most of the payloads aim to execute commands on the operating system. To make detection more difficult, the exploitation is “blind,” meaning we cannot see the result of the command inserted into the payload. To address this problem, a few years ago when I wrote the Java Deserialization Scanner plugin I also made a fork of ysoserial, modifying the payloads to add some detection mechanisms. The fork adds some modules to the tool, including the ability to generate payloads that, instead of executing commands on the operating system, execute native Java synchronous sleeps. This provides a reliable detection mechanism based on the timing of the responses.
So first, let’s generate every ysoserial payload for the Apache Commons Collections 3 that sleep for 10 seconds using my fork (there are 5 payloads that may work differently in different target environments; CommonsCollections2 and CommonsCollections4 are skipped because they are for Apache Commons Collections version 4):
$ java -jar ysoserial-fd-0.0.6.jar CommonsCollections1 10000 sleep base64
rO0ABXNyADJzdW4ucmVm[...]AAAAAAAAAAAAAB4cHEAfgA5

$ java -jar ysoserial-fd-0.0.6.jar CommonsCollections3 10000 sleep base64
rO0ABXNyADJzd[...]AAAAAeHBxAH4ALg==

$ java -jar ysoserial-fd-0.0.6.jar CommonsCollections5 10000 sleep base64
rO0ABXNyAC5qYXZheC5tYW5hZ[...]AB3CAAAABAAAAAAeHg=

$ java -jar ysoserial-fd-0.0.6.jar CommonsCollections6 10000 sleep base64
rO0ABXNyABFqYX[...]AQAAAAAHh4eA==

$ java -jar ysoserial-fd-0.0.6.jar CommonsCollections7 10000 sleep base64
rO0ABXNyABNqYX[...]4ALQAAAAJ4
Once generated, we put all these payloads in a dedicated class of our code, in order to keep the code with the logic clean:
package org.fd.montoyatutorial;

public class StaticItems {

    public static String[] apacheCommonsCollections3Payloads = new String[] {
           "rO0ABXNyADJzdW4ucmVmbGVjdC[...]AAAAAAAAAAAB4cHEAfgA5",
           "rO0ABXNyADJzdW4u[...]WRlAAAAAAAAAAAAAAB4cHEAfgAu",
           "rO0ABXNyAC5[...]AAAAB3CAAAABAAAAAAeHg",
           "rO0ABXN[...]AAHh4eA==",
           "rO0ABXNyABNq[...]AH4ALQAAAAJ4"
    };

}
Now let’s build the skeleton of our method for active scan:
@Override
public AuditResult activeAudit(HttpRequestResponse baseRequestResponse, AuditInsertionPoint auditInsertionPoint) {

    // Initialize an empty list of audit issues that we will eventually populate and return at the end of the function
    List<AuditIssue> activeAuditIssues = new ArrayList<AuditIssue>();

    // For each CommonsCollections 3 payload we defined, we try to exploit the issue
    for(int i=0;i<SerializationPayloads.apacheCommonsCollections3Payloads.length;i++) {

        // We create an HTTP request containing our payload in the current insertion point

        // We record the current time, execute the request and record the time again

        // We calculate the interval between when we sent the request and when we received the response (converted in seconds)

        // If the interval is greater than 9 seconds we may have a vulnerable endpoint (our payloads sleep for 10 seconds)
        if (((int) duration) >= 9) {

            // In this case, we create an issue object and adds it to the list of issues to be returned

        }

    }

    // Return the list of issues
    return AuditResult.auditResult(activeAuditIssues);

}
We will execute the following steps in order:
- We initialize an empty list of AuditIssue, that we will put in the object of type AuditResult that we have to return
- We loop through all our Commons Collections 3 payloads and:
- For each payload we will create an HTTP request containing our payload in the current insertion point
- We send the HTTP request to the backend, taking record of the time passed till we receive the response
- If the time is greater than 9 seconds we create the issue and add it to the result list (we avoid using 10 in order to allow for a little margin due to calculations and conversions)
- Finally we return the list of issues, using a static method of the AuditResult class that creates an object of this type for us, that contains our list
Let’s take a closer look inside the for loop.
First, we create an HTTP request containing our payload in the current insertion point. This step is quite simple, thanks to the buildHttpRequestWithPayload method of the AuditInsertionPoint class, which takes as input our attack vector and creates the final HttpRequest on its own with the payload in the correct place:
// We create an HTTP request containing our payload in the current insertion point
HttpRequest commonsCollectionsCheckRequest = auditInsertionPoint.buildHttpRequestWithPayload(
        ByteArray.byteArray(SerializationPayloads.apacheCommonsCollections3Payloads[i]))
        .withService(baseRequestResponse.httpService());
You may have noticed the withService method called in the last line. This method of the HttpRequest class adds the so-called “service” to the request, which includes the host, port, and protocol (to be more precise, generates a new HttpRequest that contains also the service supplied as argument). In order to be able to send an HttpRequest object in Burp, it must contain both the bytes of the request and the information on where to send it (host, port, and protocol). Some methods in Burp that create these types of objects also copy the “service”, while others do not. To be safe, it doesn’t hurt to manually include it, taking it from the original request sent to the scanner provided as a parameter.
You may also have noticed that we sent the payloads encoded in Base64. What if the serialized object is sent in ASCII HEX or with a different encoding? According to the documentation, we should provide the attack vector in RAW format and the insertion point will handle the data encoding properly:

So, why did we supply a Base64 encoded attack vector? Because based on the tests I’ve done the encoding is not always handled correctly. If I’m not mistaken, Burp Suite only manages the encoding given by the request content type and the position of the insertion point (URL encoding in forms, escape in JSON, etc.), but it does not (or maybe not always) identify additional encodings of the specific parameters (e.g., a parameter encoded in Base64, as in this case). In a real extension, all these cases need to be handled, either by extracting the value contained in the vulnerable parameter of the original request (which we have in the baseRequestResponse variable) and applying the same encoding, or by sending a request for each encoding/compression mechanism/etc. that we want to support. To keep the example simple, I will send only payloads encoded in Base64.
Secondly, we send the HttpRequest to the application, recording the time just before and just after, in order to calculate the response time. To send the request we can use the sendRequest function offered by the Http object that we can obtain directly from the MontoyaApi object (the object that we receive and save in the initialize method of every plugin and that we use for everything):
// We record the current time, execute the request and record the time again
long startTime = System.nanoTime();
HttpRequestResponse commonsCollectionsCheckRequestResponse = api.http().sendRequest(commonsCollectionsCheckRequest);
long endTime = System.nanoTime();

// We calculate the internal between when we sent the request and when we received the response (converted in seconds)
long duration = TimeUnit.SECONDS.convert((endTime - startTime), TimeUnit.NANOSECONDS);
Finally, if the response time is greater than 9 we create an issue and add it to the result list. Luckily for us, the Montoya API of Burp Suite offers a convenient method for creating an issue from various pieces of information about it, such as title, description, severity, etc. (in the previous API, this convenient method was not available and you had to create a specific class). Here too, to keep the code clean, we can place these static strings in an external class, like StaticItems that we created to collect the serialization payloads.
package org.fd.montoyatutorial;

import burp.api.montoya.scanner.audit.issues.AuditIssueSeverity;
import burp.api.montoya.scanner.audit.issues.AuditIssueConfidence;

public class StaticItems {

    [...]

    public static String apacheCommonsCollections3IssueName = "Remote Code Execution through Java Unsafe Deserialization, vulnerable library: Apache Commons Collections 3";
    public static String apacheCommonsCollections3IssueDetail = "The application deserializes untrusted serialized Java objects,"+
            " without first checking the type of the received object and run on an unpatched Java environment. This issue can be"+
            " exploited by sending malicious objects that, when deserialized,"+
            " execute custom Java code. Several objects defined in popular libraries"+
            " can be used for the exploitation.";
    public static AuditIssueSeverity apacheCommonsCollections3IssueSeverity = AuditIssueSeverity.HIGH;
    public static AuditIssueConfidence apacheCommonsCollections3IssueConfidence = AuditIssueConfidence.FIRM;
    public static AuditIssueSeverity apacheCommonsCollections3IssueTypicalSeverity = AuditIssueSeverity.HIGH;

    public static String passiveSerializationIssueName = "Serialized Java objects detected";
    public static String passiveSerializationIssueDetail = "Serialized Java objects have been detected in the body"+
            " or in the parameters of the request. If the server application does "+
            " not check on the type of the received objects before"+
            " the deserialization phase, it may be vulnerable to the Java Deserialization"+
            " Vulnerability.";
    public static AuditIssueSeverity passiveSerializationIssueSeverity = AuditIssueSeverity.INFORMATION;
    public static AuditIssueConfidence passiveSerializationIssueConfidence = AuditIssueConfidence.FIRM;
    public static AuditIssueSeverity passiveSerializationIssueTypicalSeverity = AuditIssueSeverity.INFORMATION;

}
The method we can use to create the issue is the static method auditIssue of the AuditIssue class:
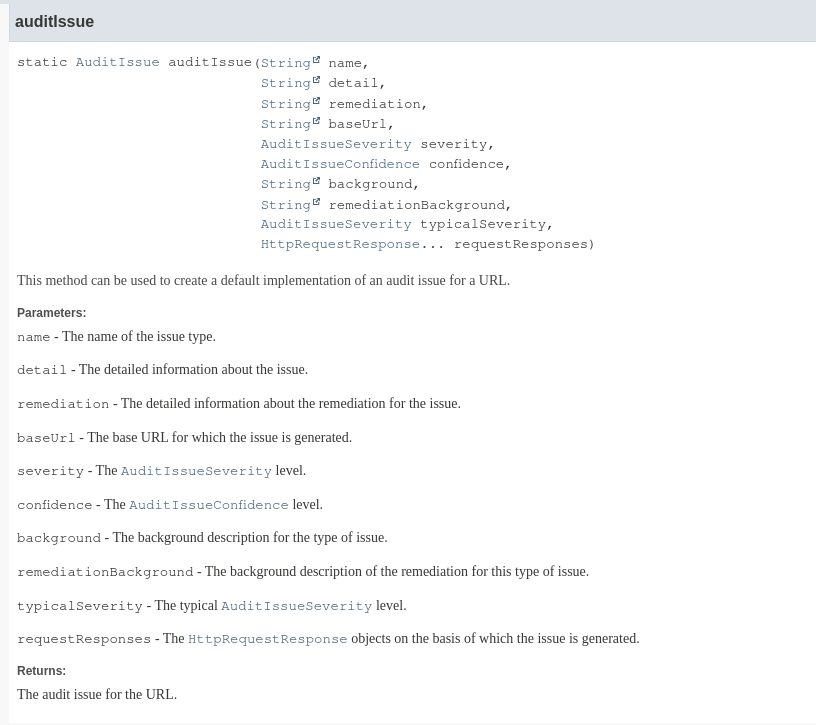
We may add only the fields we want to insert, leaving others as null (it is not necessary to fill every field):
// If the interval is greater than 9 seconds we may have a vulnerable endpoint (our payloads sleep for 10 seconds)
if (((int) duration) >= 9) {

    // In this case, we create an issue object and adds it to the list of issues to be returned
    AuditIssue auditIssue = AuditIssue.auditIssue(SerializationPayloads.apacheCommonsCollections3IssueName,
            SerializationPayloads.apacheCommonsCollections3IssueDetail,
            null, // remediation
            baseRequestResponse.request().url(),
            SerializationPayloads.apacheCommonsCollections3IssueSeverity,
            SerializationPayloads.apacheCommonsCollections3IssueConfidence,
            null, // background
            null, // remediationBackground
            SerializationPayloads.apacheCommonsCollections3IssueTypicalSeverity,
            commonsCollectionsCheckRequestResponse); //Request/response can be highlighted

    activeAuditIssues.add(auditIssue);

}
The last parameter is the request that we used to detect the issue (or list of requests, because we can add to the issue as many request/response objects as we need). We can also highlight a portion of the request or the response in order to clearly mark the evidence of the issue. In this case it is not so useful, because we detected the issue with side channel information (the response time), but we will use that feature in the method related to the passive scanner.
The final code of the activeAudit function is the following:
@Override
public AuditResult activeAudit(HttpRequestResponse baseRequestResponse, AuditInsertionPoint auditInsertionPoint) {

    // Initialize an empty list of audit issues that we will eventually populate and return at the end of the function
    List<AuditIssue> activeAuditIssues = new ArrayList<AuditIssue>();

    // For each CommonsCollections 3 payload we defined, we try to exploit the issue
    for(int i = 0; i< StaticItems.apacheCommonsCollections3Payloads.length; i++) {

        // We create an HTTP request containing our payload in the current insertion point
        HttpRequest commonsCollectionsCheckRequest = auditInsertionPoint.buildHttpRequestWithPayload(
                ByteArray.byteArray(StaticItems.apacheCommonsCollections3Payloads[i]))
                .withService(baseRequestResponse.httpService());

        // We record the current time, execute the request and record the time again
        long startTime = System.nanoTime();
        HttpRequestResponse commonsCollectionsCheckRequestResponse = api.http().sendRequest(commonsCollectionsCheckRequest);
        long endTime = System.nanoTime();

        // We calculate the interval between when we sent the request and when we received the response (converted in seconds)
        long duration = TimeUnit.SECONDS.convert((endTime - startTime), TimeUnit.NANOSECONDS);

        // If the interval is greater than 9 seconds we may have a vulnerable endpoint (our payloads sleep for 10 seconds)
        if (((int) duration) >= 9) {

            // In this case, we create an issue object and adds it to the list of issues to be returned
            AuditIssue auditIssue = AuditIssue.auditIssue(StaticItems.apacheCommonsCollections3IssueName,
                    StaticItems.apacheCommonsCollections3IssueDetail,
                    null, // remediation
                    baseRequestResponse.request().url(),
                    StaticItems.apacheCommonsCollections3IssueSeverity,
                    StaticItems.apacheCommonsCollections3IssueConfidence,
                    null, // background
                    null, // remediationBackground
                    StaticItems.apacheCommonsCollections3IssueTypicalSeverity,
                    commonsCollectionsCheckRequestResponse); //Request/response can be highlighted

            activeAuditIssues.add(auditIssue);

        }

    }

    // Return the list of issues
    return AuditResult.auditResult(activeAuditIssues);

}
Moving on to the passiveAudit method for adding checks to the passive scanner, our goal is simply to identify HTTP request parameters containing potential serialized Java objects. These objects always start with the same bytes (magic bytes) and can therefore be easily identified. For simplicity, we will limit our search to objects sent in ASCII HEX format and encoded in Base64. The goal is to find requests that send serialized objects to the backend, as they are potentially vulnerable to RCE.
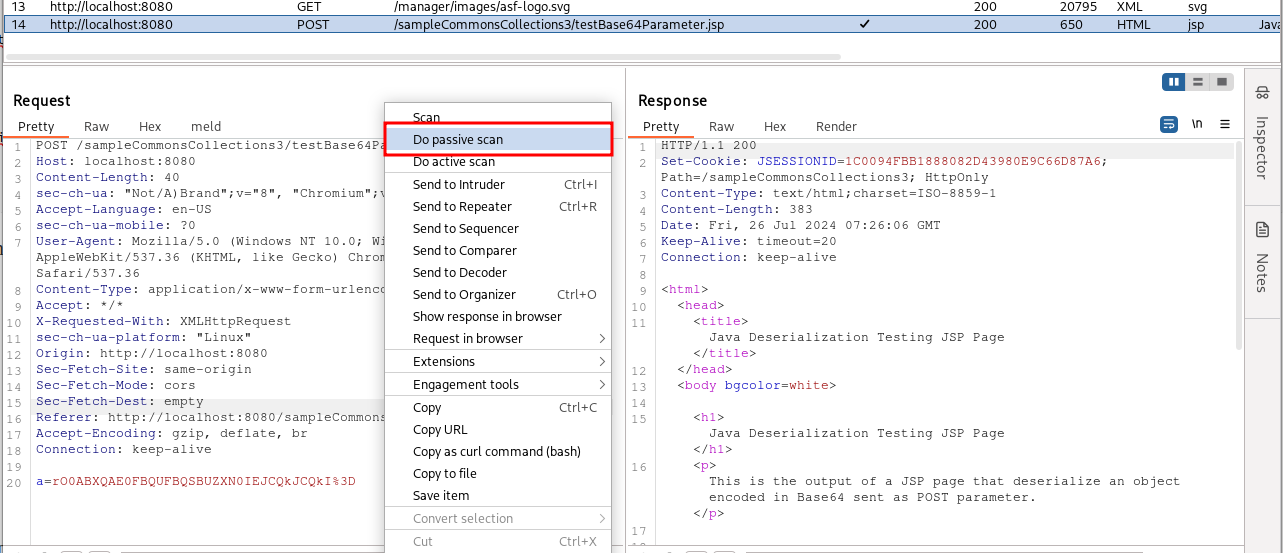
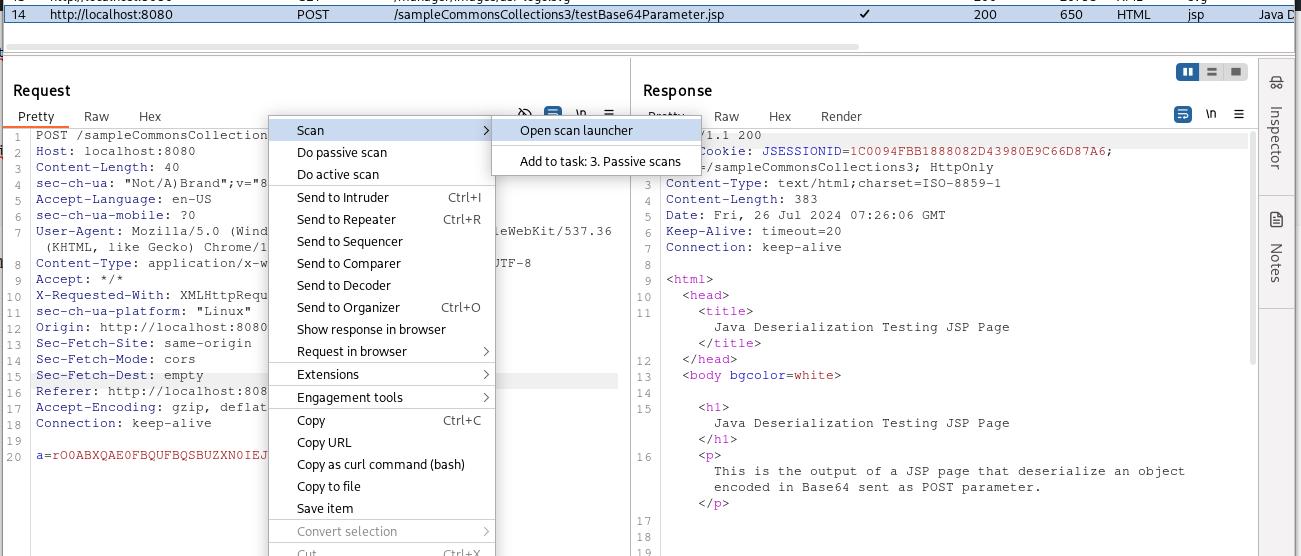
Then we can run the active scan. A little trick: when you test a scanner plugin, in order to avoid wasting time, my advice is to configure a scan configuration that only executes extender checks, in order to check if the plugin works without having to wait for a full scan. To do so, first open the scan launcher:
Then in “Scan configuration” create a new configuration and deselect all the individual issues in the “Issues Reported” section (CTRL-A to select all, right click and remove the flag on “Selected):
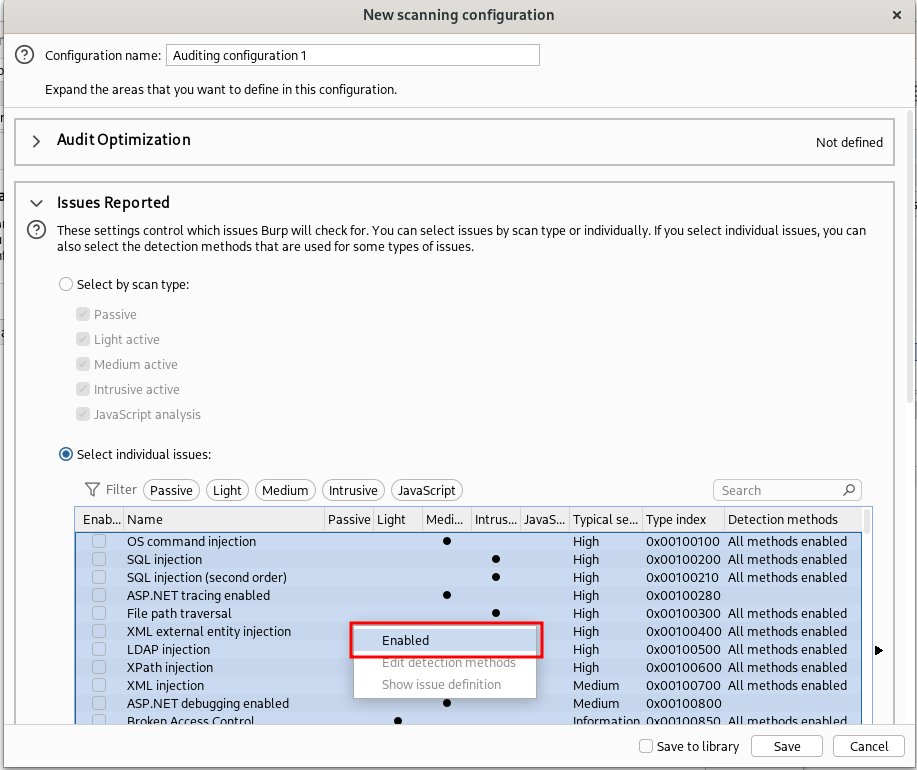
Finally flag only “Extension generated issue” (you have a search form at the top right)

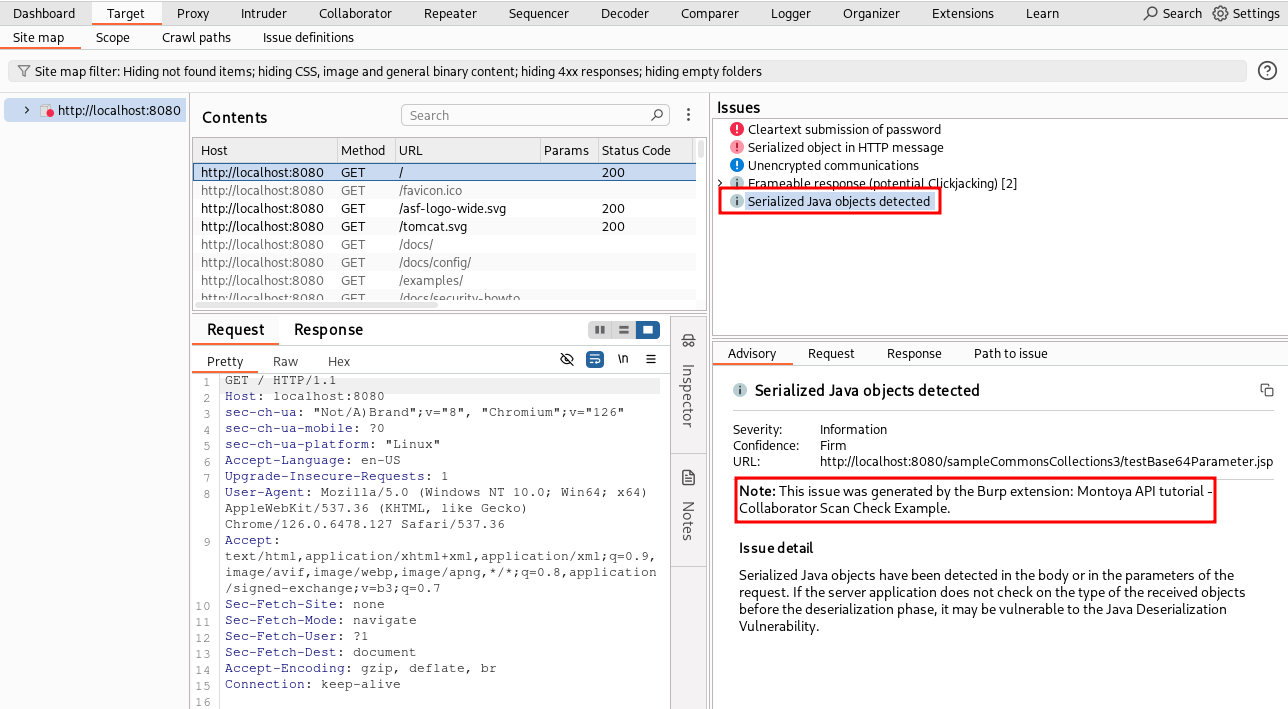
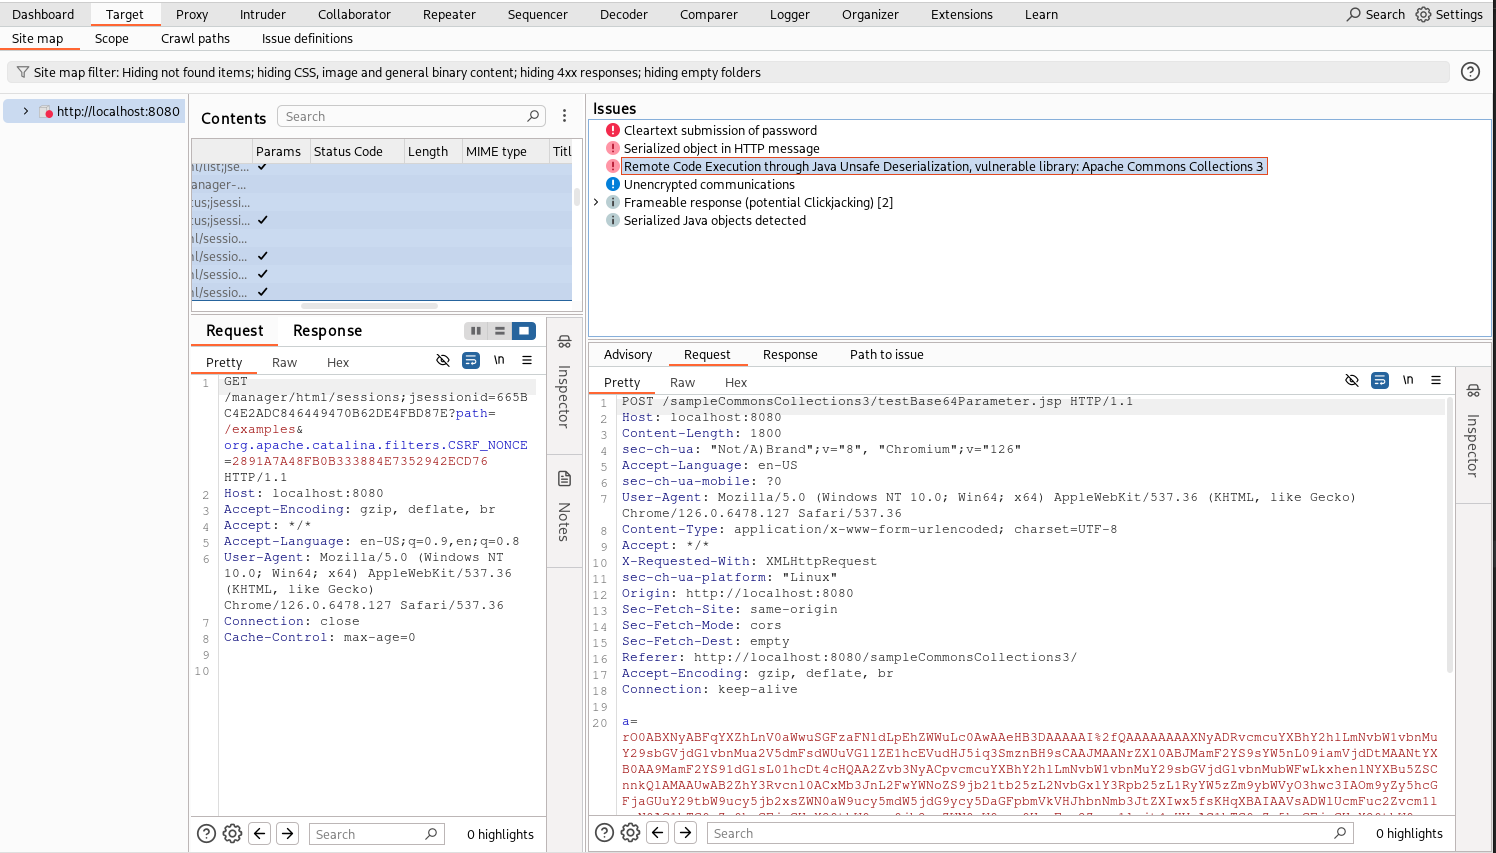
Save, run and the result is the following:
One last tip that you may not know: you don’t have to run a full scan on all insertion points of the request all the times you use Burp Suite’s active scanner. Burp allows to scan only specific insertion points. To do so, send the request to Burp Intruder, highlight the insertion point(s) you want to scan, right click and select “Scan defined insertion points” (very useful feature not only when you develop a plugin but also during everyday’s pentesting):
And that’s all for today. In the next part, we will see how to use the Collaborator in our plugins.
As always, the complete code of the backend and of the plugins can be downloaded from my GitHub repository.
Cheers!
