In this third and final post in the series about Sliver C2 I’ll provide a tutorial for creating a simple command, named helloworld, that will take some parameters in input, send them to the implant, and then print back a string coming from the implant. You can find the full code implementing the helloworld command here at the branch hello_world of my fork of Sliver.
Creating the Hello World command
The process for creating the command can be split in three phases:
- Define protobuf messages for server, client, and implant in sliver.proto/client.proto and the rpc functions inside services.proto.
- Develop/debug the interaction betweeen client-side command and server handler.
- Develop the implant handler and debug all the flow.
Defining protobuf messages
First of all, we need to define the format of requests and responses that will be exchanged during client-server interaction and server-implant interaction, and the gRPC function for client-server communication.
Here are the definitions in sliver.proto and services.proto:
sliver.proto
...
...
message HelloWorldReq {
  string param1 = 1;
  uint32 param2 = 2;
  bool param3 = 3;
commonpb.Request Request = 9;
}
message HelloWorld {
  string output = 1;
  commonpb.Response Response = 9;
}
...
...
-------------------------------------------
services.proto
...
...
// *** Hello World ***
rpc HelloWorld(sliverpb.HelloWorldReq) returns (sliverpb.HelloWorld);
The request is HelloWorldReq and contains a string, a uint32, and a boolean field. In addition, it embeds commonpb.Request as all the other request messages in the file.
The response is HelloWorld and contains just a string. In addition it embeds commonpb.Response as all the other response messages in the file.
You can give a look at the other messages in order to find more field types that you can embed in your messages.
Finally, in services.proto we defined the gRPC function HelloWorld that takes as input a sliverpb.HelloWorldReq message and returns a sliverpb.HelloWorld message, the ones defined in sliverpb.proto.
Now, run the command make pb in a terminal under the sliver main folder:
┌──(kali㉿kali)-[~/sliver]
└─$ make pb
protoc -I protobuf/ protobuf/commonpb/common.proto --go_out=paths=source_relative:protobuf/
protoc -I protobuf/ protobuf/sliverpb/sliver.proto --go_out=paths=source_relative:protobuf/
protoc -I protobuf/ protobuf/clientpb/client.proto --go_out=paths=source_relative:protobuf/
protoc -I protobuf/ protobuf/dnspb/dns.proto --go_out=paths=source_relative:protobuf/
protoc -I protobuf/ protobuf/rpcpb/services.proto --go_out=paths=source_relative:protobuf/ --go-grpc_out=protobuf/ --go-grpc_opt=paths=source_relative
┌──(kali㉿kali)-[~/sliver]
└─$
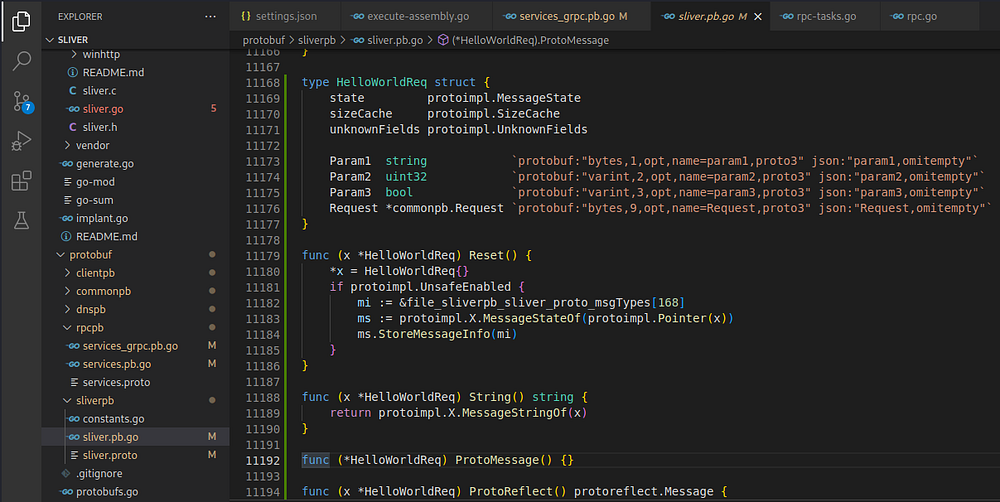
This is going to rebuild all the go files under the protobuf folder such as sliver.pb.go, client.pb.go, and so on. By now they contain the go struct and functions corresponding to messages and gRPC functions previously defined. You can browse to protobuf/sliver.pb.go in order to notice that now a HelloWorldReq struct is present with associated methods.
Developing the client-side command
Here we are going to define a new HelloWorld command in the client component of the framework. First, we need to add the command definition in client/command/sliver.go. Here’s the definition I’ve written:
// [ Hello World] ------------------------------------------
  helloWorldCmd := &cobra.Command{
   Use:   consts.HelloWorldStr,
   Short: "Hello World command",
   Long:  help.GetHelpFor([]string{consts.HelloWorldStr}),
   Args:  cobra.ExactArgs(1),
   Run: func(cmd *cobra.Command, args []string) {
    helloworld.HelloWorldCmd(cmd, con, args)
   },
   GroupID: consts.FilesystemHelpGroup,
  }
  sliver.AddCommand(helloWorldCmd)
  Flags("", false, helloWorldCmd, func(f *pflag.FlagSet) {
   f.Uint32P("intflag", "i", 0, "parameter 2")
   f.BoolP("boolflag", "x", false, "parameter 3")
   f.Int64P("timeout", "t", defaultTimeout, "grpc timeout in seconds")
  })
  carapace.Gen(helloWorldCmd).PositionalCompletion(
   carapace.ActionValues().Usage("parameter1")
  )
First I created a cobra.Command struct having with the following fields:
- Use: set to consts.HelloWorldStr. This is a string I defined inside client/constants/constants.go in this way:
HelloWorldStr = "helloworld" - Short: another string
- Long: the full description of the command. In client/help/long-help.go add the entry
consts.HelloWorldStr: helloWorldHelpto the mapcmdHelp, and add the stringhelloWorldHelpcontaining the full help for the command. - Run: contains a callback that calls
helloworld.HelloWorldCmd(). This is the function that will actually send the request to the server and print the response. We will define it later.
Then I added the command and I defined two flags for the command. A boolean flag -X and a timeout flag -t (timeout is present in all commands).
I’m not sure about what the last part involving the carapace library does, but I think that BishopFox added it quite recently to improve user experience. I just copy/pasted it from another command and then modified the relevant parts.
At the end, the helloworld command takes as input one positional parameter in the form of string, and three flags: an integer, a boolean, and another integer indicating a timeout. The boolean and the integer will be embedded in the request sent to the server, just for showing how to pass data through flags to the server and eventually to the implant.
Now it is required to define the function helloworld.HelloWorldCmd(). In order to do this I’ll create a folder called helloworld under client/command and inside it, I will create a source file named helloworld.go containing the definition of helloworld.HelloWorldCmd() and the package helloworld.
The contents of my helloworld.go are:
package helloworld

import (
 ...
...
)
func HelloWorldCmd(cmd *cobra.Command, con *console.SliverConsoleClient, args []string) (err error) {
 session, beacon := con.ActiveTarget.GetInteractive()
 if session == nil && beacon == nil {
  return
 }
 if len(args) != 1 {
  con.PrintErrorf("Please specify an argument for param1.\n")
  return
 }
 param1 := args[0]
 param2, _ := cmd.Flags().GetUint32("intflag")
 param3, _ := cmd.Flags().GetBool("boolflag")
 out, err := con.Rpc.HelloWorld(context.Background(), &sliverpb.HelloWorldReq{
  Request: con.ActiveTarget.Request(cmd),
  Param1:  param1,
  Param2:  param2,
  Param3:  param3,
 })
 if err != nil {
  con.PrintErrorf("%s\n", err)
  return
 }
 if out.Response != nil && out.Response.Async {
  con.AddBeaconCallback(out.Response.TaskID, func(task *clientpb.BeaconTask) {
   err = proto.Unmarshal(task.Response, out)
   if err != nil {
    con.PrintErrorf("Failed to decode response %s\n", err)
    return
   }
   PrintHelloWorld(out,con)
  })
  con.PrintAsyncResponse(out.Response)
 } else {
  PrintHelloWorld(out, con)
 }
 return
}
func PrintHelloWorld(hw *sliverpb.HelloWorld, con *console.SliverConsoleClient) {
 if hw.Response != nil && hw.Response.Err != "" {
  con.PrintErrorf("%s\n", hw.Response.Err)
  return
 }
 con.PrintInfof("Here the output coming from the implant: %s\n", hw.Output)
}
In HelloWorldCmd I just take the 3 parameters: args[0] the string passed as positional parameter, the integer flag cmd.Flags().GetUint32(“intflag”), and the boolean flag cmd.Flags().GetBool(“boolflag”). Then I create the HelloWorldReq struct, populate its fields with the parameters and send the request to the server calling con.Rpc.HelloWorld().
Later there are some if statements checking if the request is for a beacon or for a session. In both cases we are going to execute PrintHelloWorld() to print the result coming from the server.
Finally, go back to sliver.go and add the import “github.com/bishopfox/sliver/client/command/helloworld”, in case VSCode doesn’t automatically adds it for you, after saving all files.
Now we will define the server-side handler for our HelloWorldReq request. We can create server/rpc/rpc-helloworld.go and define here the handler, in order to be coherent with the project structure.
The contents of my rpc-helloworld.go file are:
package rpc

import (
 "context"
 "github.com/bishopfox/sliver/protobuf/commonpb"
 "github.com/bishopfox/sliver/protobuf/sliverpb"
)
// HelloWorld - HelloWorld command
func (rpc *Server) HelloWorld(ctx context.Context, req *sliverpb.HelloWorldReq) (*sliverpb.HelloWorld, error) {
 resp := &sliverpb.HelloWorld{Response: &commonpb.Response{}}
 err := rpc.GenericHandler(req, resp)
 if err != nil {
  return nil, err
 }
 return resp, nil
}
The defined function falls under the rpc package. As defined in services.proto, HelloWorld() is our function handling the request server-side; it takes as input a struct of type sliverpb.HelloWorldReq and returns a struct of type sliverpb.HelloWorld. We defined the structs previously in sliverpb.proto.
If you are unsure about what the signature of the function you have to define should be, I suggest you to take a simple rpc handler function, such as Ls(), defined in rpc-filesystem, and modify it accordingly, by checking your definitions inside services.proto/sliver.proto.
The function simply creates a struct of type sliverpb.HelloWorld, stores it in the resp variable and then calls rpc.GenericHandler() passing the initial request coming from the client and the resp variable. When rpc.GenericHandler() returns, we will find the response from the implant in the resp variable. Therefore, resp is returned to the caller with the return resp, nil statement, and finally sent to the client.
Let’s debug what we have done so far in order to check that the client successfully sends the request to the server.
Debugging client-server interaction
You must first launch both client and server in debug mode, inside VSCode, as shown in part 1, Setting up the Environment section.
Then just create an implant, move it to your Windows machine and run it.
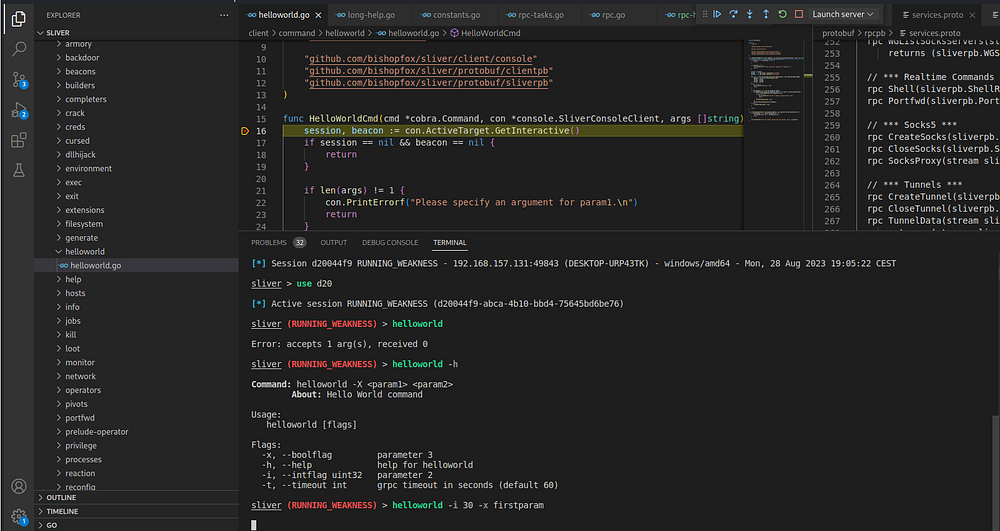
When you receive the callback from the implant, interact with it and check that the helloworld command is available.

Now put a breakpoint on HelloWorldCmd() in the client and on HelloWorld() in the server. Then run your newly created helloworld command like this:
> helloworld -i 30 -x firstparam
You should see the first breakpoint on HelloWorldCmd() got hit.
Stepping with the debugger you should reach the second breakpoint on the server.
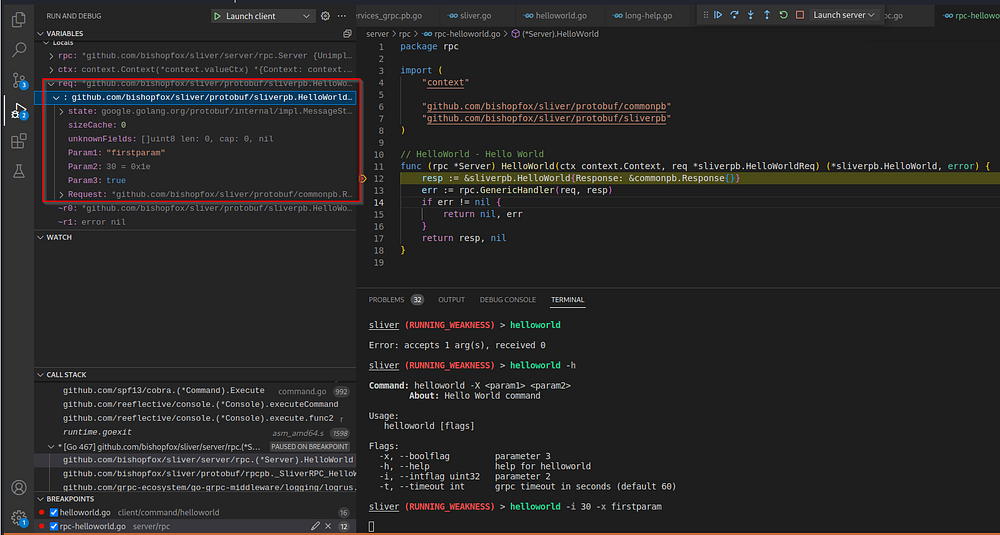
Notice, with the help of the right upper pane, that the req parameter contains param1, param2, and param3 with the values sent through the command line.
We managed to create a command that sends a request from the client to the server. In the the next phase we are going to let the server forward the request to the implant, and the implant will process the request and answer to the server.
Developing the implant handler
In this phase we will customize the implant, by defining a handler function that is in charge of handling the HelloWorldReq message coming from the server.
In order to do that, move to the folder containing the source code of one of your generated implants (recall from part 1 that the folder is of type ~/.sliver/slivers/windows/amd64/<IMPLANT_NAME>/src) and add the .vscode folder as shown in part 1. Finally, open the folder in VSCode.
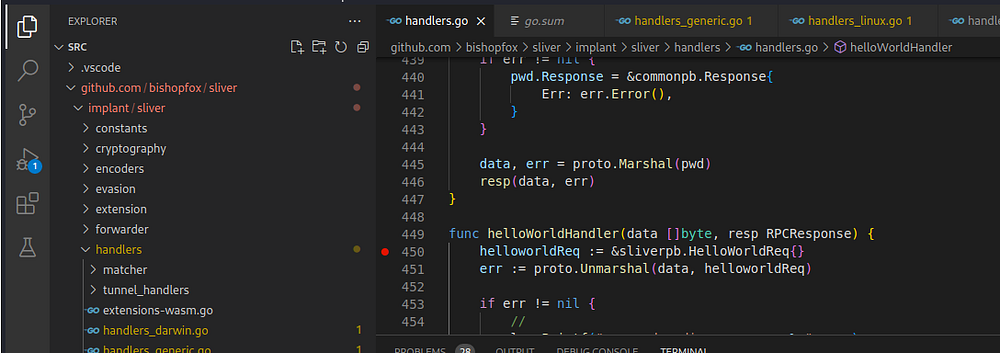
We are going to add our handler function in implant/sliver/handlers/handlers.go. Since the HelloWorld task can be executed on any OS, we can place our handler in handlers.go. On the other hand, if the task can be executed for example only on Windows, the handler should be placed in handlers_windows.go. The same applies to Linux and macOS as already outlined in part 2.
The code for the handler function is:
func helloWorldHandler(data []byte, resp RPCResponse) {
 helloworldReq := &sliverpb.HelloWorldReq{}
 err := proto.Unmarshal(data, helloworldReq)

if err != nil {
  //
  log.Printf("error decoding message: %v", err)
  //
  return
 }
 //
 helloworldResp := &sliverpb.HelloWorld{}
 p3 := ""
 if helloworldReq.Param3 {
  p3 = "FALSE"
 } else {
  p3 = "TRUE"
 }
 helloworldResp.Output = fmt.Sprintf("I'm your implant and i received the following:\nparam1: %s\nparam2: %d\nparam3: %s",
  helloworldReq.Param1, helloworldReq.Param2, p3)
 //log.Printf("ping id = %d", ping.Nonce)
 //
 data, err = proto.Marshal(helloworldResp)
 resp(data, err)
}
The function simply unserializes the incoming data request in the sliverpb.HelloWorldReq struct, then creates the sliverpb.HelloWorld struct that will store the response.
In helloworldResp.Output I just store a string that shows the data received in the request. This will be printed on console client-side.
Finally, I serialize the response helloworldResp and invoke the callback resp() in order to send the response back to the C2 server.
Lastly, we need to add our handler to the list of handlers in a map. This is required so that the implant, during the main loop, will invoke our handler when required. Since this is a “generic” handler, meaning that the implant can get executed on any OS, we can add our handler to the map systemHandlers, where handlers_windows.go, handler_linux.go, and handlers_darwin.go define systemHandlers.
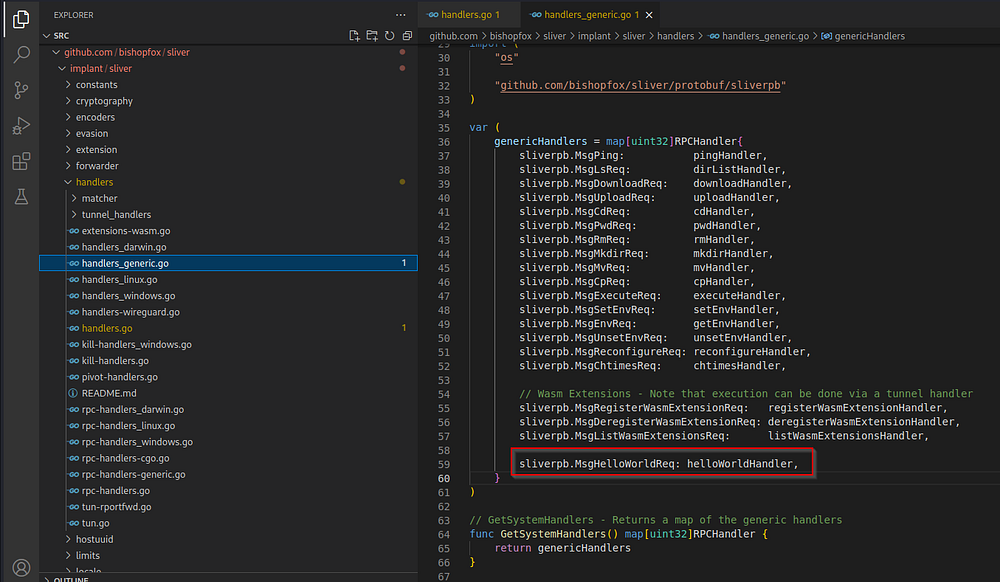
So I’ll add the following entry to the handlers map in the three files already mentioned:
sliverpb.MsgHelloWorldReq: helloWorldHandler,
As shown in the screenshot:
Notice that we still have to define the uint32 sliverpb.MsgHelloWorldReq. This must be defined in protobuf/sliverpb/constants.go.
You need to add the definition to both the constants.go file in the sliver main folder and the implant folder.
So here’s the updated constants.go:
package sliverpb

import (
 "google.golang.org/protobuf/proto"
)
...
...
const (
 // MsgRegister - Initial message from sliver with metadata
 MsgRegister = uint32(1 + iota)
 // MsgTaskReq - A local shellcode injection task
 MsgTaskReq
...
...
 //MsgHelloWorldReq
 MsgHelloWorldReq
)
...
...
// MsgNumber - Get a message number of type
func MsgNumber(request proto.Message) uint32 {
 switch request.(type) {
 case *Register:
  return MsgRegister
...
...
 case *HelloWorldReq:
  return MsgHelloWorldReq
}
 return uint32(0)
}
Basically I just added:
- MsgHelloWorldReq at the end of the first list of consts.
- The
case *HelloWorldReqto the switch statement at the bottom.
Be careful to add the definition always at the end. In fact, the developers specified in constants.go, in the comment at the top, that you can modify the constants by appending only.
Rebuilding and debugging
Now we have to rebuild our implant and start client, server, and implant in debug mode in order to check that everything works.
Let’s first rebuild our implant. In our main implant folder let’s move to src/github.com/bishopfox/sliver (the folder containing sliver.go, main.go, and so on), and rebuild our implant issuing the following commands:
┌──(kali㉿kali)-[~/.sliver/slivers/windows/amd64/RUNNING_WEAKNESS/src/github.com/bishopfox/sliver]
└─$ export GOOS=windows
┌──(kali㉿kali)-[~/.sliver/slivers/windows/amd64/RUNNING_WEAKNESS/src/github.com/bishopfox/sliver]
└─$ /home/kali/.sliver/go/bin/go  build -trimpath -gcflags=all=-N  -o agent.exe .

┌──(kali㉿kali)-[~/.sliver/slivers/windows/amd64/RUNNING_WEAKNESS/src/github.com/bishopfox/sliver]
└─$ ls
agent.exe  go.mod  go.sum  implant  protobuf  sliver.go  vendor
┌──(kali㉿kali)-[~/.sliver/slivers/windows/amd64/RUNNING_WEAKNESS/src/github.com/bishopfox/sliver]
└─$
First I set the environment variable GOOS to the target running environment for the implant, in this case “windows”. Then I build the implant. In this case the final executable is named agent.exe.
Now perform the following:
- in the VSCode window containing the sliver main folder, save all files and then restart server and client in debugging mode.
- move the agent.exe to your Windows machine, then run agent.exe with dlv as shown during part 1 (needed for debugging purposes).
Now that you are running everything in debugging mode, let’s move to the VSCode window debugging the implant and let’s put a breakpoint at helloWorldHandler() in handlers.go.
Let’s put an additional breakpoint on the client in helloWorldCmd in helloworld.go, at the line of code after calling conRpc.HelloWorld(). So, when reaching this breakpoint, the out variable will contain the response from the implant.
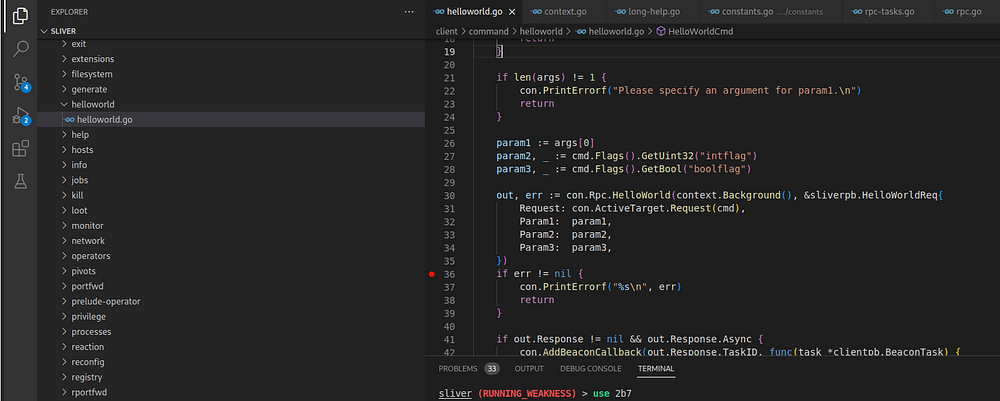
Now let’s move to the Sliver client console, select the agent session and run our newly created command this way:
[*] Session 2b7aa1e7 RUNNING_WEAKNESS - 192.168.157.131:59650 (DESKTOP-URP43TK) - windows/amd64 - Sun, 10 Sep 2023 22:27:26 CEST

sliver (RUNNING_WEAKNESS) > use 2b7
[*] Active session RUNNING_WEAKNESS (2b7aa1e7-1b67-4174-a532-9ff9976a6df3)
sliver (RUNNING_WEAKNESS) > helloworld -x -i 30 myparam -t 4000
After running the command you should hit the breakpoint at helloWorldHandler(). If you step through the code you can see what happens step by step.
Now, if you resume the execution, you should hit the second breakpoint on the client. The execution will finally land in PrintHelloWorld() that prints the result coming from the implant, as you can see by looking at the Sliver client console.
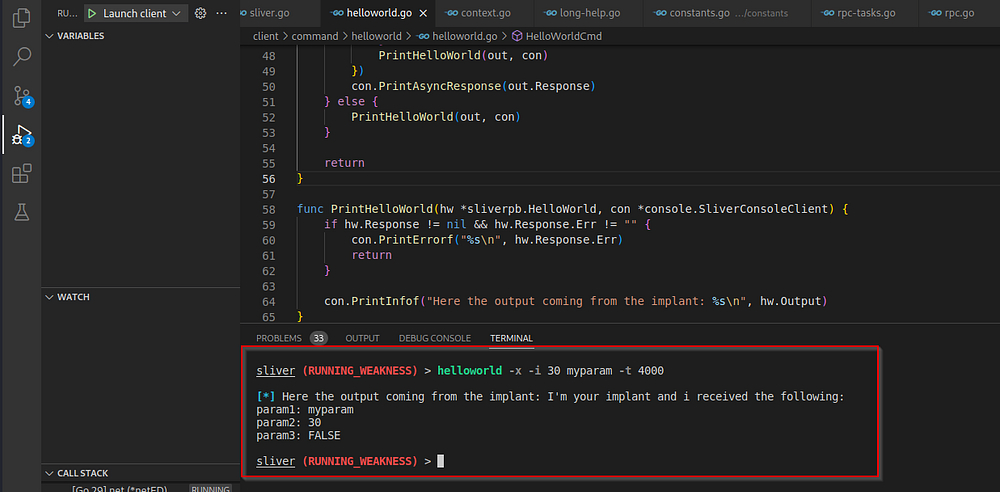
So you can see the implant successfully took parameters passed through the command-line and inserted them in a string that was sent back to the client. The client finally printed the string on the console.
Now that you tested your code on the implant-side, and it works successfully, you just need to insert your code under the sliver main folder at sliver/implant/sliver.
If you rebuild server and client with the make command, as outlined here, the server will generate implants that are able to process your helloworld command.
By now you should have an idea about how to add your own commands to Sliver C2!
Exercise for the reader
Many C2s implement what is called a token vault. You can think about it as an array of token handles, stored in the implant process, obtained by calling DuplicateTokenEx() on tokens assigned to other processes.
I leave as an exercise to the reader the implementation of the following commands:
- grab_token: command that calls DuplicateTokenEx() on the process primary token and stores it in a map called tokenVaultMap.
- list_token_vault: command that lists tokens in the vault in the form of a map id - token owner.
- impersonate_token_vault: command that impersonates a token in the vault given the id.
- remove_token_vault: command that removes a token from the vault given the id.
I encourage you to read the code defined under sliver/implant/sliver/priv to understand token management in Sliver C2 implants. That’s all for now, thank you for reading!