After attending the OST2 – Exp4011 course, taught by Cedric Halbronn (a free course that I really recommend to follow to anyone interested in the topic), I decided to start doing vulnerability research on third-party Windows drivers. I already had a bit of academic experience in kernel exploit development by crafting some exploits (stack overflow, arbitrary write, session pool overflow) for the driver HackSysExtremeVulnerableDriver, so I decided to move on to real kernel drivers.
In this series of blog posts I’ll describe how I found two vulnerabilities in a Windows kernel driver part of an old AMD software package and how I exploited them in order to achieve local privilege escalation. Probably, this article won’t be very useful for experienced exploit developers/vulnerability researchers, but I think it will be useful for red teamers that are looking for vulnerable drivers that are not blacklisted, in order to disable/bypass EDRs. In addition, I’ll focus on how to use IDA Pro to reverse and then debug drivers with the assistance of the pseudocode.
The series is divided in three parts as follows:
I assume the reader already has basic knowledge about Windows kernel driver development/exploitation. If that’s not the case, I suggest reading the following articles in order to gain a basic understanding of the interaction between user-mode processes and kernel-mode drivers and of protection mechanisms such as SMEP:
- https://connormcgarr.github.io/Kernel-Exploitation-1/
- https://connormcgarr.github.io/Kernel-Exploitation-2/
- https://connormcgarr.github.io/x64-Kernel-Shellcode-Revisited-and-SMEP-Bypass/
- https://voidsec.com/windows-drivers-reverse-engineering-methodology/
I also recommend following the OST2 – Dbg3011 course, again taught by Cedric Halbronn, in order to become familiar with WinDbg.
Disclosure
The vulnerabilities were reported directly to the AMD product security team on July 26th, 2024.
The AMD product security team replied the same day declaring that as the vulnerabilities affect an old software package that’s no longer maintained, they won’t be issuing a CVE ID or a security notice.
Setting up the environment
If you want to follow along I suggest you to create a Windows 11 VM. Specifically, I’m going to use the following build.
PS > systeminfo
Host Name:                 WINDOWS11
OS Name:                   Microsoft Windows 11 Pro
OS Version:                10.0.22631 N/A Build 22631
OS Manufacturer:           Microsoft Corporation
[...]
In addition, I provide here the hash of the ntoskrnl.exe file I have on my own Windows 11 VM.
PS > get-filehash C:\Windows\System32\ntoskrnl.exe | select -expandProperty Hash
0CE15480462E9CD3F7CBF2D44D2E393CF5674EE1D69A3459ADFA0E913A7A2AEB
PS >
In the Windows 11 VM, setup network kernel debugging as follows (run all commands as administrator).
> bcdedit /debug on
> bcdedit /dbgsettings net hostip:<ip of your host machine> port:<port for example 50099>
Take note of the key that the last command outputs. You can always get it back running the following command (again, as administrator).
> bcdedit /dbgsettings
key                     1dins0yu1y3cp.k42pkhb9dnua.1evtrhpv56ygd.349y5ok12c1ul
debugtype               NET
hostip                  192.168.157.1
port                    50001
dhcp                    Yes
The operation completed successfully.
>
Restart the VM so that changes will take effect.
Analyzing the driver
Reversing the driver
The vulnerable driver can be obtained following these steps:
- Download this software package
- Open the .exe with 7zip and extract it. The driver is located at Packages\Drivers\Display\WT6A_INF\B336522\atdcm64a.sys
- Copy the driver both on your host machine (where you have IDA Pro or any other reversing framework) and on your VM
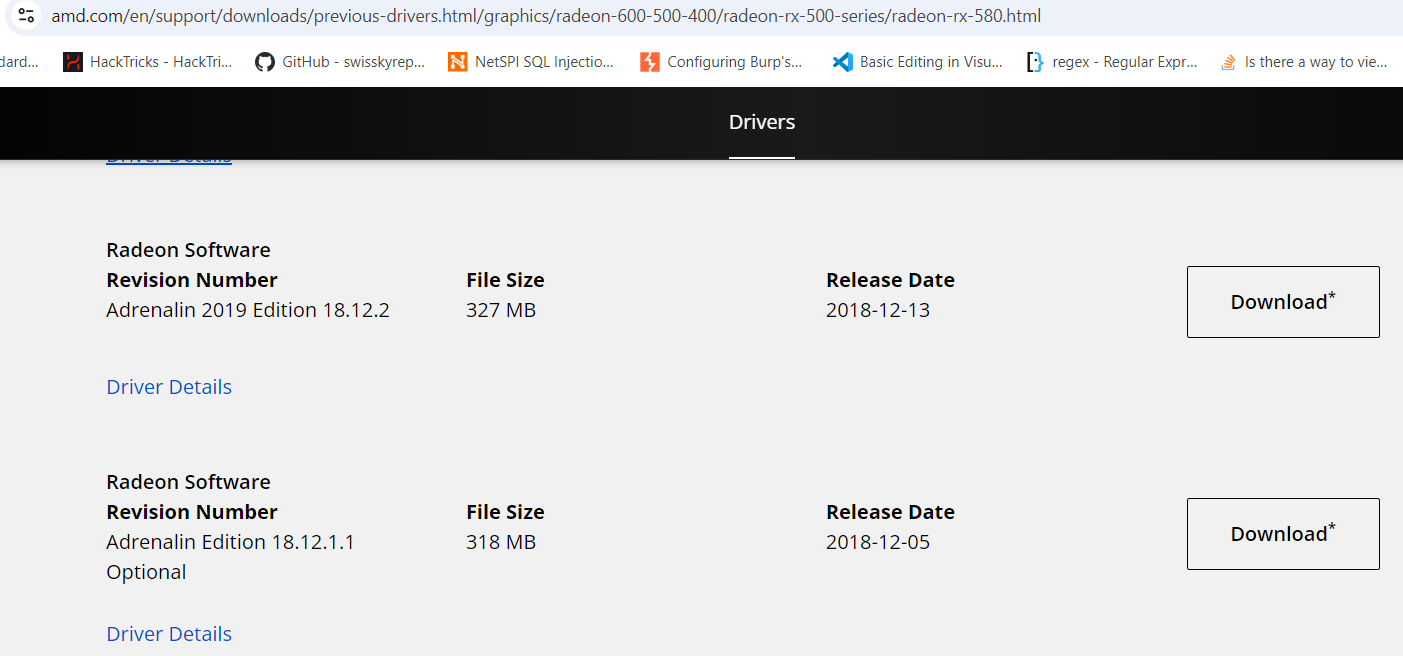
If you are not able to download from the direct link, follow these steps:
- Navigate to this link
- Expand the “Windows 10 – 64-bit Edition” tab
- Download the package Adrenalin Edition 18.12.1.1 Optional (Release date: 2018-12-05)
You can use OSRLoader to load the driver in the VM following the instructions here (just look at the animated GIF and ignore the other steps).
Once the driver is loaded successfully in the VM, I suggest to create a snapshot of the VM. Usually the VM crashes many times especially during the exploit development phase. Having a snapshot allows to restart quickly from the point we want.
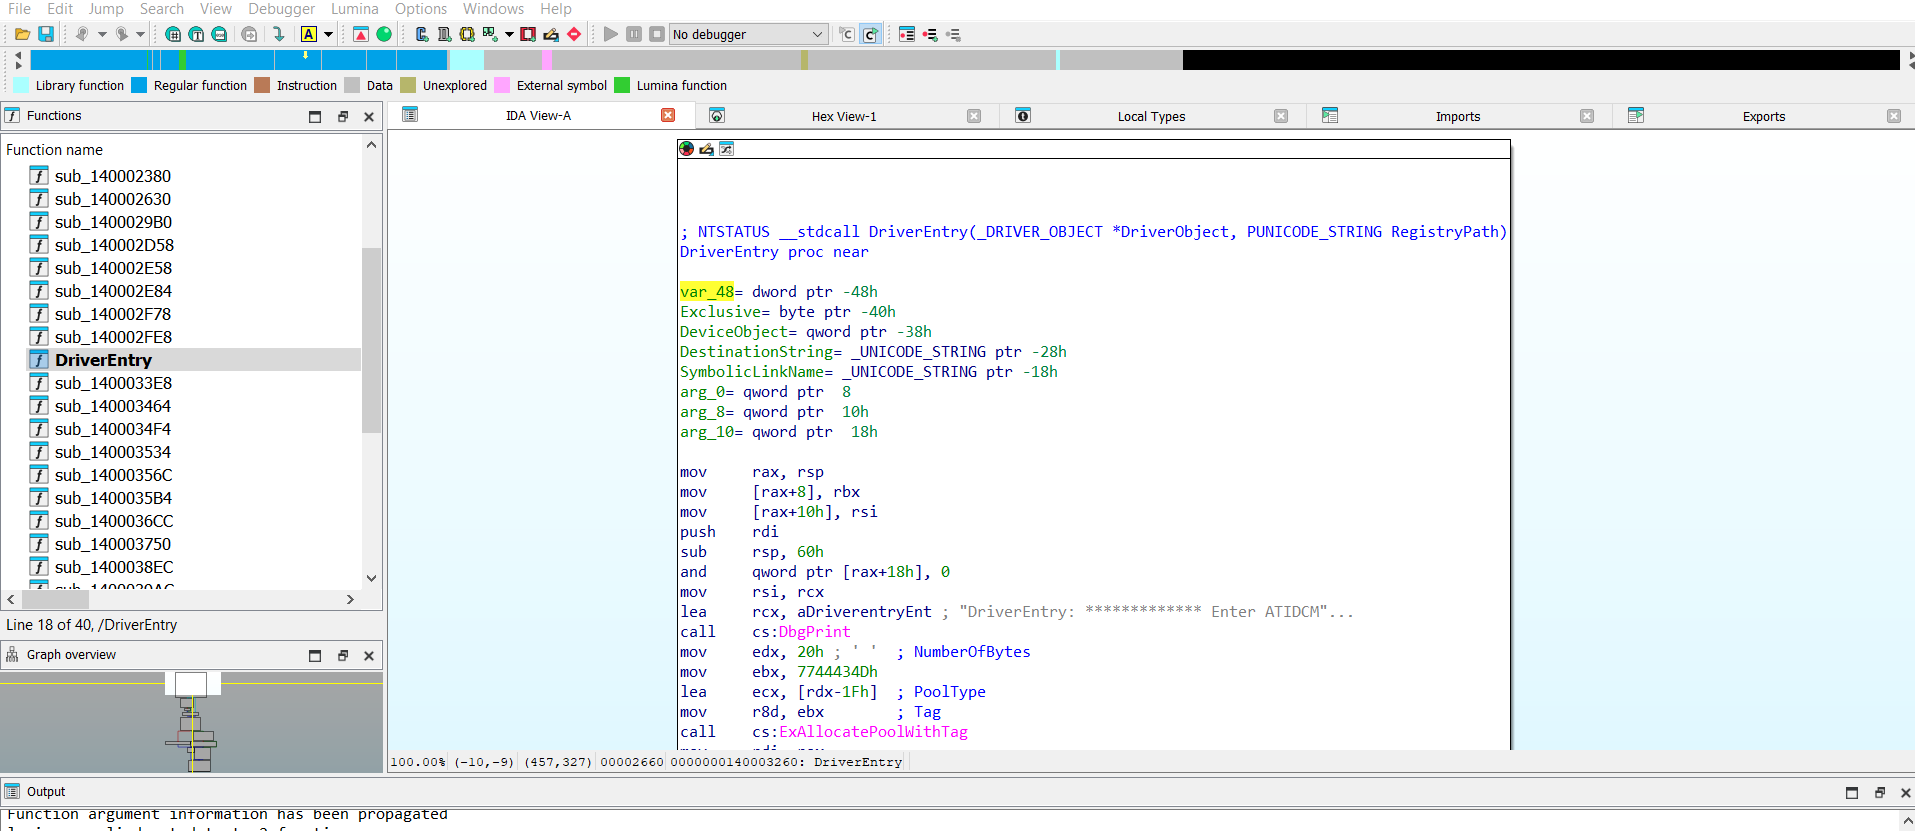
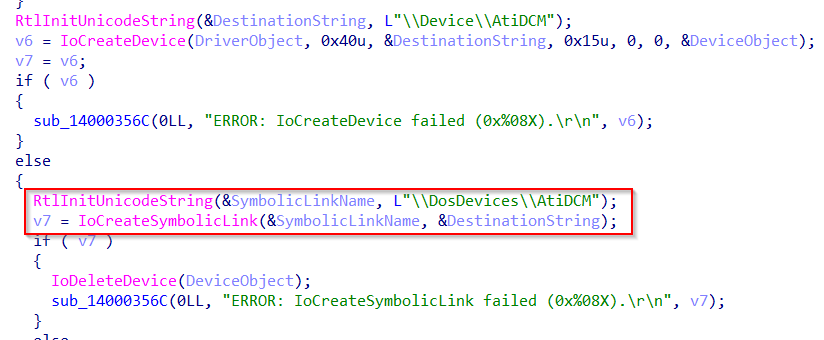
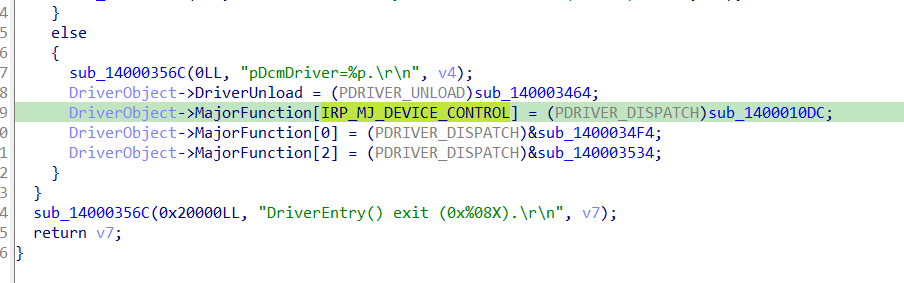
IDA Pro already shows the entry point: the DriverEntry routine.
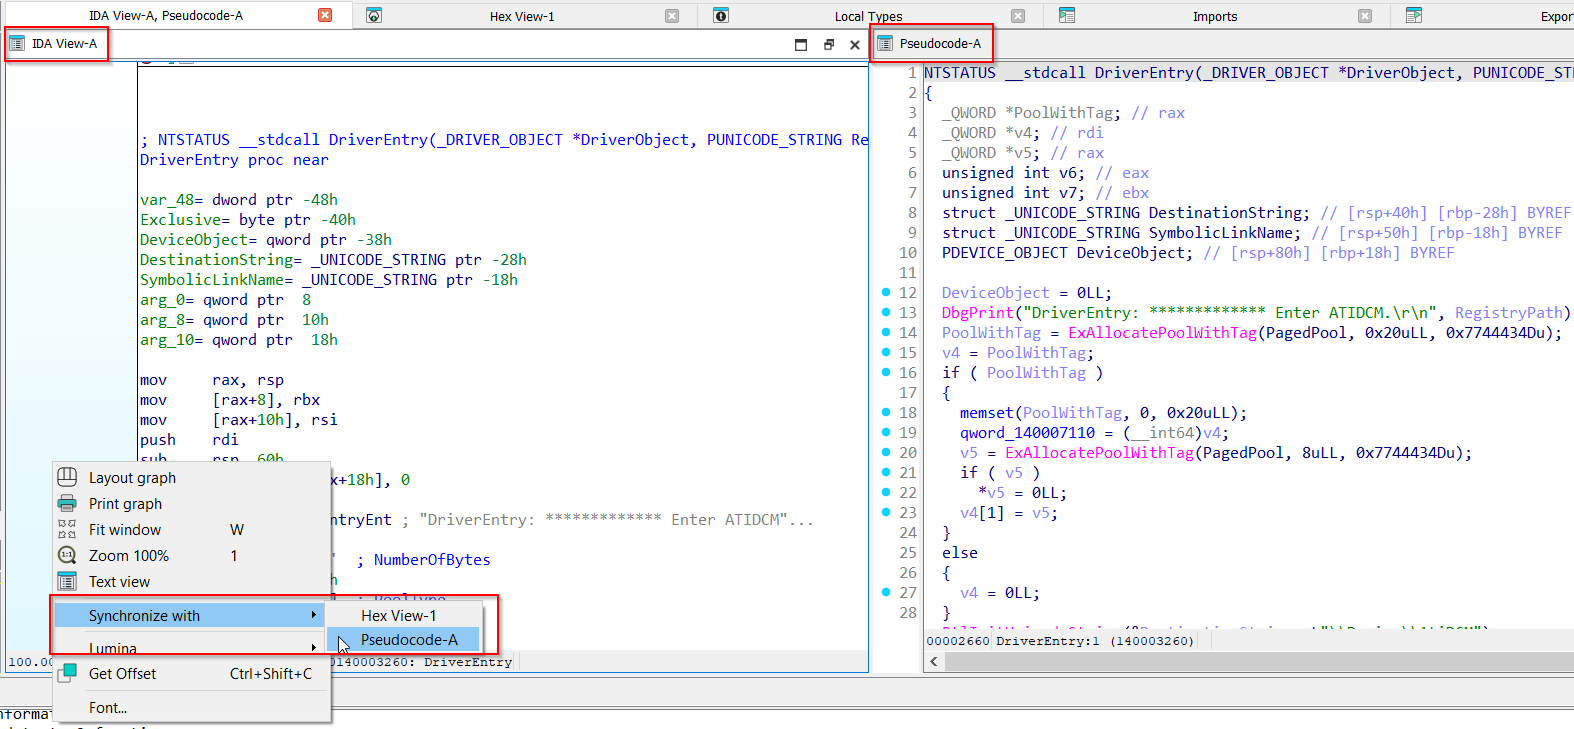
First thing I like to do is synchronize the decompiled View with the IDA View. Spawn the decompiled view with F5, right-click on the IDA View window and select Synchronize With -> Pseudocode - A.
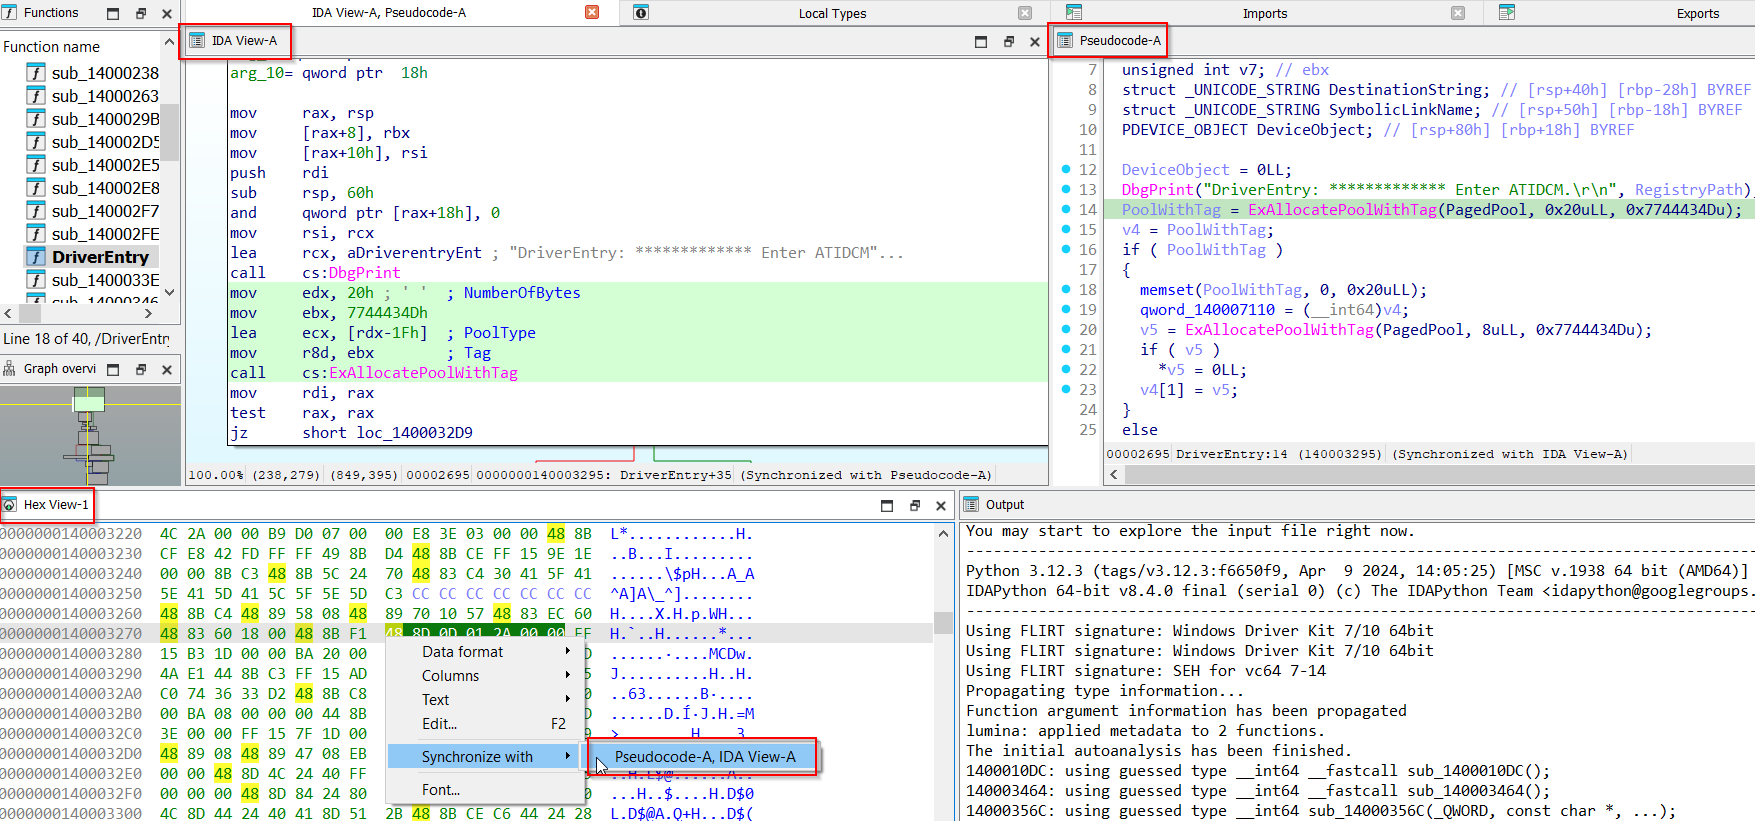
If you want you can also further synchronize the Hex View with IDA View and Pseudocode windows using the same procedure. Right-click on the Hex View window and then select Synchronize With -> IDA VIEW A - Pseudocode - A.
The next steps here are:
- Identifying the symbolic link to the driver (so that we know how to get a handle to the driver from user-mode).
- Identifying driver dispatch routines handling IRPs.
In this case we will focus only on the IRP_MJ_DEVICE_CONTROL major function code but typically he IRP_MJ_READ IRP_MJ_WRITE and IRP_MJ_CREATE major function codes are also of interest.
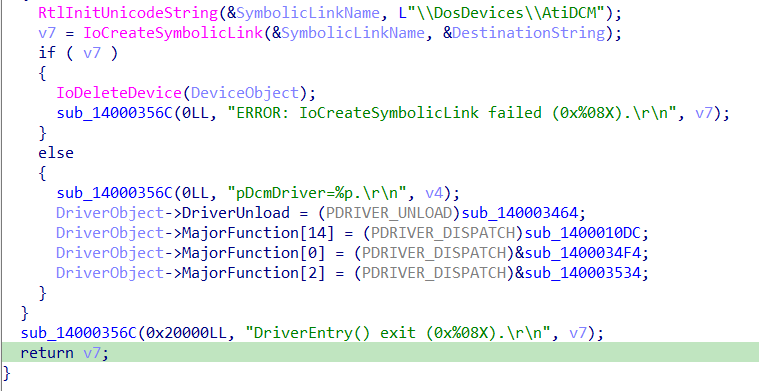
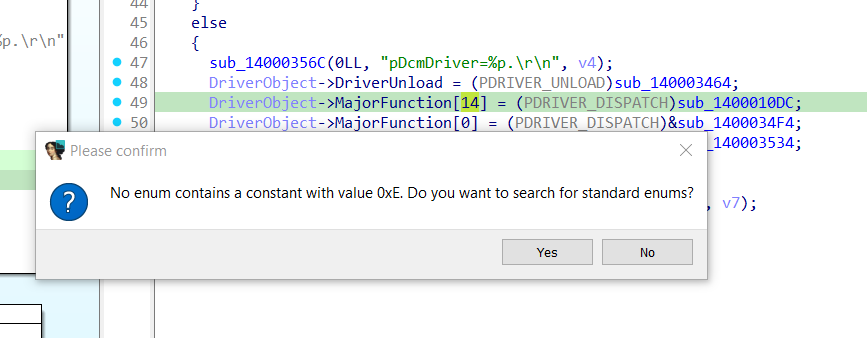
At this point I suggest to rename the indexes in the array with the corresponding IRP_MJ_XXX code. To do this you can:
- Click on the number and press
m. - Select Yes in the popup.
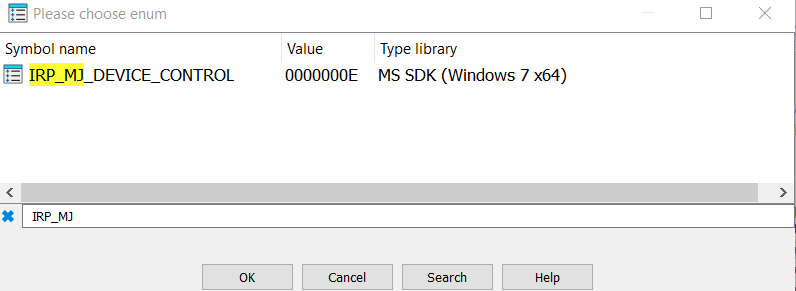
- Then
Ctrl-Fand type IRP_MJ in the search bar. - Select the appropriate entry and press ok.
- Clicking on the sub_XXXX you want to rename.
- Press
n. - Change the name and press
Enter.
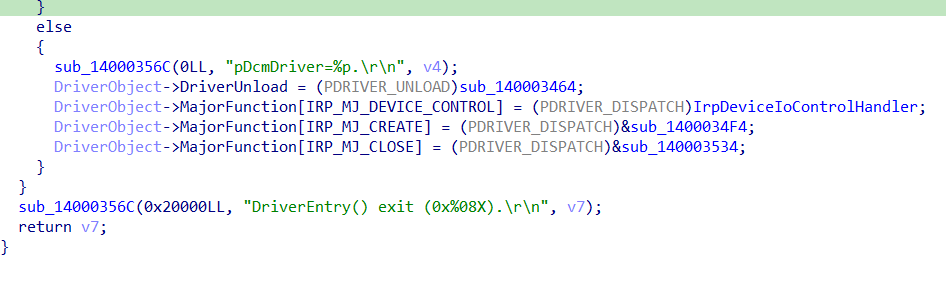
After that I suggest to change the function signature to the appropriate one. Based on MSDN, the signature is the following:
NTSTATUS DriverDispatch(
  [in, out] _DEVICE_OBJECT *DeviceObject,
  [in, out] _IRP *Irp
)
To change the function signature:
- Click on the target function name.
- Press
y. - Insert the appropriate function signature.
It is advisable to keep the same calling convention you find in the original definition. In this case it is __fastcall.

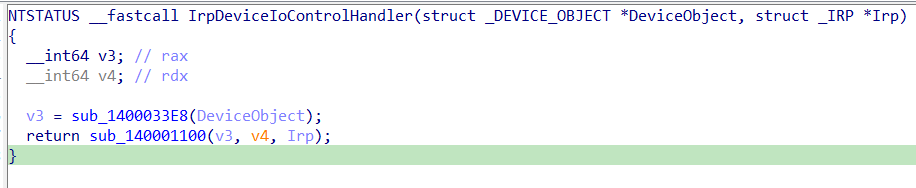

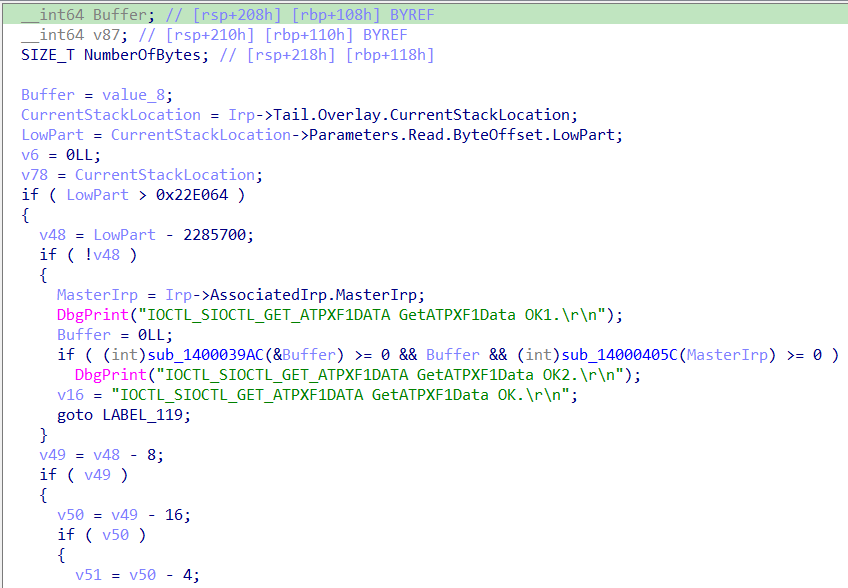
We can see it references multiple fields inside the IRP. If we give a look at the definition of the IRP and _IO_STACK_LOCATION we can see the fields CurrentStackLocation->Parameters and Irp->AssociatedIrp are actually unions.
Taking the CurrentStackLocation->Parameters we can see that it’s a union that changes based on the IRP Major Function Code handled. As the current function handles a IRP_MJ_DEVICE_CONTROL function code, we should use CurrentStackLocation->Parameters.DeviceIoControl in IDA Pro.
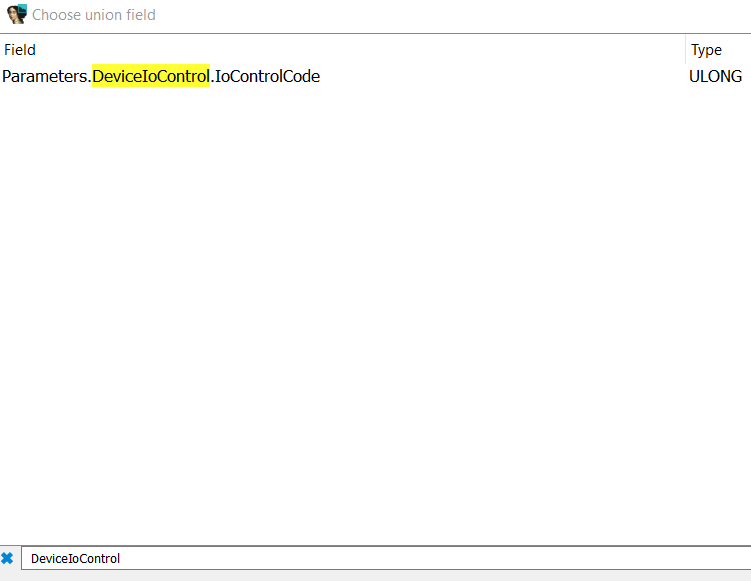
To instruct IDA Pro to do so, you must:
- Click on the union field (CurrentStackLication->Parameters) press
Alt + y. Ctrl + ffor searching for DeviceIoControl and then select the proper one (Parameters.DeviceIoControl.IoControlCode in this case).
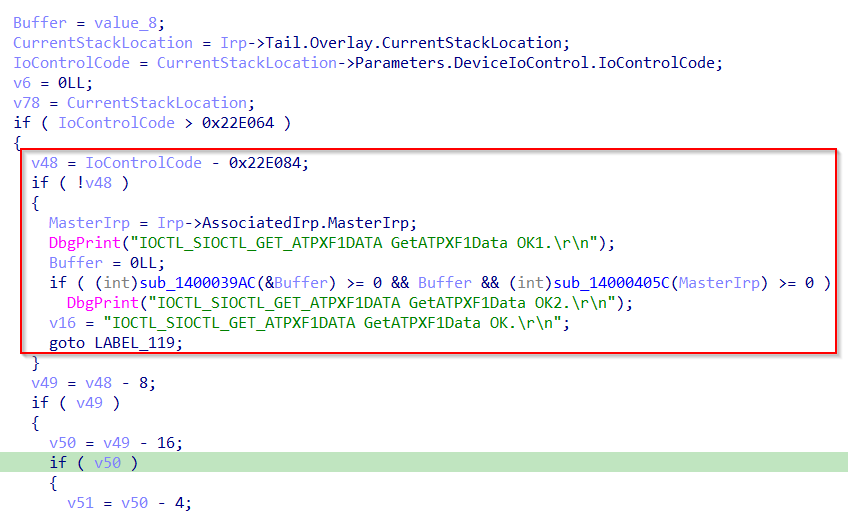
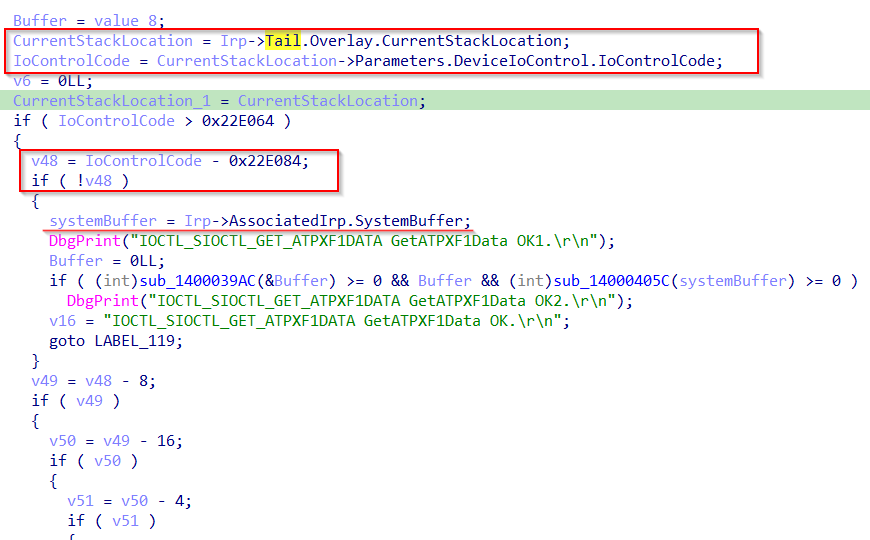
At this point we are interested in reversing and analyzing the code that handles our systemBuffer variable and see if there are any vulnerabilities.
Identifying an arbitrary MSR read
rdmsr instruction (__readmsr() in the decompiled code).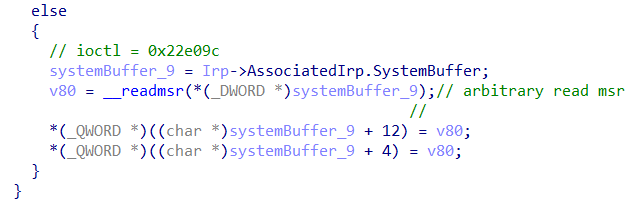
As we can see from the snippet of code above, the routine takes the input for the __readmsr instruction from the systemBuffer (that we control) and returns the output again in systemBuffer. This grants us the ability to read arbitrary MSRs!
Identifying an arbitrary pointer dereference
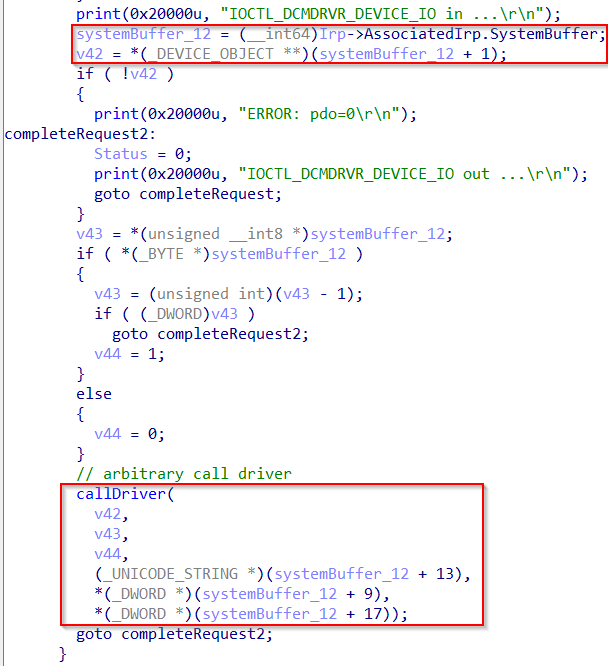
We can see it performs:
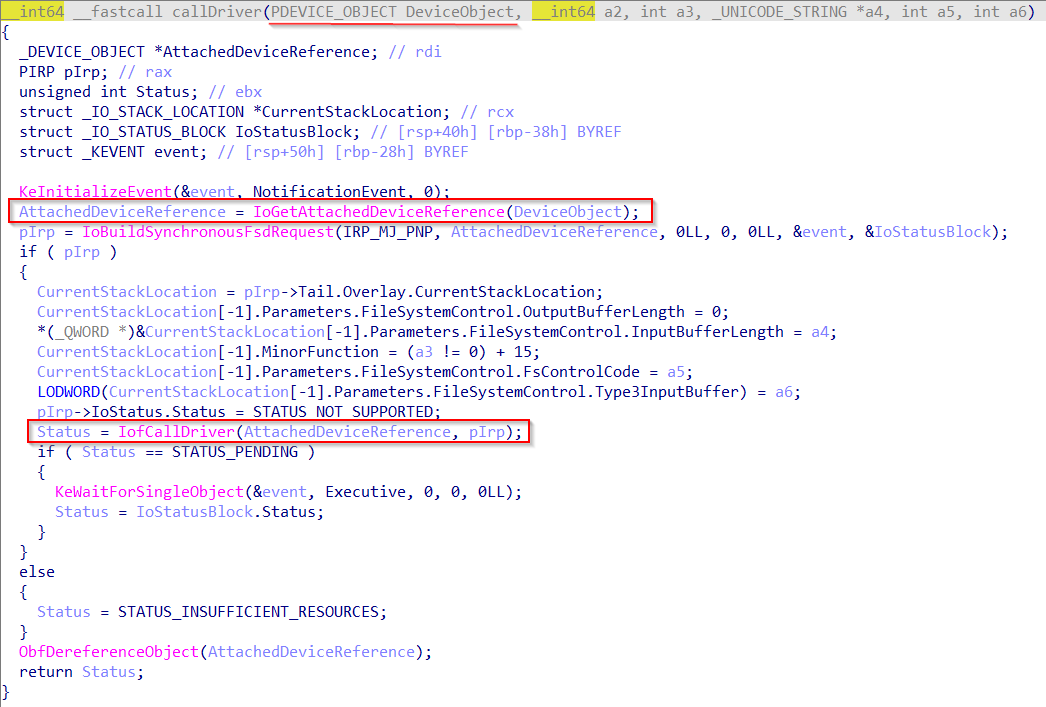
- A call to IoGetAttachedDeviceReference() passing as input the first parameter (that we fully control).
- A call to IofCallDriver() passing as input the output of IoGetAttachedDeviceReference().
Open another IDA Pro window and load the ntoskrnl.exe of the Windows 11 VM. After some reversing we get the shape of IoGetAttachedDeviceReference():
PDEVICE_OBJECT __stdcall IoGetAttachedDeviceReference(PDEVICE_OBJECT DeviceObject)
{
  unsigned __int8 CurrentIrql; // di
  char *v3; // rcx
  _DEVICE_OBJECT *i; // rax
  _DWORD *SchedulerAssist; // r8
  __int64 v7; // r9
  unsigned __int8 v8; // cl
  struct _KPRCB *CurrentPrcb; // r9
  _DWORD *v10; // r8
  int v11; // eax
  bool v12; // zf


 [...]
  for ( i = DeviceObject->AttachedDevice; i; i = i->AttachedDevice )
    DeviceObject = i;
  if ( ObpTraceFlags )
    ObpPushStackInfo((__int64)&DeviceObject[-1].DeviceLock.Header.WaitListHead, 1, 1u, 'tlfD');
  ObpIncrPointerCount((volatile signed __int64 *)&DeviceObject[-1].DeviceLock.Header.WaitListHead);
  KxReleaseQueuedSpinLock((char *)KeGetPcr()->NtTib.ArbitraryUserPointer + 160);
  if ( KiIrqlFlags )
  {
    v8 = KeGetCurrentIrql();
    if ( (KiIrqlFlags & 1) != 0 && v8 <= 0xFu && CurrentIrql <= 0xFu && v8 >= 2u )
    {
      CurrentPrcb = KeGetCurrentPrcb();
      v10 = CurrentPrcb->SchedulerAssist;
      v11 = ~(unsigned __int16)(-1LL << (CurrentIrql + 1));
      v12 = (v11 & v10[5]) == 0;
      v10[5] &= v11;
      if ( v12 )
        KiRemoveSystemWorkPriorityKick(CurrentPrcb);
    }
  }
  __writecr8(CurrentIrql);
  return DeviceObject;
}
We can see that basically it walks the DeviceObject->AttachedDevice linked list and then returns the last element in the list. In addition, before returning we can see a call to ObpIncrPointerCount() passing as input DeviceObject-0x30. It is easier to see it in the disassembly listing (rbxcorresponds to DeviceObject):

Here’s the reversed ObpIncrPointerCount() function:
signed __int64 __fastcall __spoils<rax> ObpIncrPointerCount(volatile signed __int64 *a1)
{
  signed __int64 result; // rax
  result = _InterlockedIncrement64(a1);
  if ( result <= 1 )
    KeBugCheckEx(0x18u, 0LL, (ULONG_PTR)(a1 + 6), 0x10uLL, result);
  return result;
}
Notice the call to _InterlockedIncrement64(). This seems to grant us an arbitrary increment primitive. However, we have to consider that callDriver(), later on, calls ObfDereferenceObject() on the same AttachedDeviceReference variable.
If we reverse ObfDereferenceObject() we can see that the function decrements the same field that was previously incremented. This compensating action is going to null out our arbitrary increment making it very likely unexploitable.
Now let’s reverse IofCallDriver():
NTSTATUS __stdcall IofCallDriver(PDEVICE_OBJECT DeviceObject, PIRP Irp)
{
  _IO_STACK_LOCATION *v2; // rax
  __int64 MajorFunction; // r8

  if ( IopDispatchCallDriver )
  {
    if ( IopDispatchCallDriver == 3 )
      return IopPerfCallDriver((PADAPTER_OBJECT)DeviceObject);
    else
      return IovCallDriver(DeviceObject);
  }
  else
  {
    if ( --Irp->CurrentLocation <= 0 )
      KeBugCheckEx(0x35u, (ULONG_PTR)Irp, 0LL, 0LL, 0LL);
    v2 = Irp->Tail.Overlay.CurrentStackLocation - 1;
    Irp->Tail.Overlay.CurrentStackLocation = v2;
    MajorFunction = v2->MajorFunction;
    v2->DeviceObject = DeviceObject;
    if ( (_BYTE)MajorFunction == 22 && (unsigned __int8)(v2->MinorFunction - 2) <= 1u )
      return IopPoHandleIrp(Irp);
    else
      return ((__int64 (__fastcall *)(PDEVICE_OBJECT))DeviceObject->DriverObject->MajorFunction[MajorFunction])(DeviceObject);
  }
}
The most interesting part of the function is the last line. It calls a function pointer inside the MajorFunction array part of DriverObject part of DeviceObject. Since we can control DeviceObject then we can control the function pointer inside the MajorFunction array. This grants us the ability redirect the execution flow to an arbitrary location!
Wrapping up
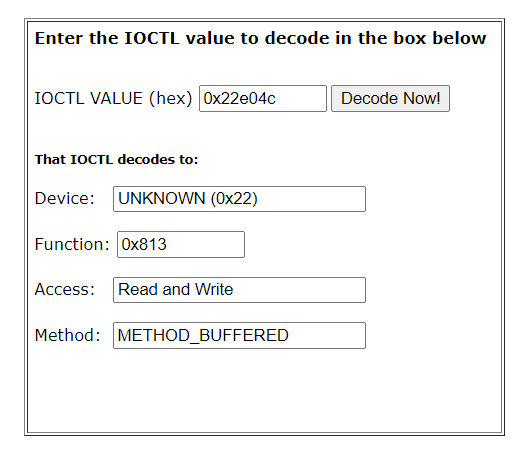
In this post we analyzed the driver EntryPoint with IDA Pro in order to retrieve the IOCTL handler. We analyzed the IOCTL handler, in order to retrieve the valid IoControlCodes and analyzed the functions in charge of handling the different IoControlCodes.
Finally, we spotted two vulnerabilities: an arbitrary MSR read and an arbitrary pointer dereference.
You may have noticed that the driver analysis process (retrieving driver name, IOCTL dispatcher, IOCTL codes, …) can be quite tedious. If you want to automate the process I suggest you to give a look at the following project that directly integrates into IDA Pro.
In Part 2 we will confirm both vulnerabilities with the help of IDA Pro’s Debugger.